Full-stack App with React, Airtable and Netlify
by Nabendu Biswas / October 12th, 2021
#css #javascript #react
In this post, we will build a course tracker using React, Airtable and Netlify serverless functions. It will have full CRUD operations and will track all the courses, which we have and the courses we want to purchase in the future.
The first thing, we will do is get into Airtable and setup our database. Once you register in Airtable, click on the Add a base icon. It will open a menu and in it click on Start from scratch button.
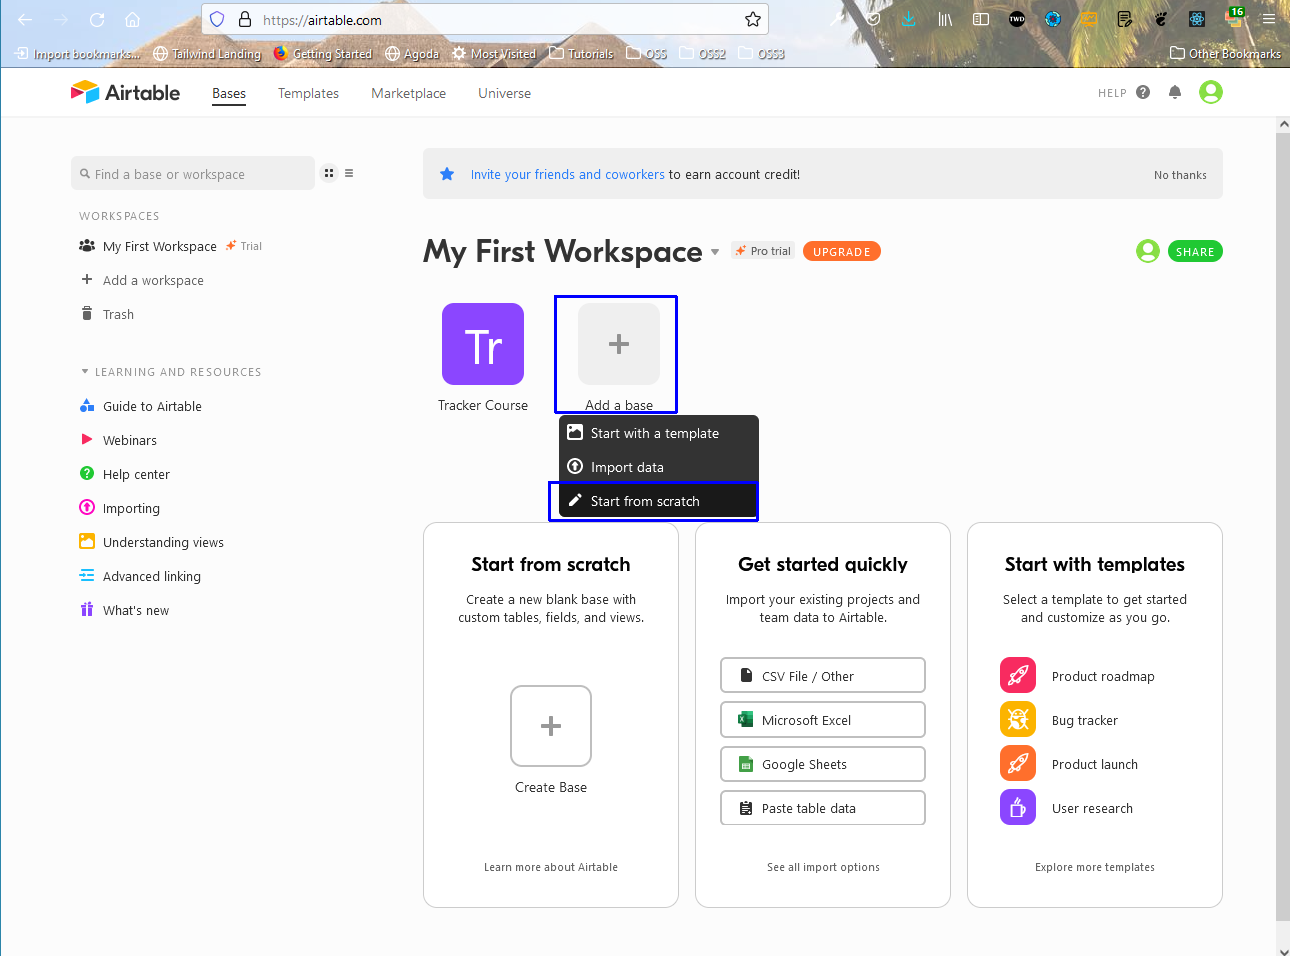 Base
Base
It will open a pop-up in which enter the database name, which i have entered Course Tracker and pressed enter.
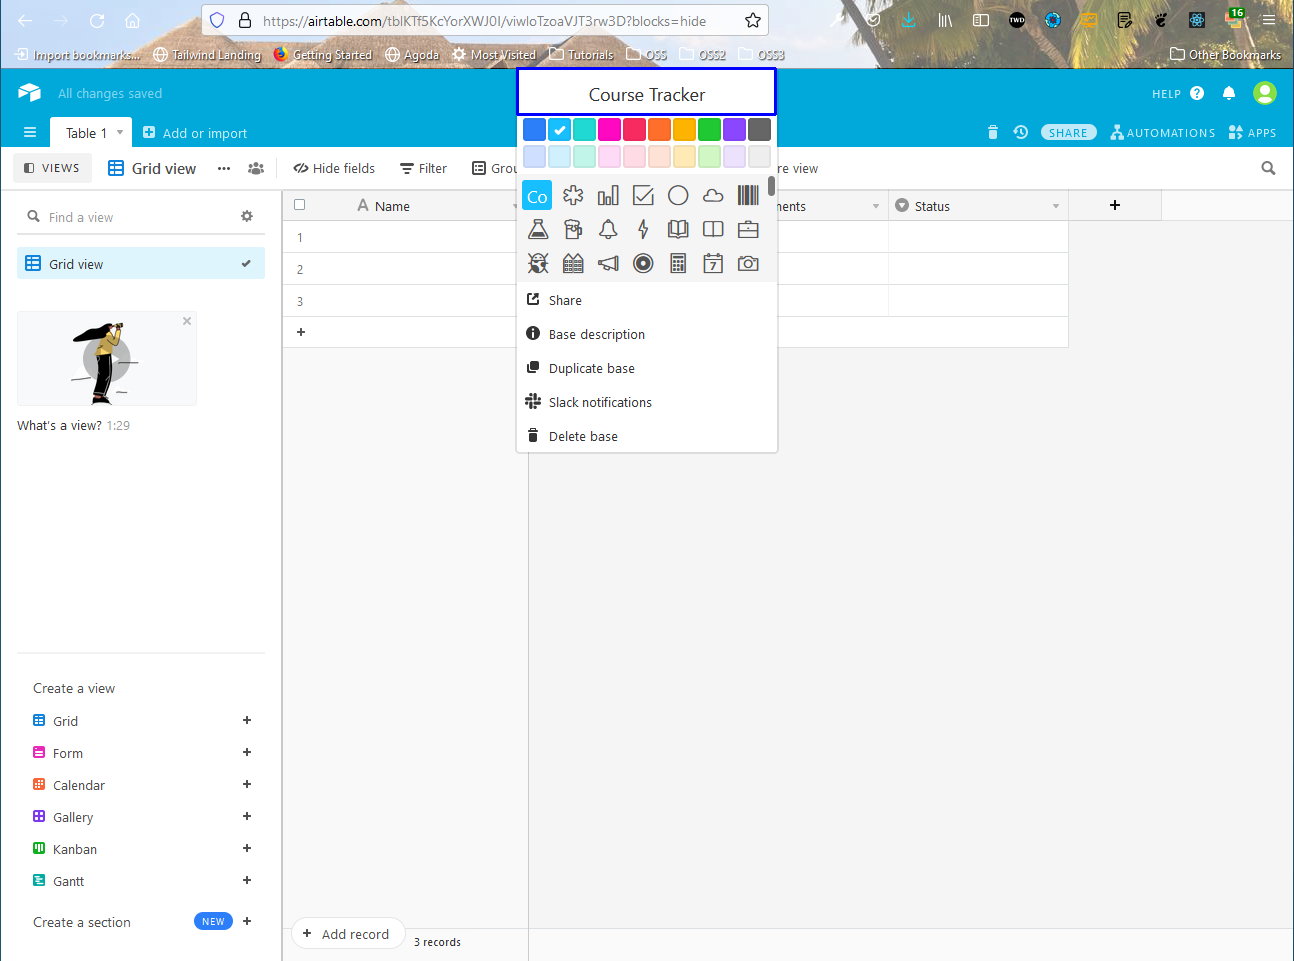 Course Tracker
We will rename the default four column which comes with it. So, first click on the little arrow in Name column and it will open a menu. Click on Customize field type link in it.
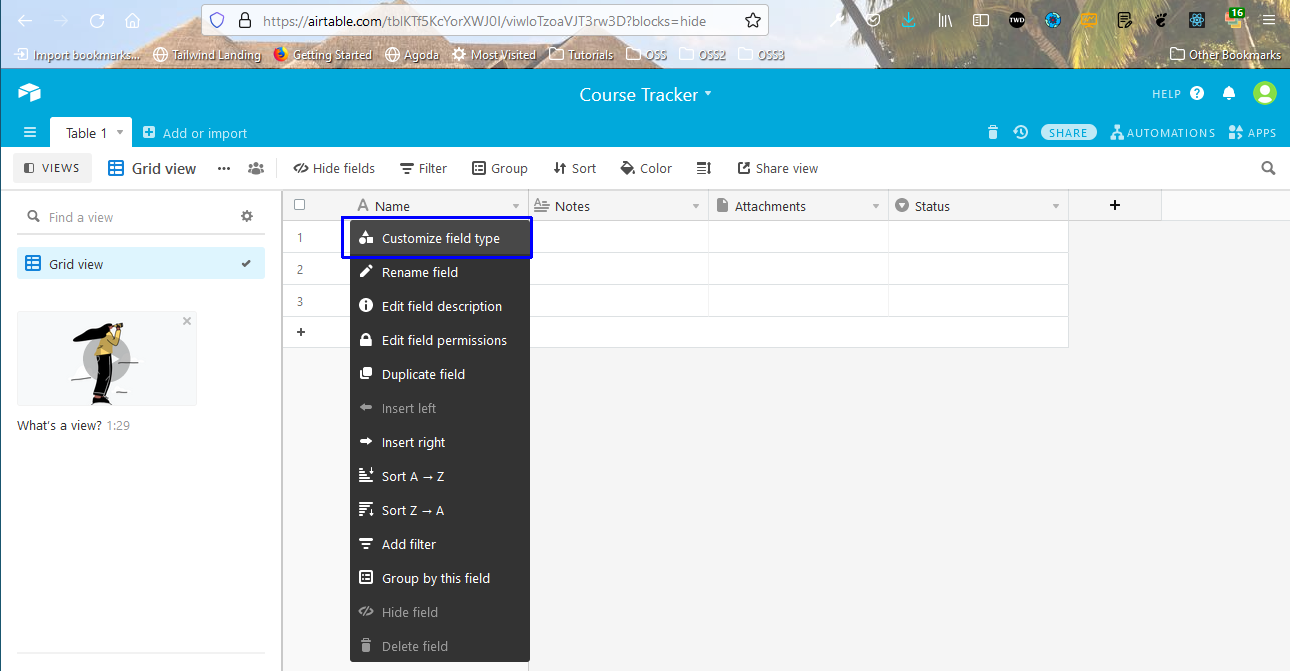 Customize
It will open a pop-up in which we need to give name in the text field and click on Save button.
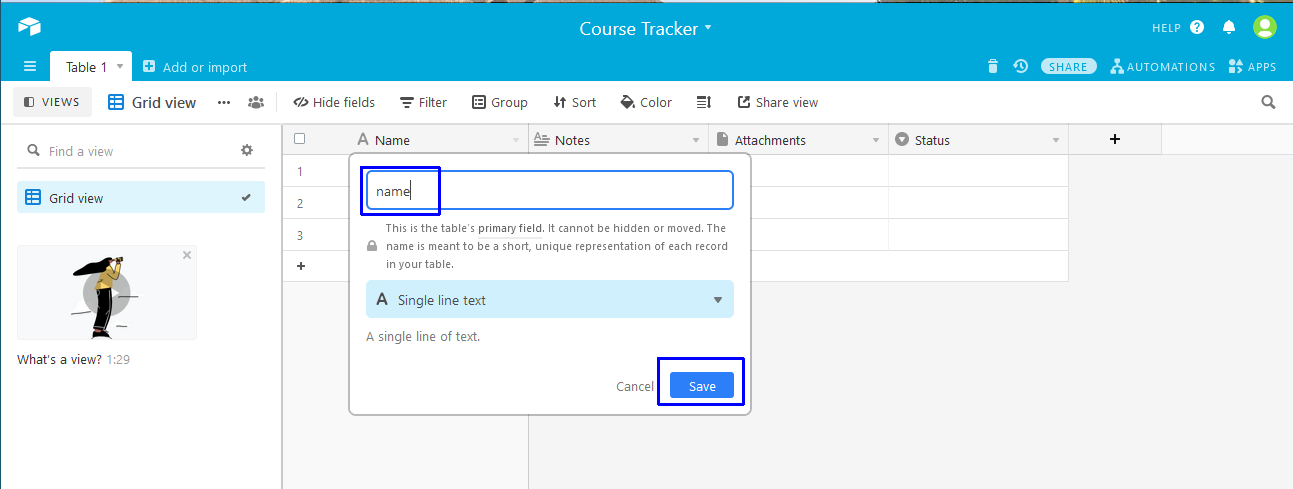 Field
Field
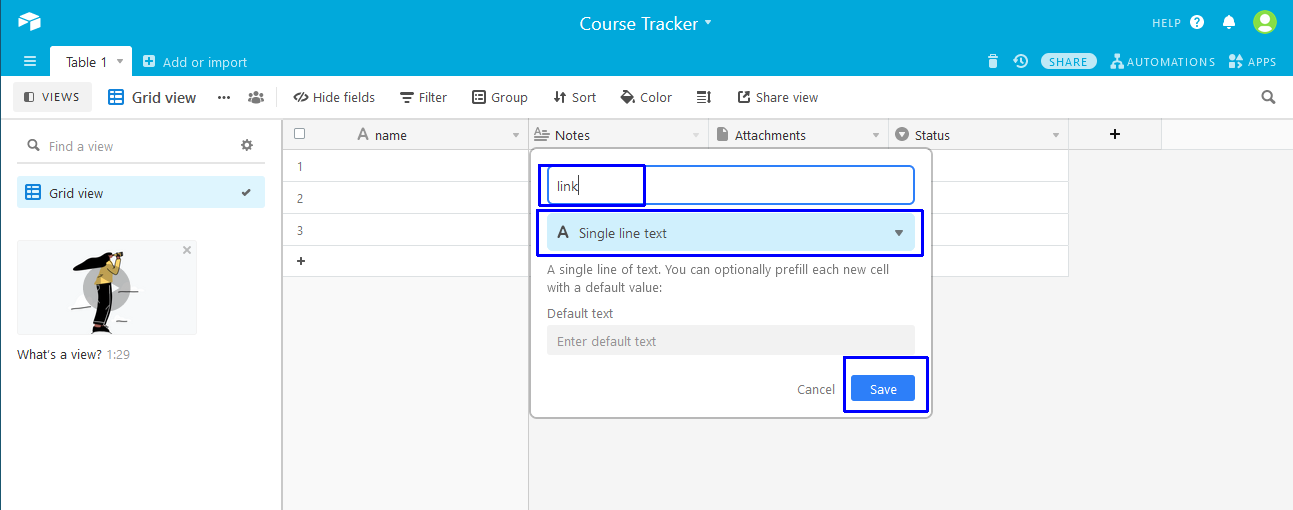
Next, change the Notes to link and a Single line text. After that click on the Save button.
 Save
Save
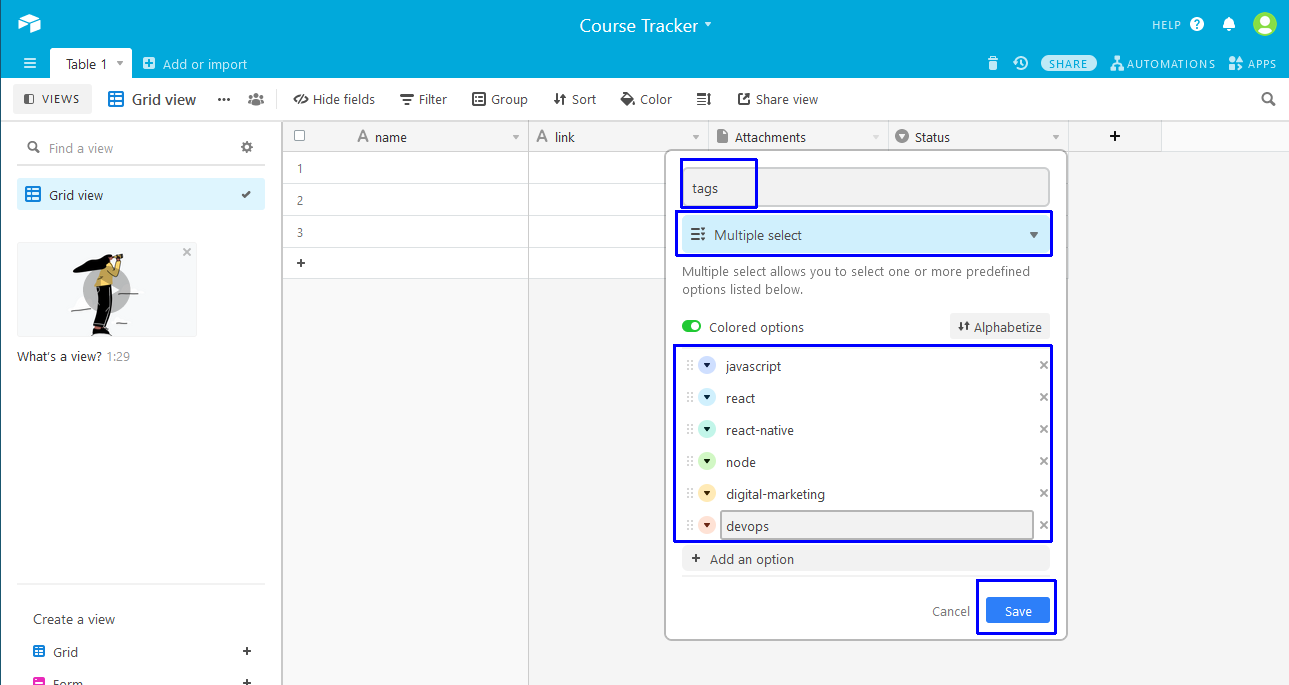
Next, we will add the tags which will be Multiple select. Here, click on Add an option and add the various tags for the courses, you want to take.
 tags
tags
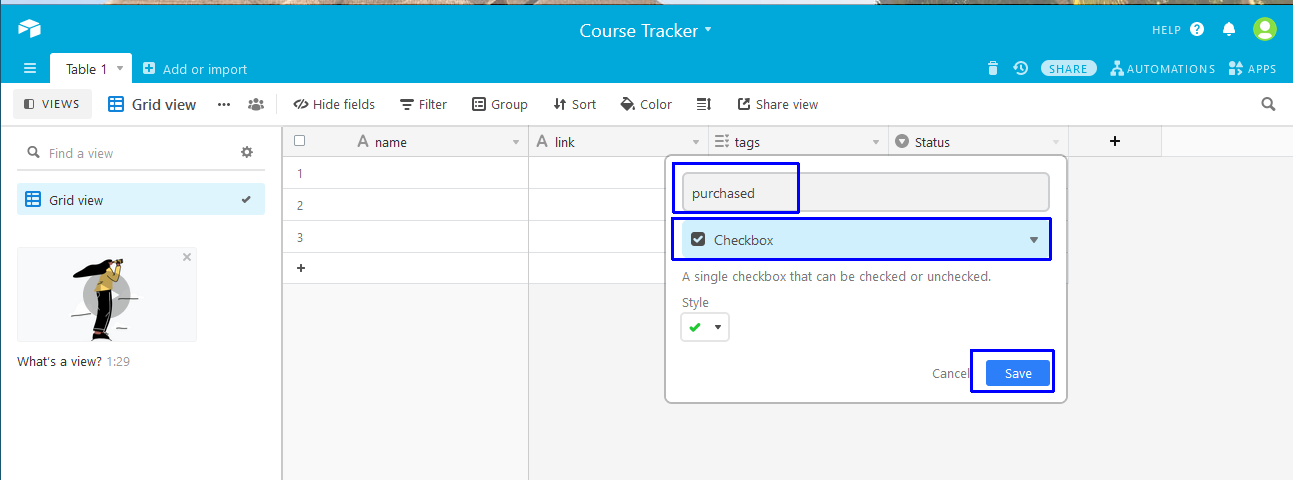
The last thing will be purchased, which will be Checkbox.
 Checkbox
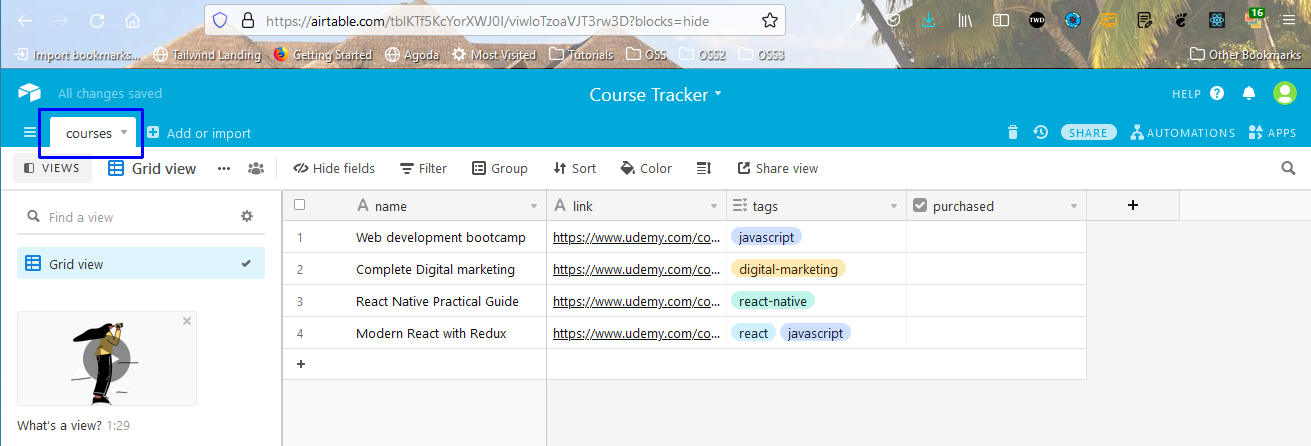
Next, add any course which you have taken or wanted to take in the excel type table. Also, i have renamed the able to courses, by right-clicking on it and changing the name.
 Table
Table
Next, we need to get our API key so go to https://airtable.com/api and we can see the new project here.
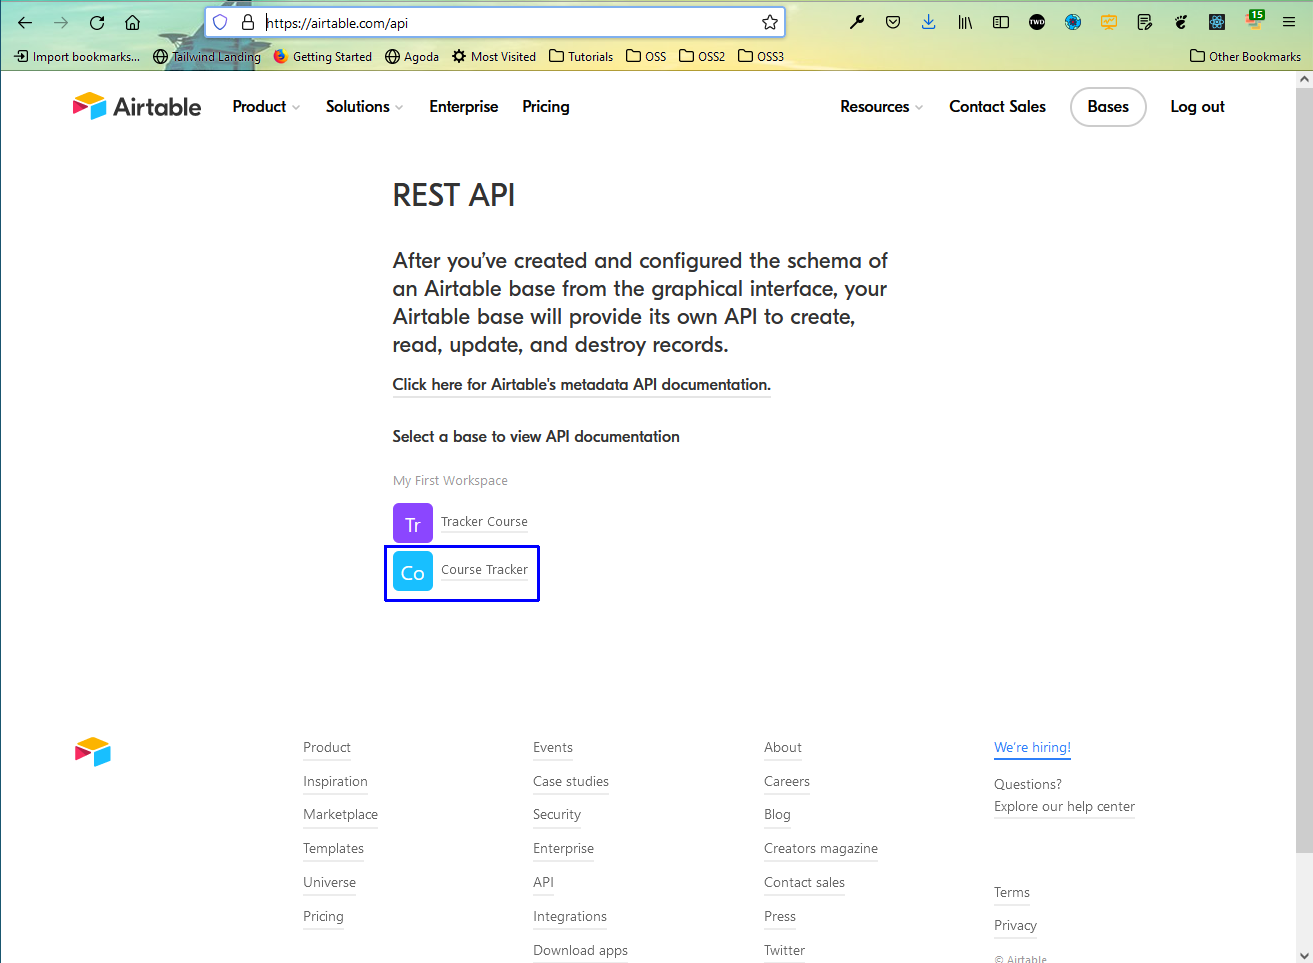 Course tracker
Click on the Course tracker database, we are taken to another page where we need to note down the base ID first. Click on the show API key on the top right and we can get the API key.
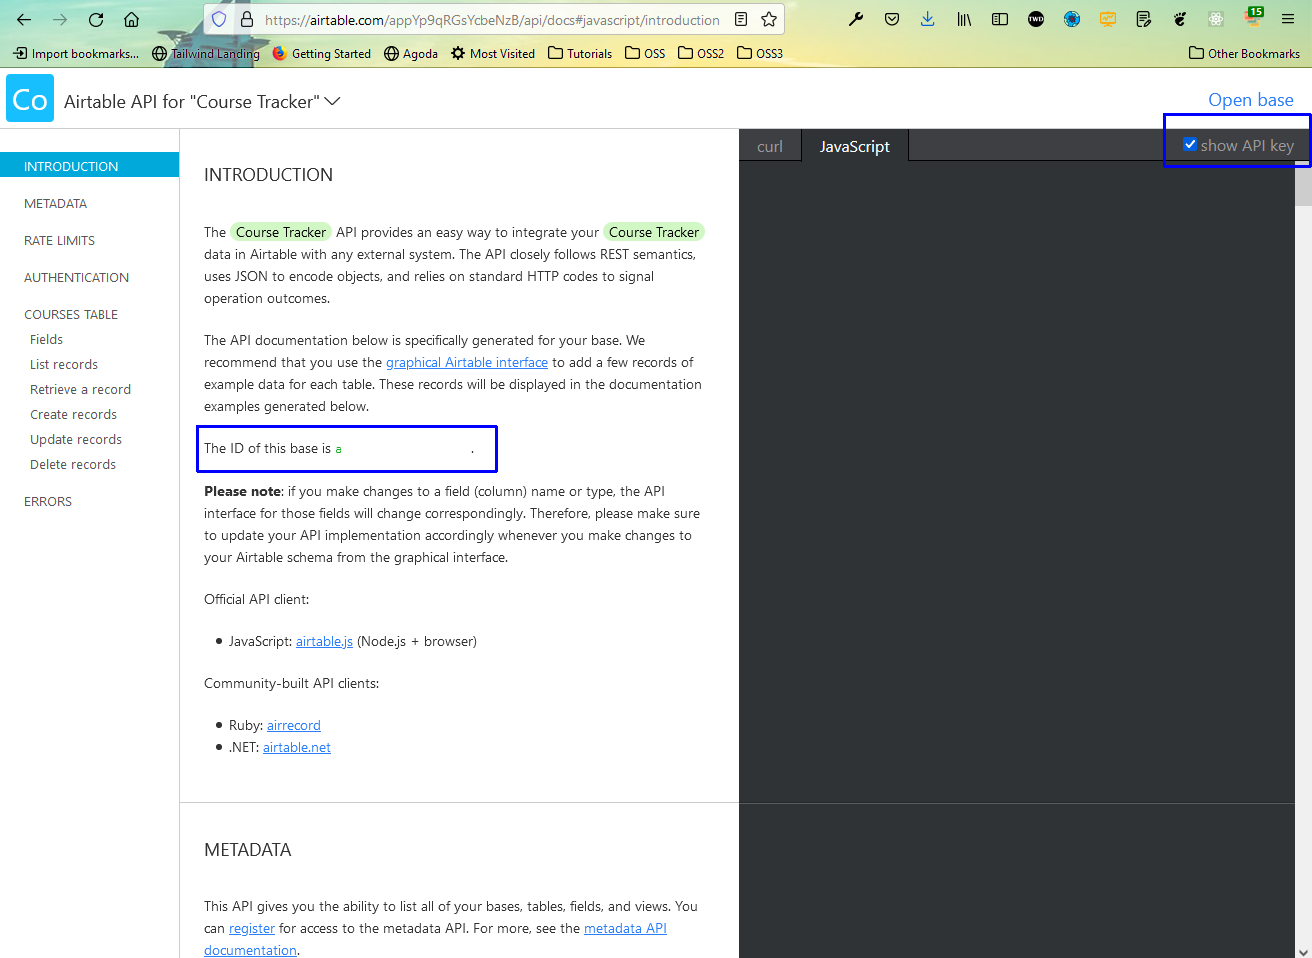 Base id
Finally it’s time to create our React project. So, create a new project with the below command.
npx create-react-app course-tracker
After that change to the directory, open with VS Code. We are also installing the packages for airtable, dotenv and bookstrap 4.
After that create a .env file in the base directory and put the Base ID and API Key from the earlier step. Also, put the table name, which is courses in our case.
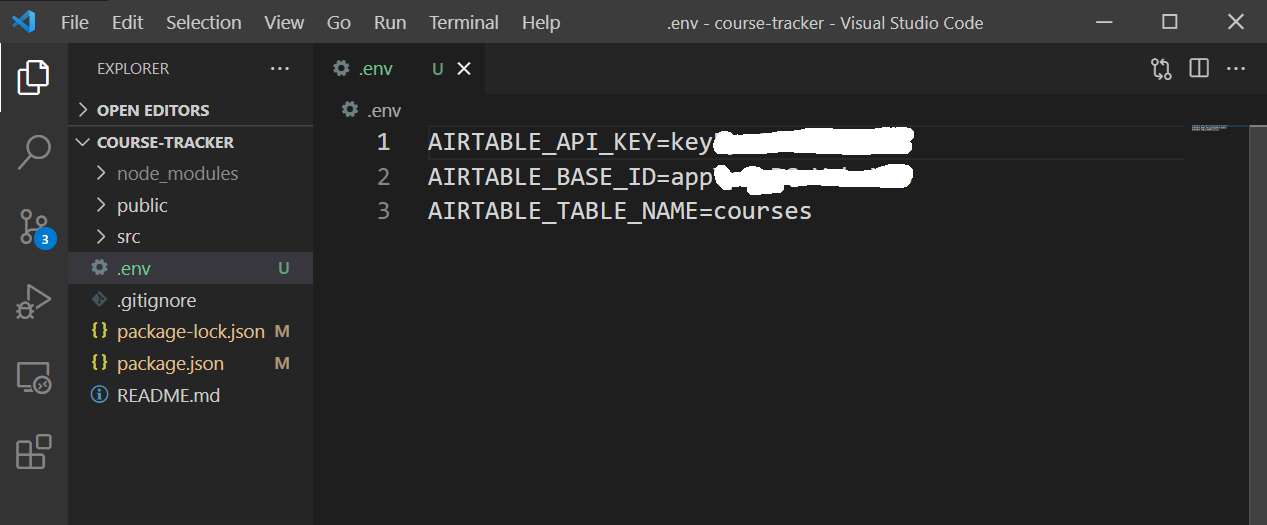 .env
.env
Next, we will add bootstrap to our index.js file.
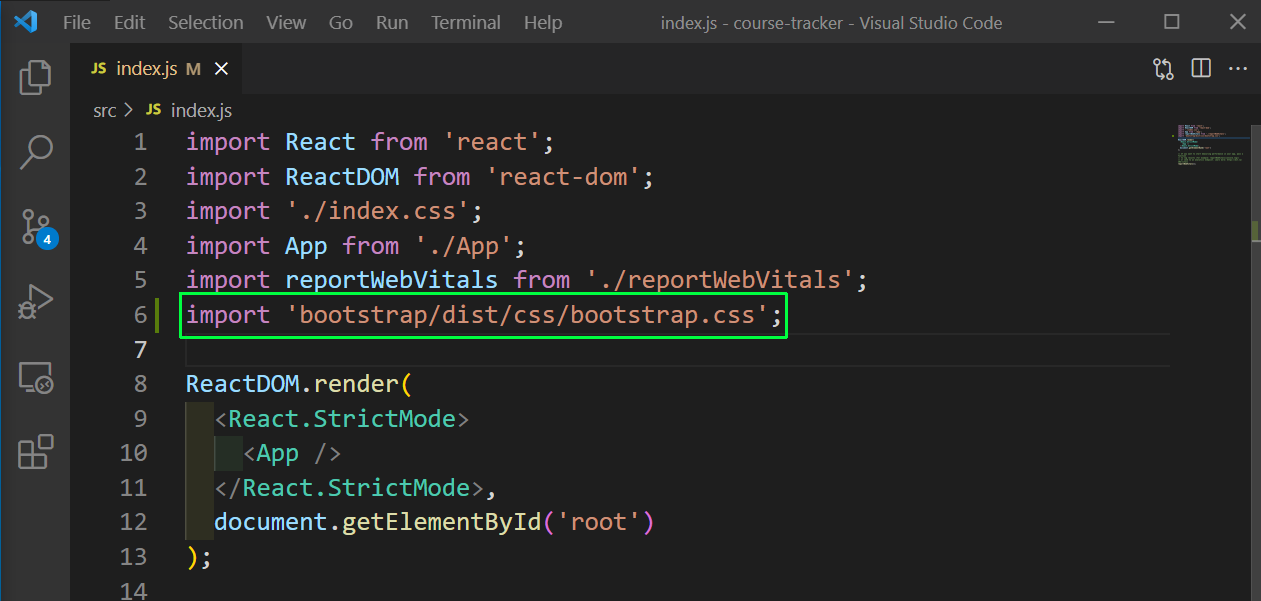 index.js
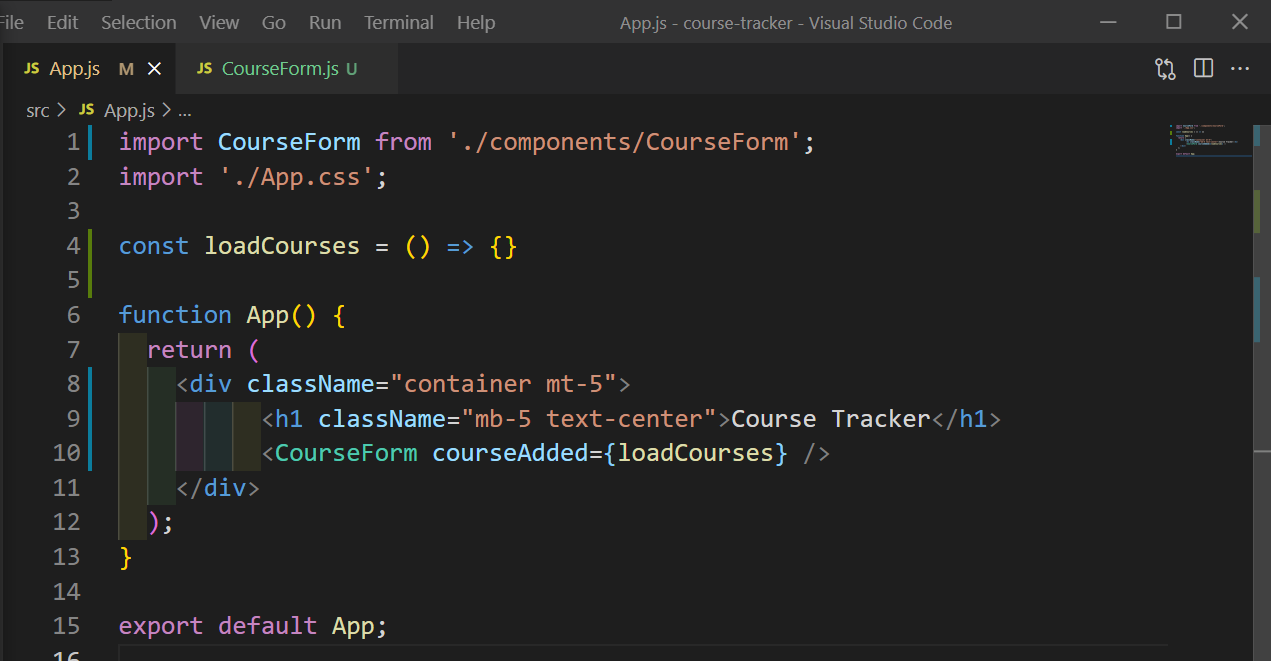
Next, update the App.js to render a CourseForm component. We are passing a prop courseAdded to it, which is basically a callback function.
 App.js
Create a components folder inside the src folder and a file CourseForm.js inside it. Here, we basically have two input fields for name and link and will call a function submitCourse, when we submit the form.
import React, { useState } from 'react';export default function CourseForm({ courseAdded }) {
    const \[name, setName\] = useState('');
    const \[link, setLink\] = useState('');
    const submitCourse = () => {};return (
        <div className="card">
            <div className="card-header">Add a New Course</div>
            <div className="card-body">
                <form className="" onSubmit={submitCourse}>
                    <div className="form-group">
                        <label htmlFor="name">Name</label>
                        <input
                            type="text"
                            name="name"
                            value={name}
                            className="form-control"
                            onChange={(e) => setName(e.target.value)}
                        />
                    </div>
                    <div className="form-group">
                        <label htmlFor="link">Link</label>
                        <input
                            type="text"
                            name="link"
                            value={link}
                            className="form-control"
                            onChange={(e) => setLink(e.target.value)}
                        />
                    </div>
                    <button type="submit" className="btn btn-primary">
                        Submit
                    </button>
                </form>
            </div>
        </div>
    );
}
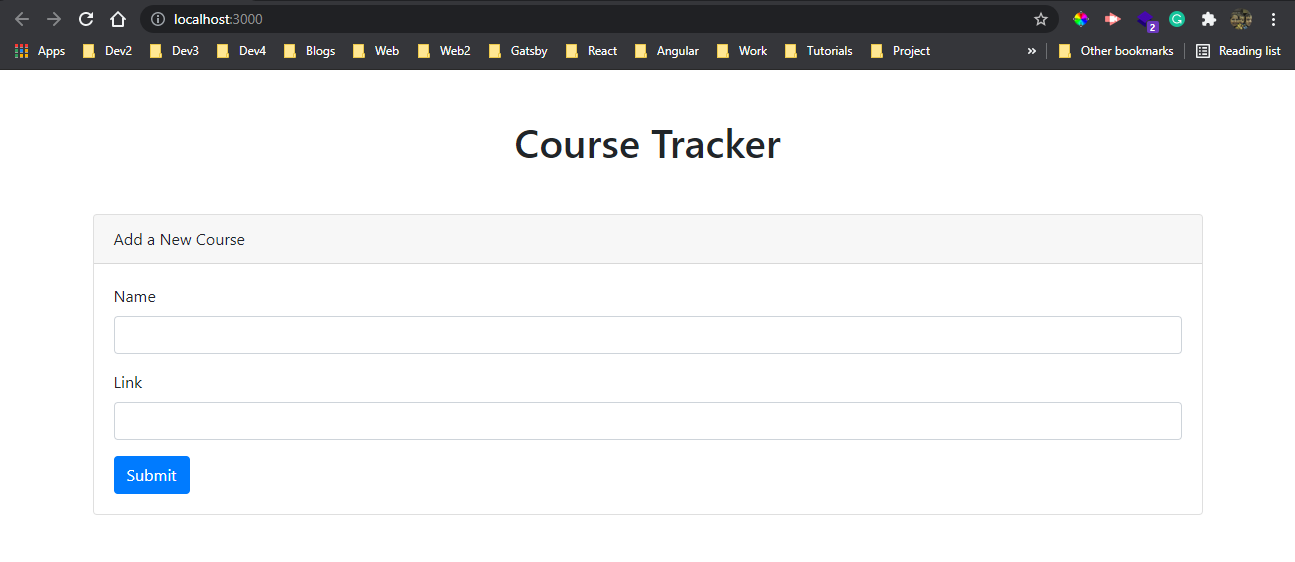
Now, when you start the react project on by npm start, it will show the form in localhost.
 localhost
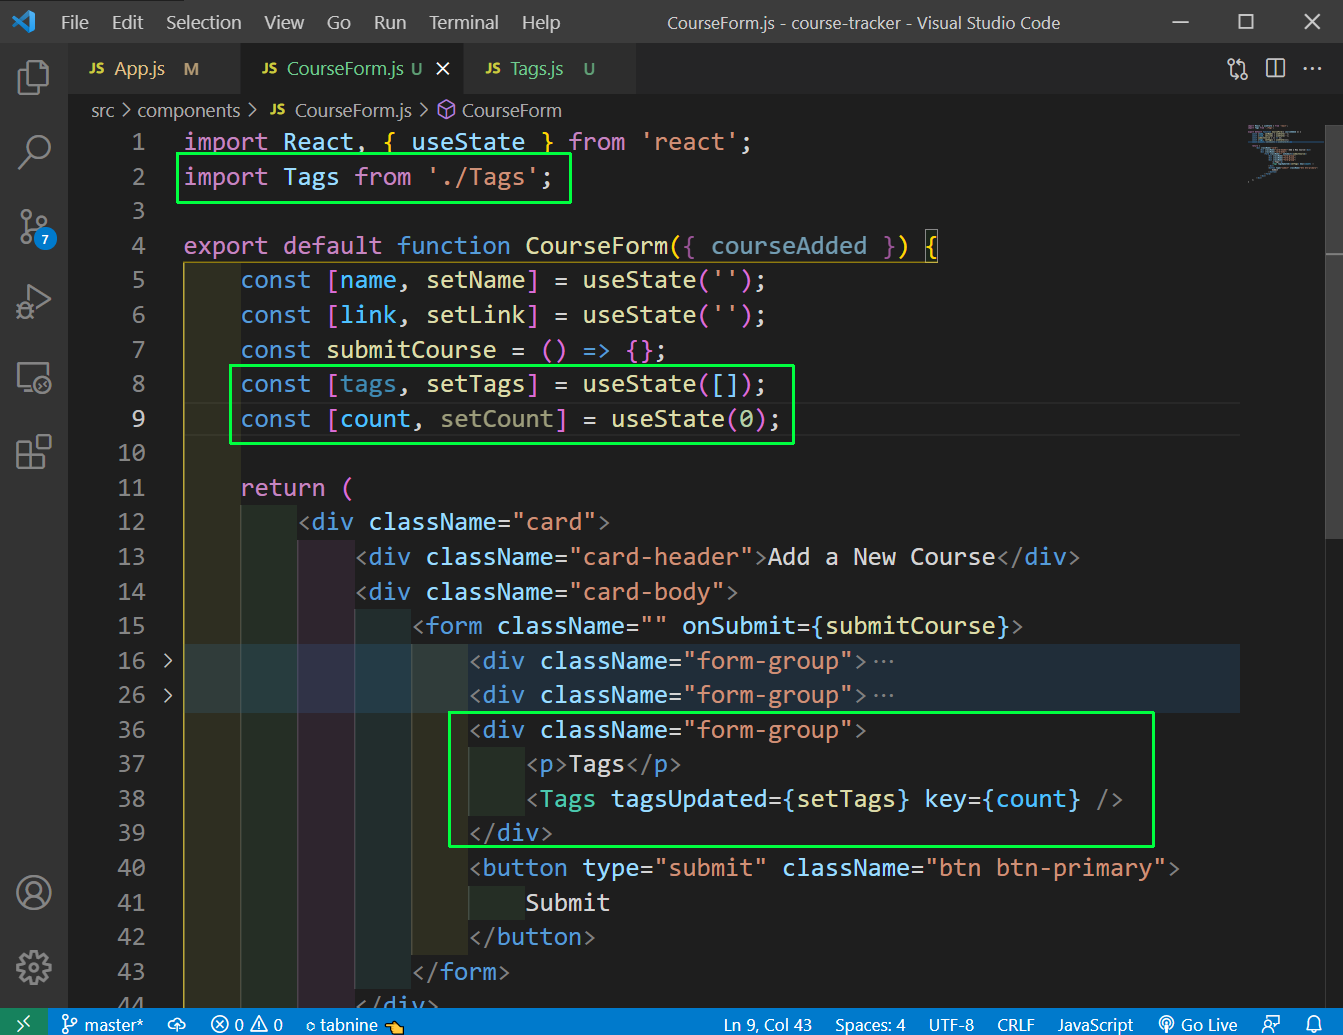
Next, we will render Tags component from CourseForm.js file. Here, we are passing the tagsUpdated and key prop.
 CourseForm.js
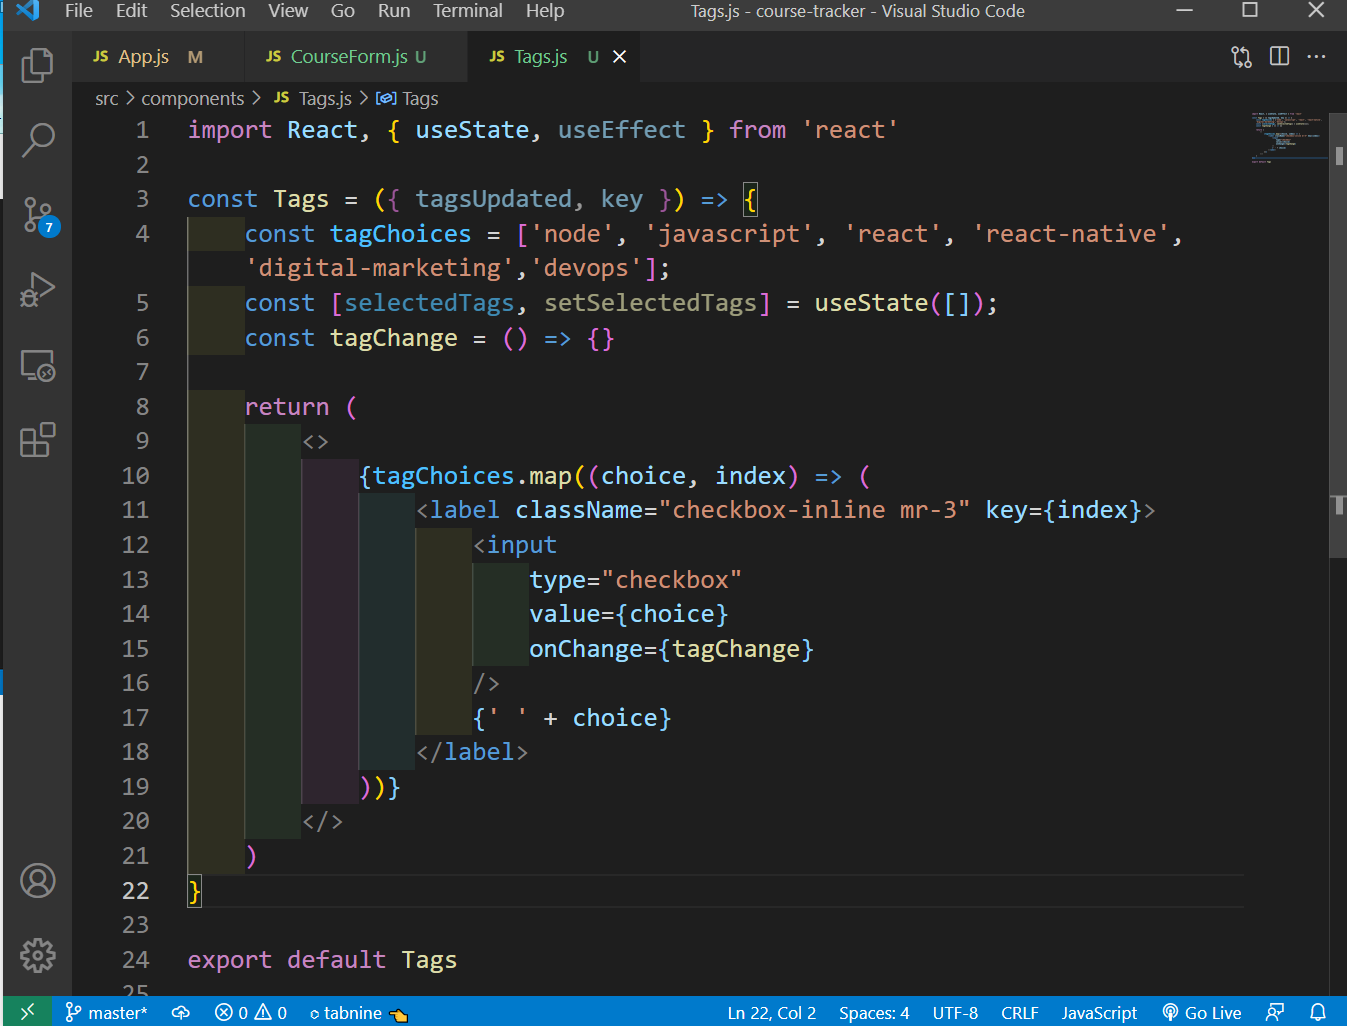
Next, create a file Tags.js in the components folder. Here, we are showing our tags, which we have put in the Airtable. We will come back to this file, one more time after completing the backend.
 Tags.js
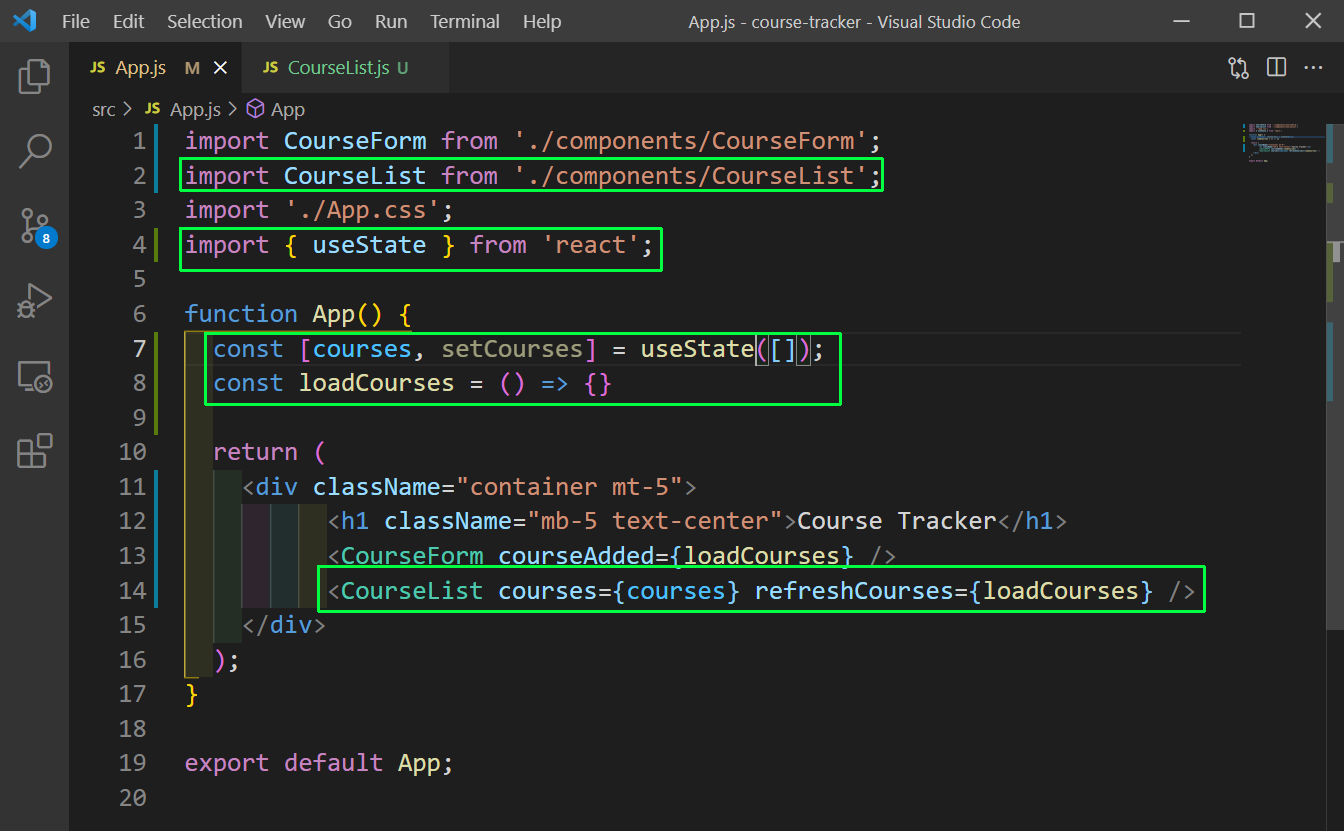
Now, we will create the CourseList component. So, we will first render it from the App.js file and pass two props courses and refreshCourses to it.
 App.js
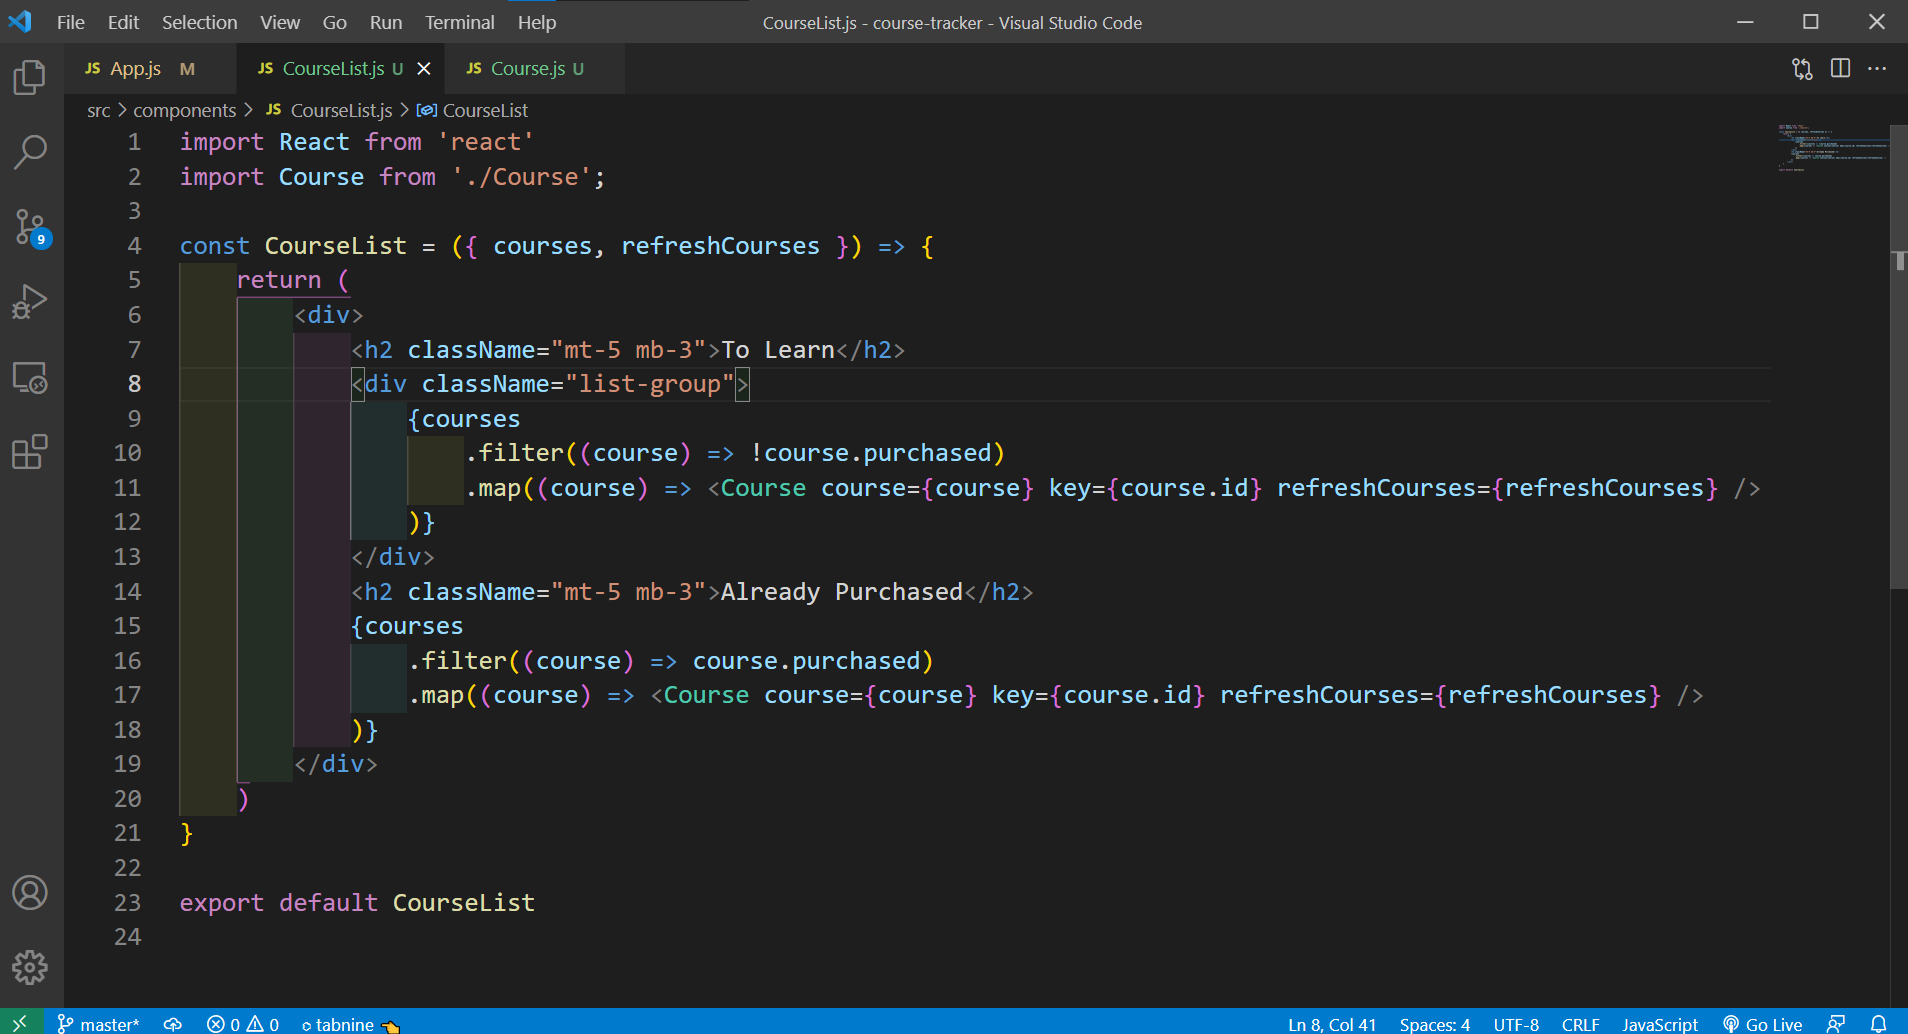
Next, create a file CourseList.js in the components folder. Here, we are filtering the course based on purchased and passing it to another component Course.
 CourseList.js
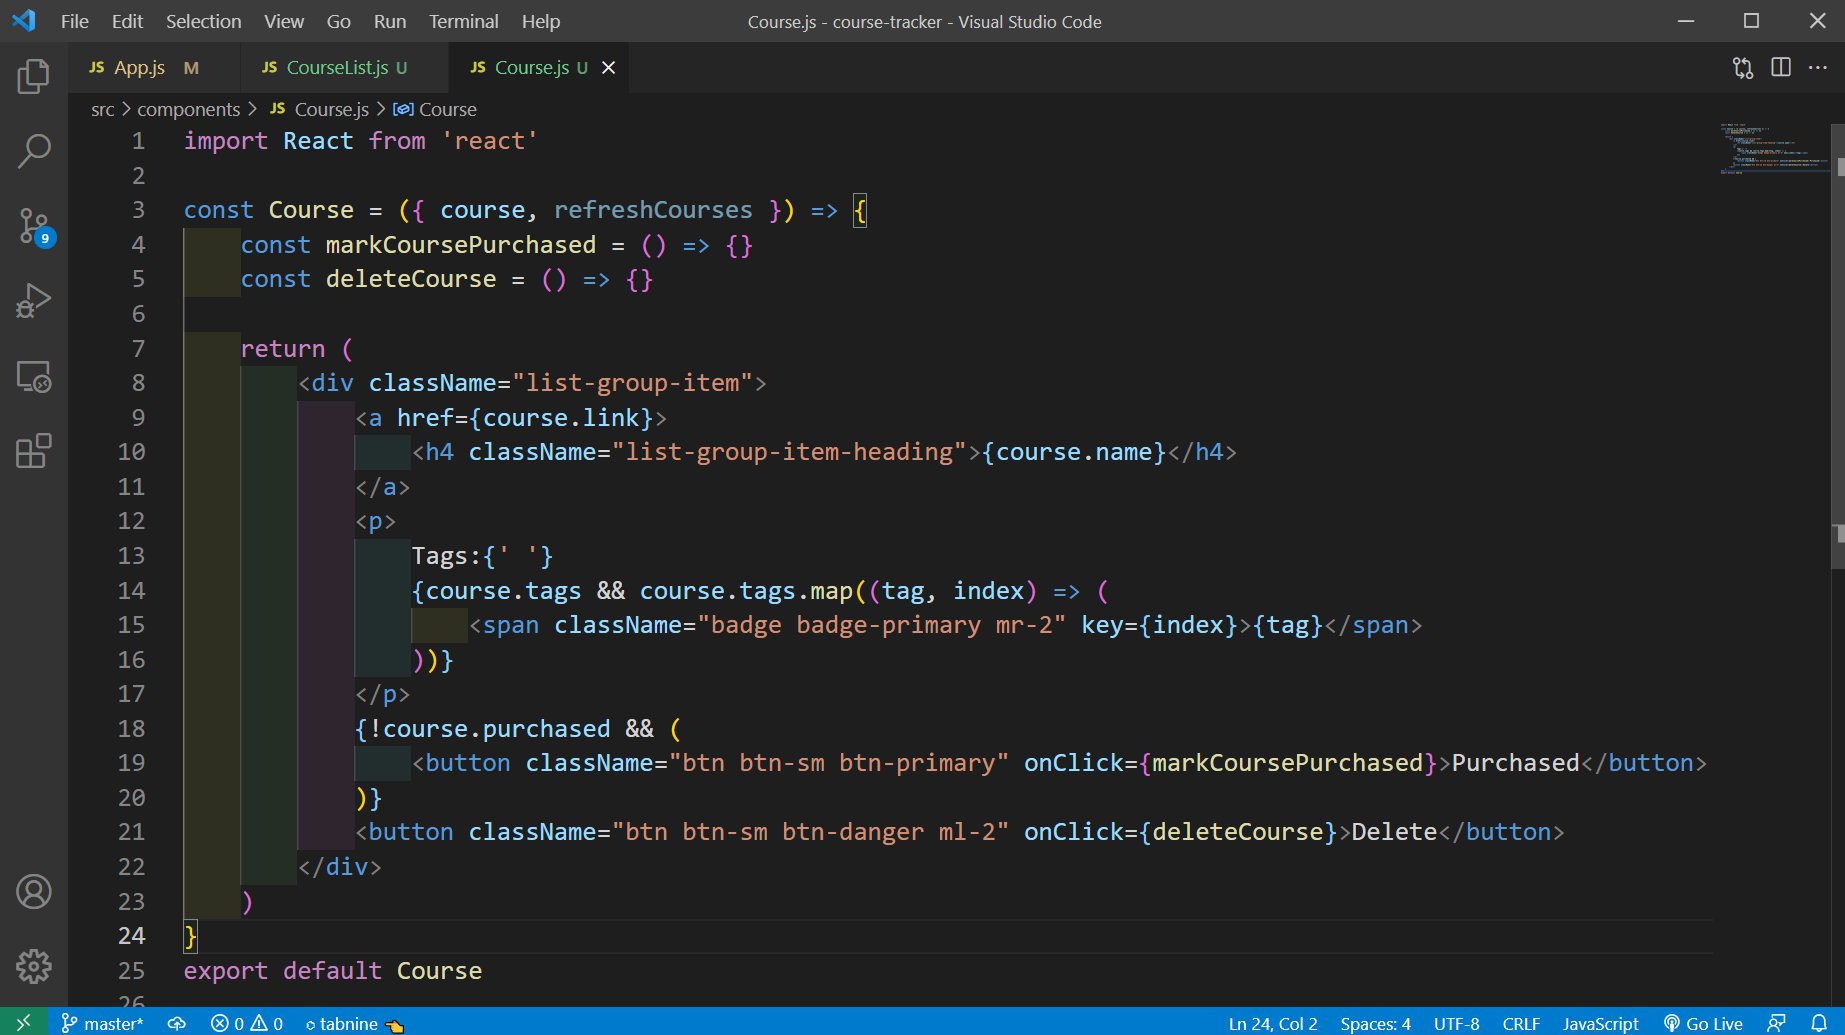
Now, create a file Course.js inside the same components folder. Add the below code in it. Here, we are just showing the details of an individual course.
 Course.js
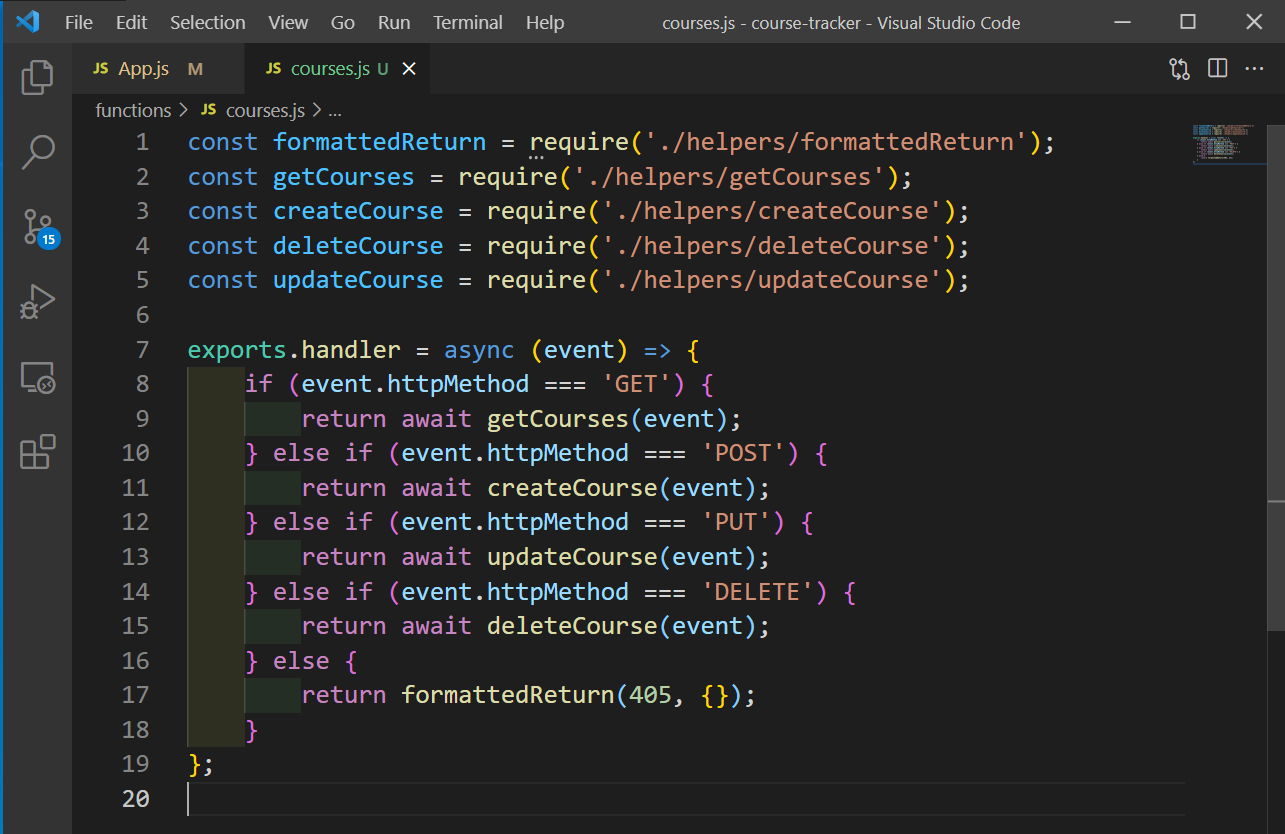
Now, it’s time to go to the backend, which are server-less functions inside netlify. For that we have to create a functions directory in the root and create a file a JavaScript file called courses.js in it.
This file have a handler and is using some of the files, for performing the CRUD operations.
 courses.js
Next, create a file netlify.toml in the root directory and put the below content in it. This is to tell netlify, where your serverless functions live.
Also, created a helper folder in the functions directory and put the five files, requires in courses.js inside it.
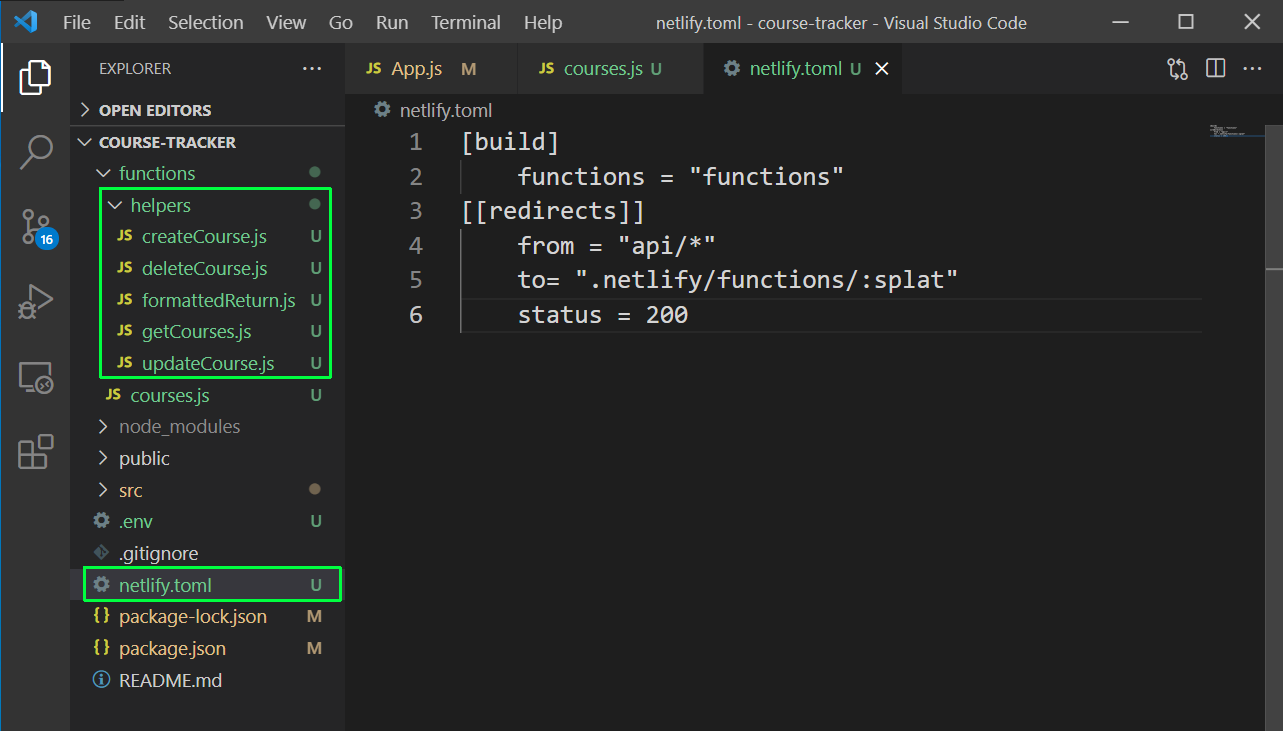 nelify.toml
Next, we need to install the netlify cli, using the below command globally.
npm install netlify-cli -g
Now, create a file airtable.js inside the helpers folder and add the below content in it. Here, we are accessing the base and the table from the environment file.
 airtable.js
Now, we will write code for the formattedReturn.js file. Here, we are just stringifying the body.
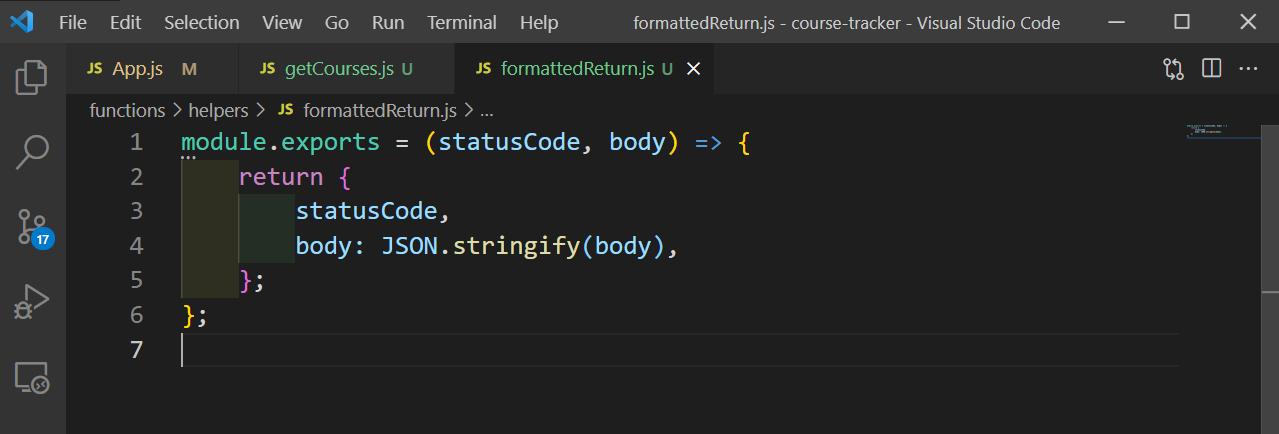 formattedReturn.js
Now, it’s time to create the getCourses.js file. Here, we are importing the aie table and the formattedReturn and then selection the first page from the table. After that we are returning it through formattedReturn, with status of 200.
We are also returning the error, in the formattedReturn if we encountered any.
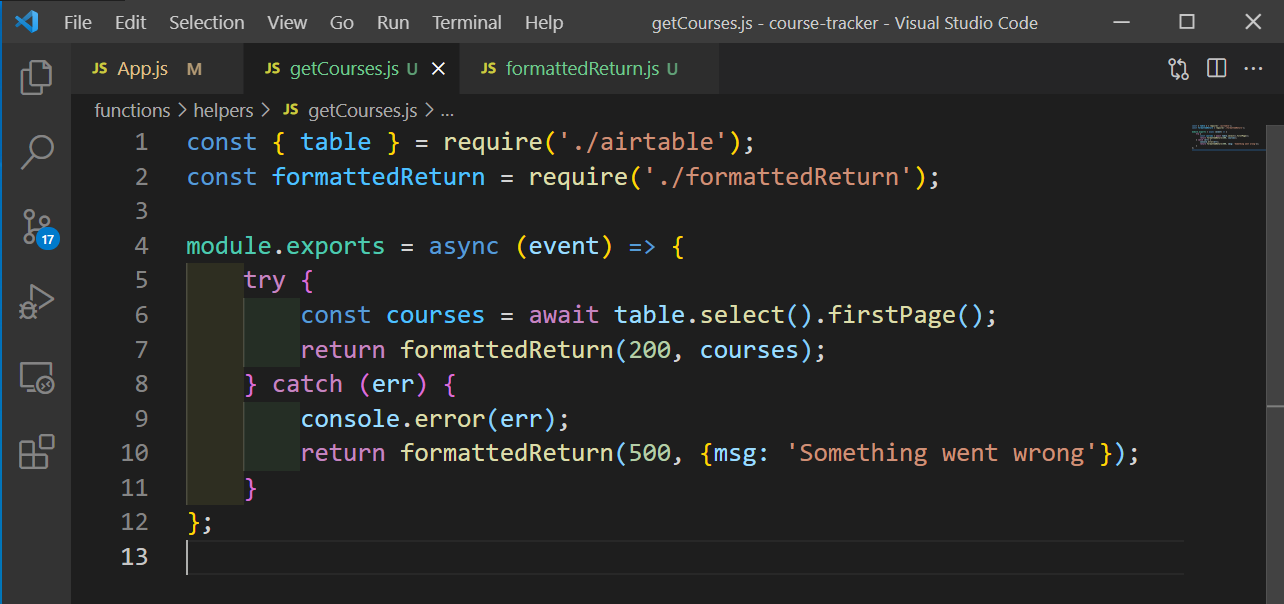 getCourses.js
Now, we need to run the below command to start React with netlify from the terminal.
netlify dev
If the above is successfully, our React app will run on http://localhost:8888/ and talk to the back-end server-less function.
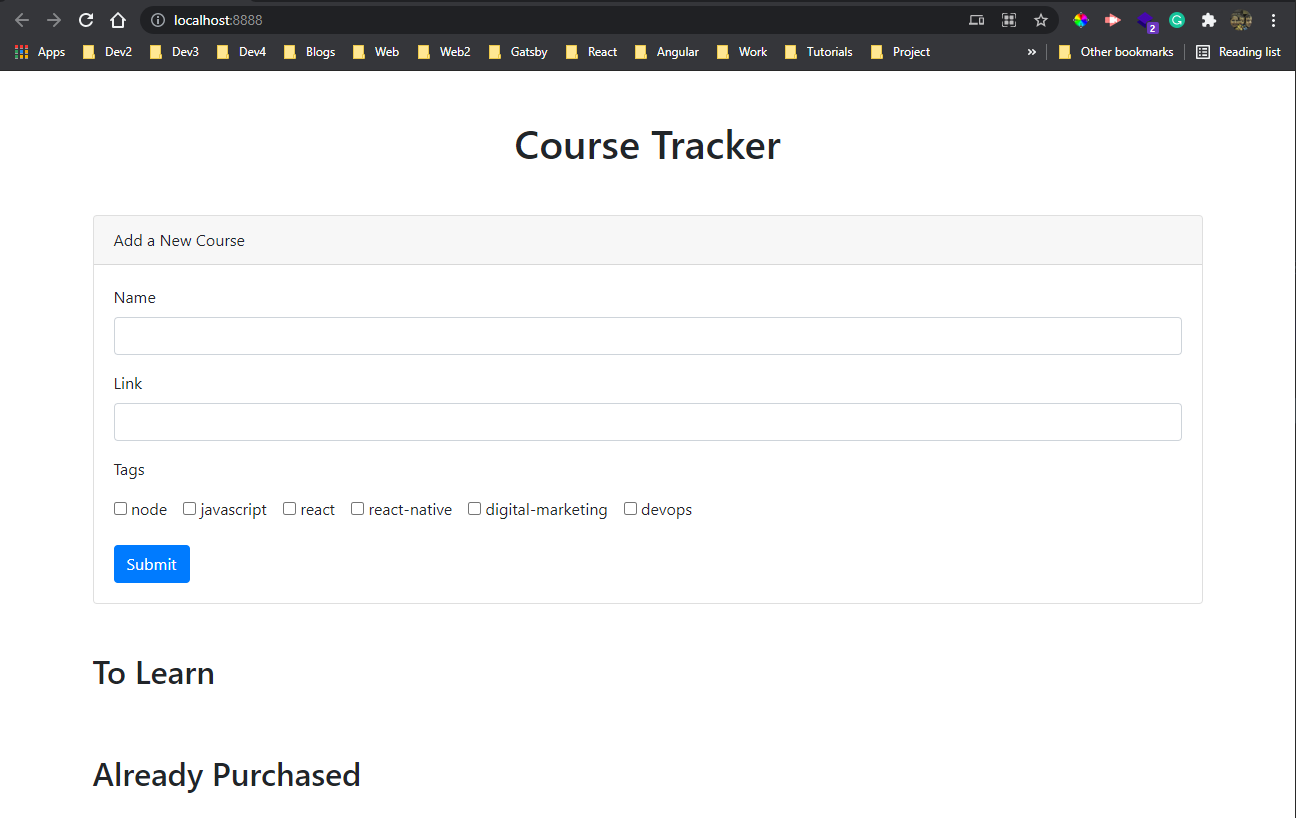 React app
Now, our backend will run on http://localhost:8888/api/courses and we can see our data coming from Airtable.
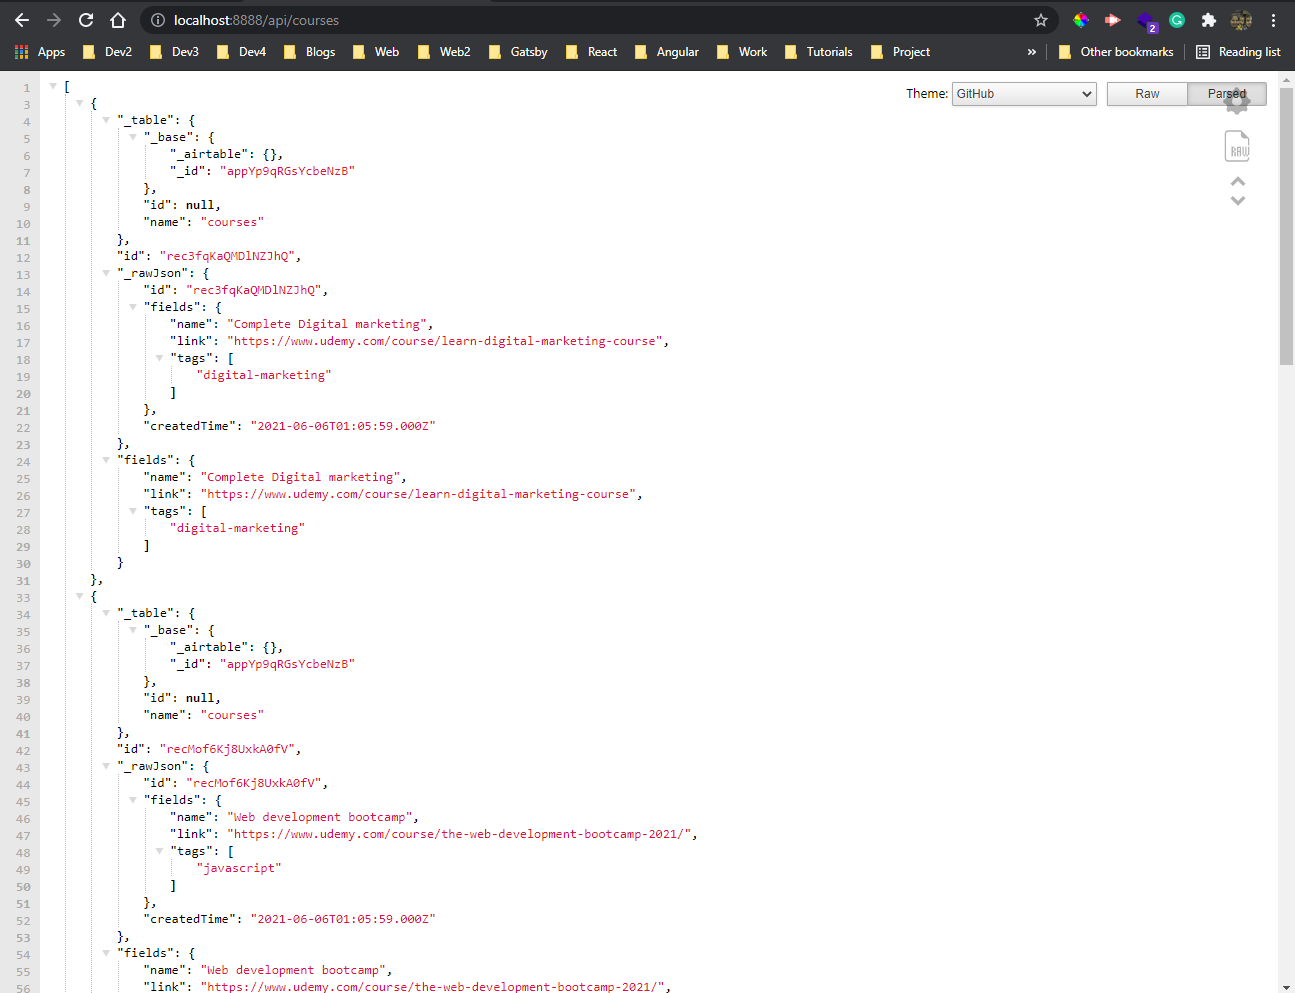 API
API
We only care about the id and the fields property here, so we will format this array in our getCourses.js file.
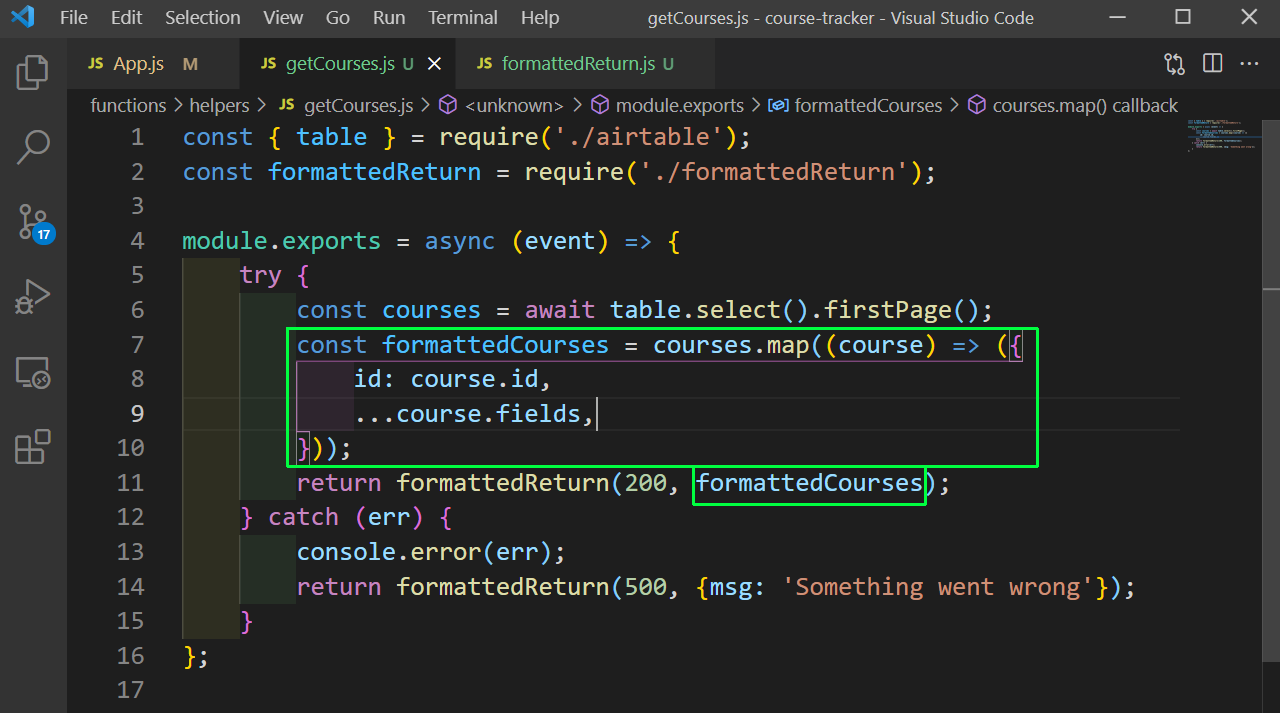 getCourses.js
Now, when we will come to our API endpoint and refresh, the data will look good.
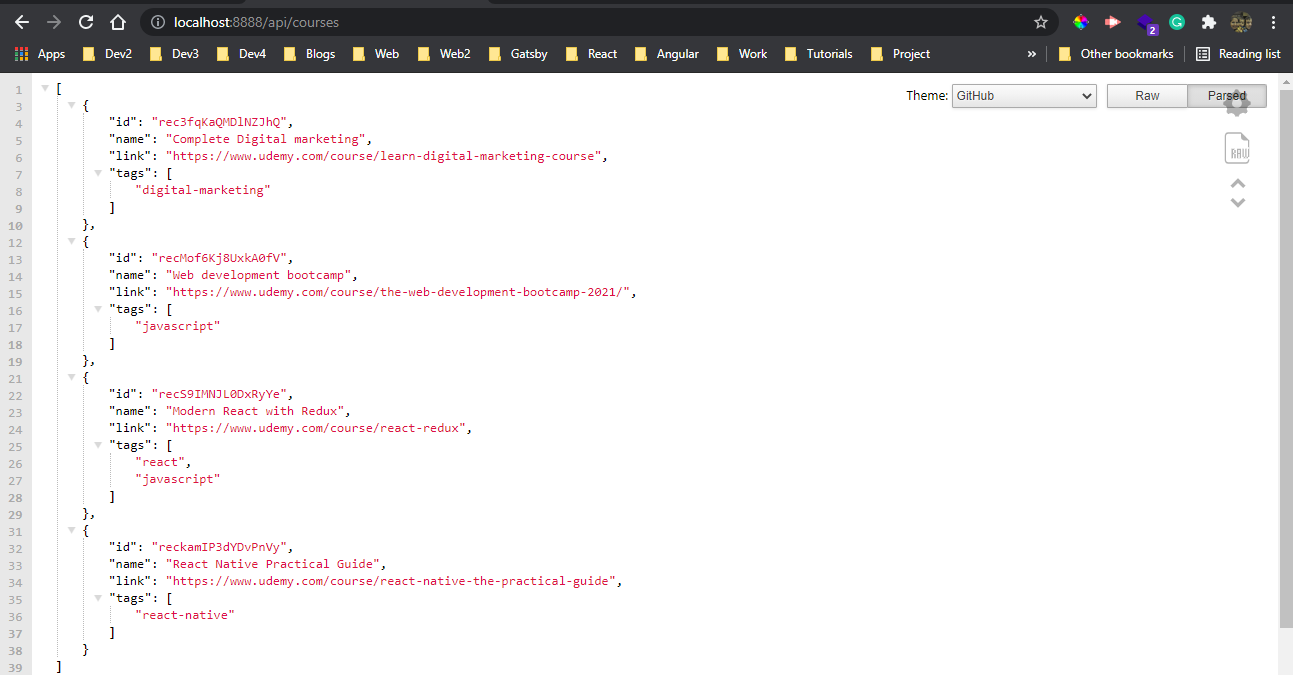 API endpoint
Next, we will complete our createCourse.js file. Here, we are taking the fields from body and using table.create to create a new field in airtable.
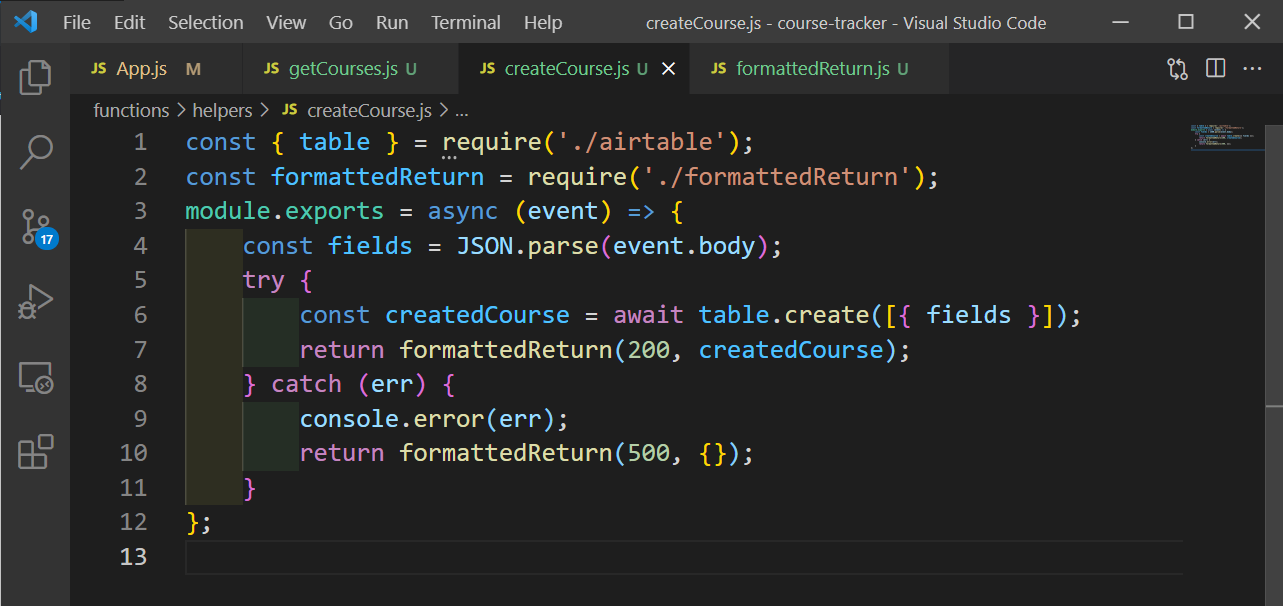 createCourse.js
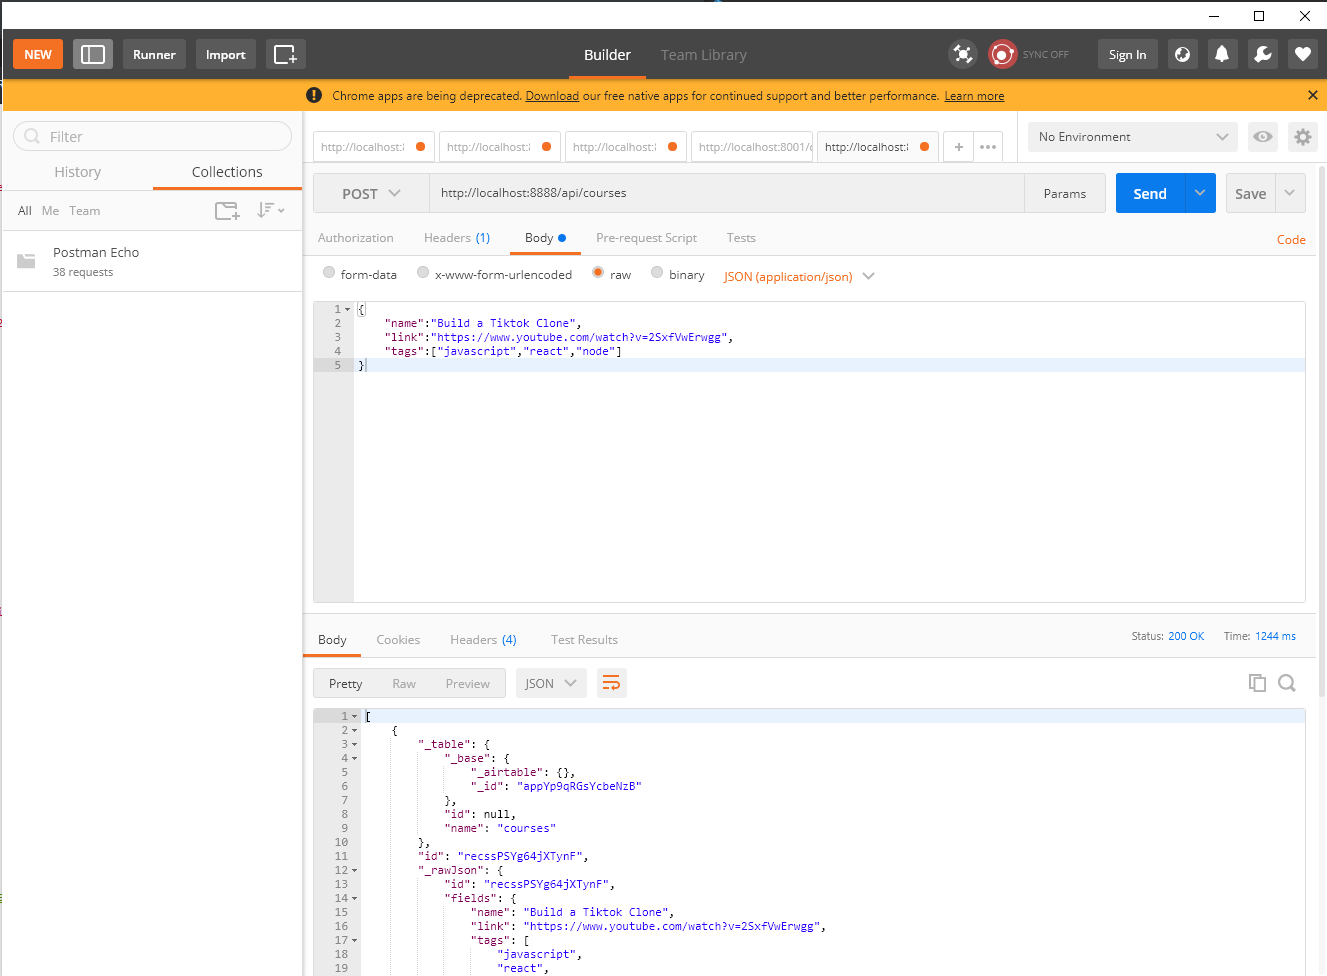
Now, we will check this POST endpoint through postman, as our frontend is not complete. Here, we are giving the name, link and tags through the body and sending the request, which is a success.
 Postman
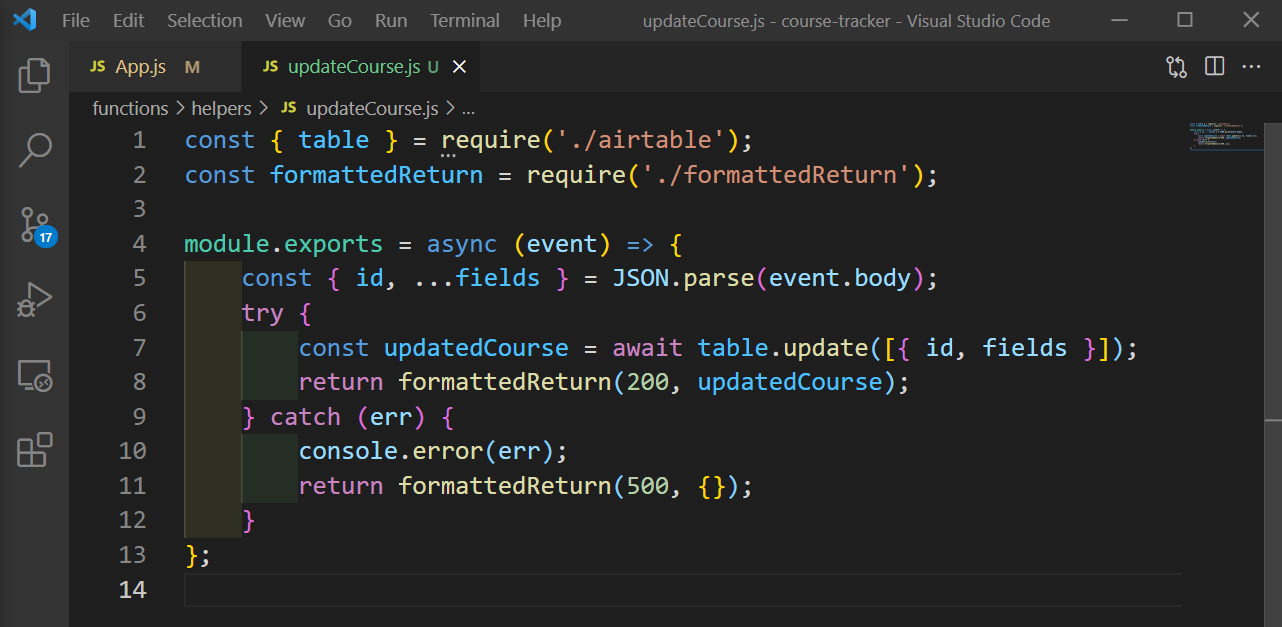
We will next write the code to update a course. So, in updateCourse.js file put the below code. Here, we are expecting the id and the fields to be provided in the request.
 updateCourse.js
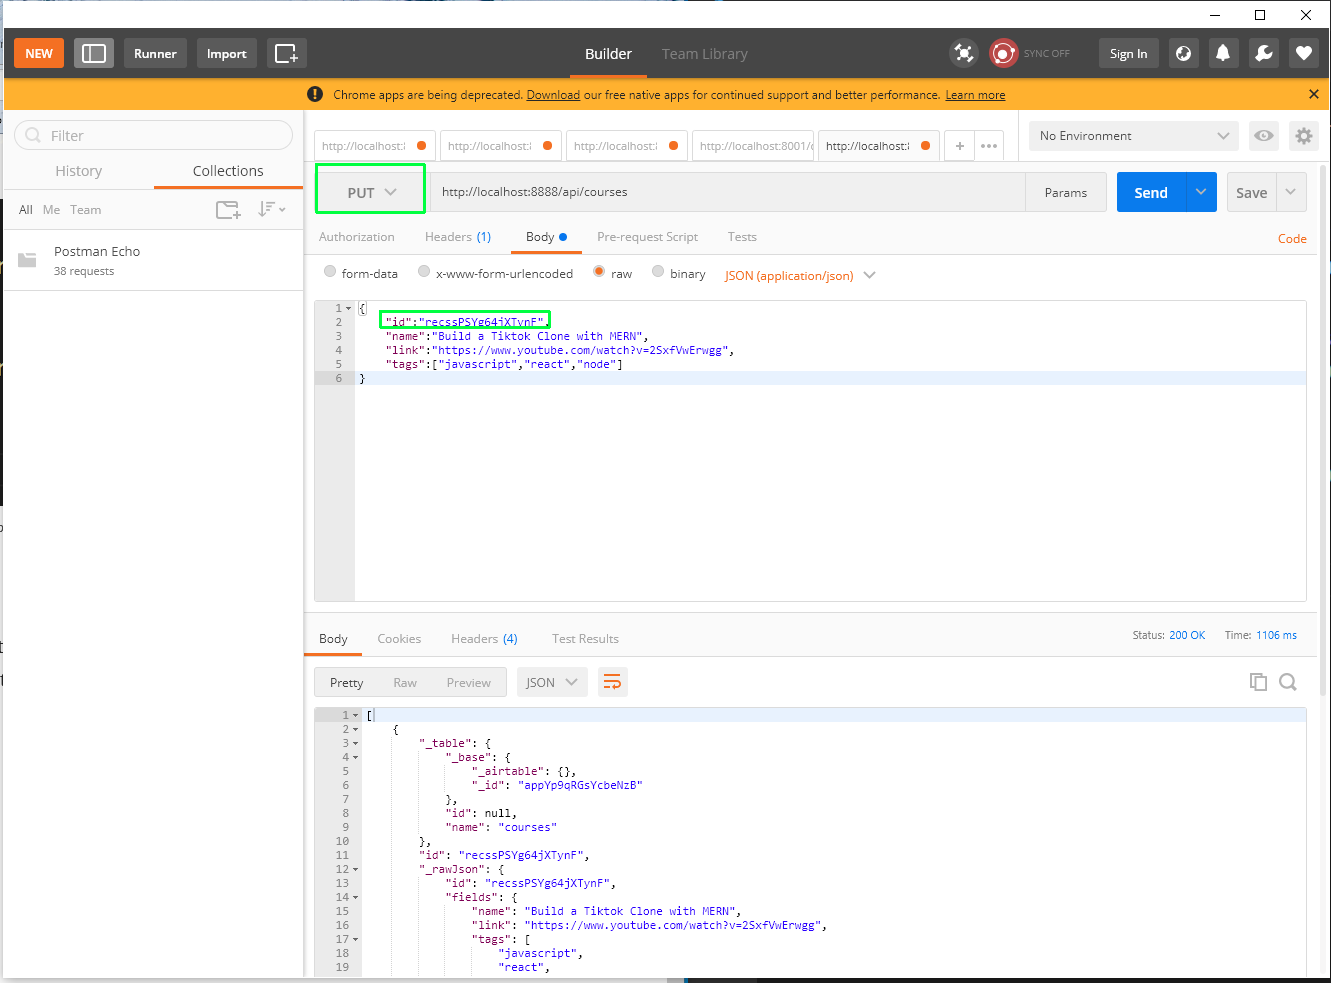
We will check it again through postman, but through a PUT request and will pass the id, we received back from the previous request.
 PUT request
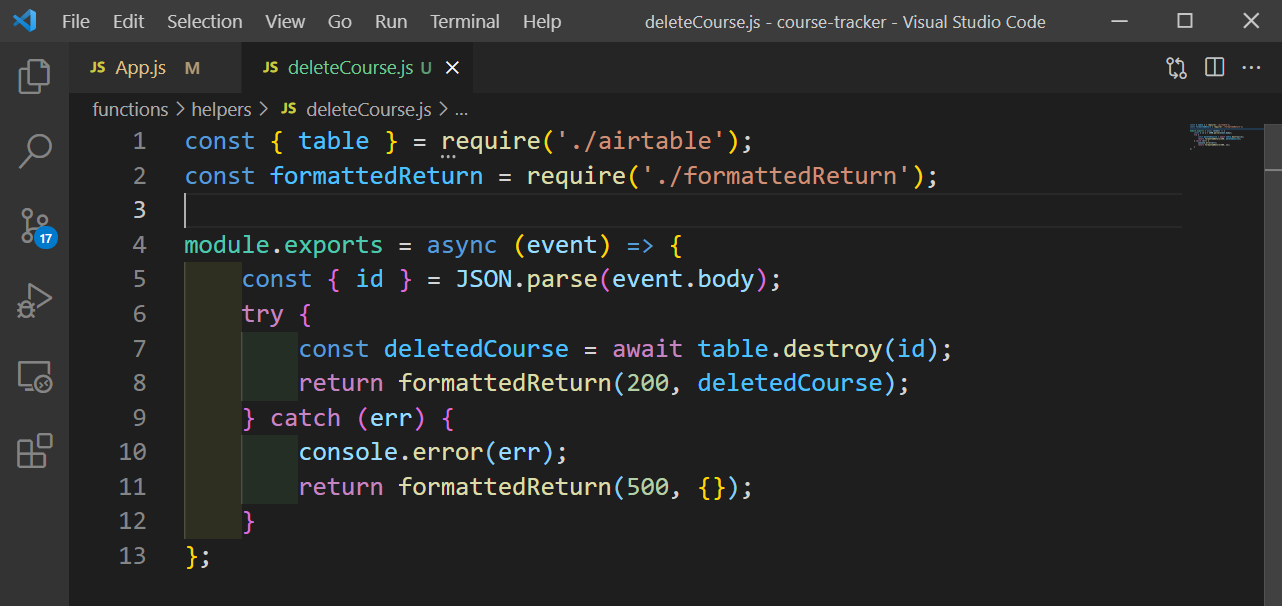
We will do our last CRUD operation, which is delete. So, in deleteCourse.js file put the below code. Here, we are just taking the id and deleting it with table.destroy method.
 deleteCourse.js
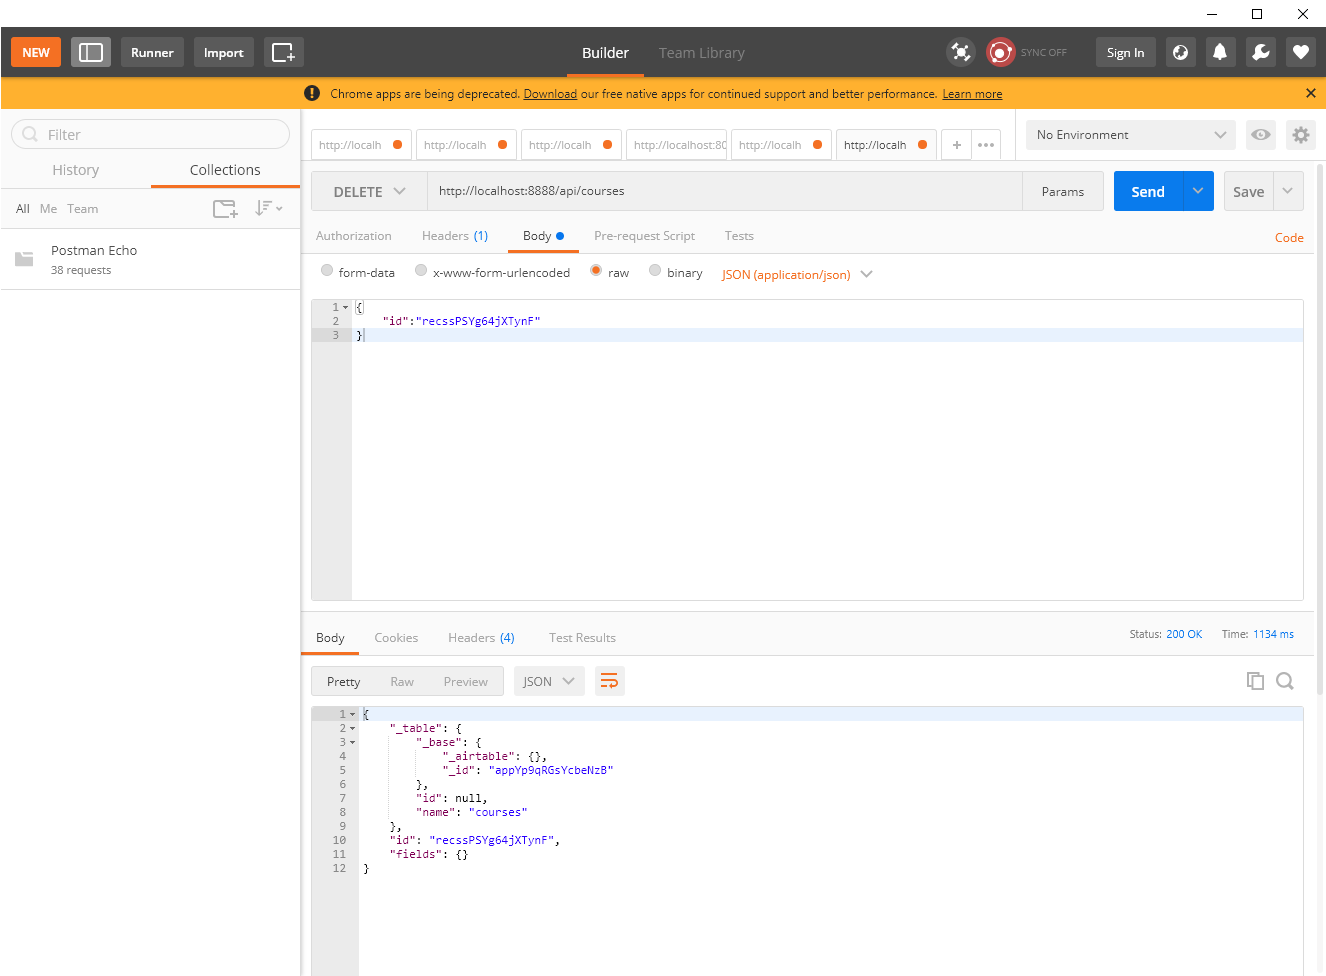
Next, in postman send a DELETE request, with just a id and hot Send.
 Postman
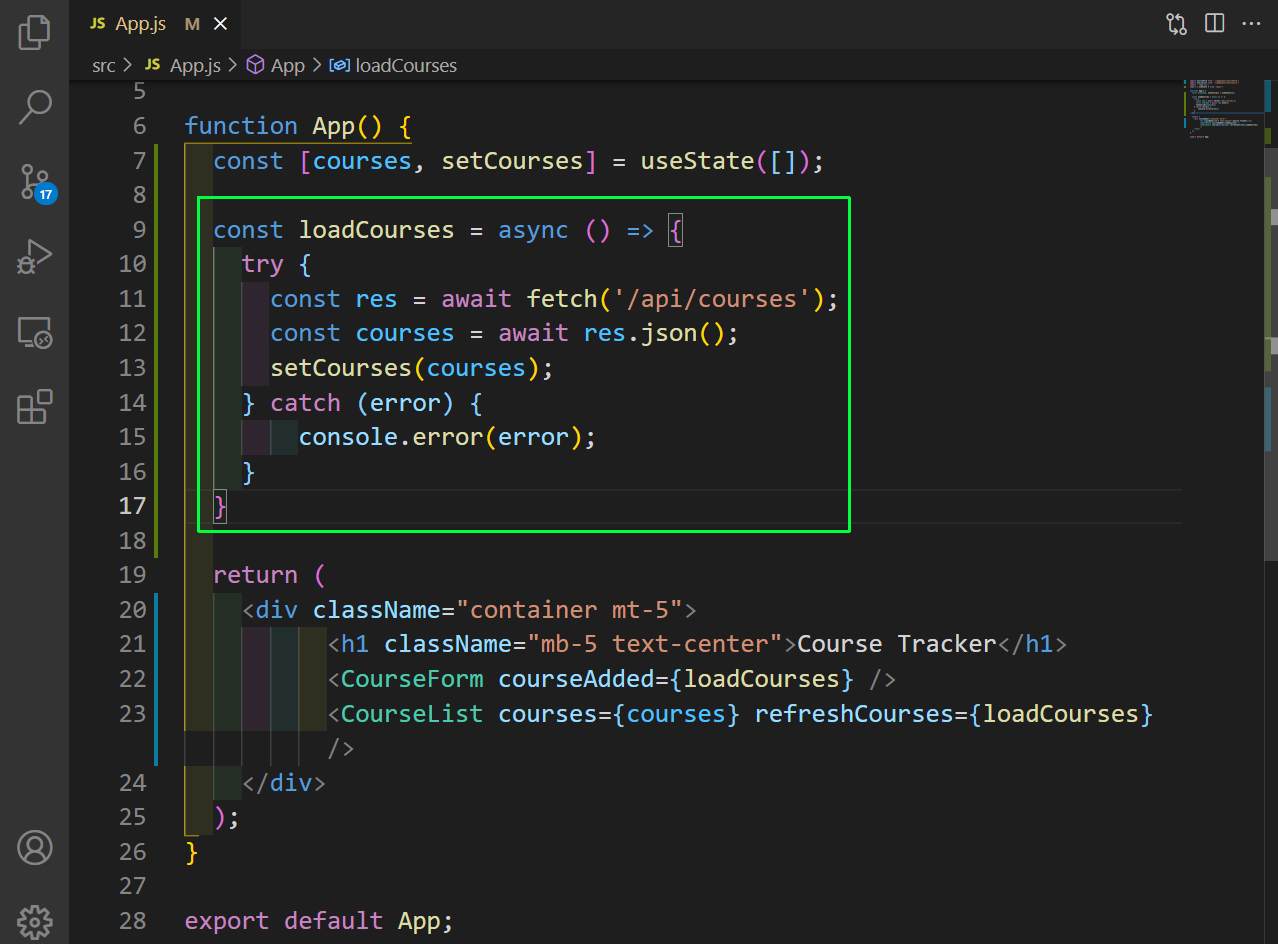
Now, we have everything to connect to the React frontend. First in our App.js we will need to do the get all the courses. Here, we are using a fetch api to get the courses and setting it to the courses array.
 App.js
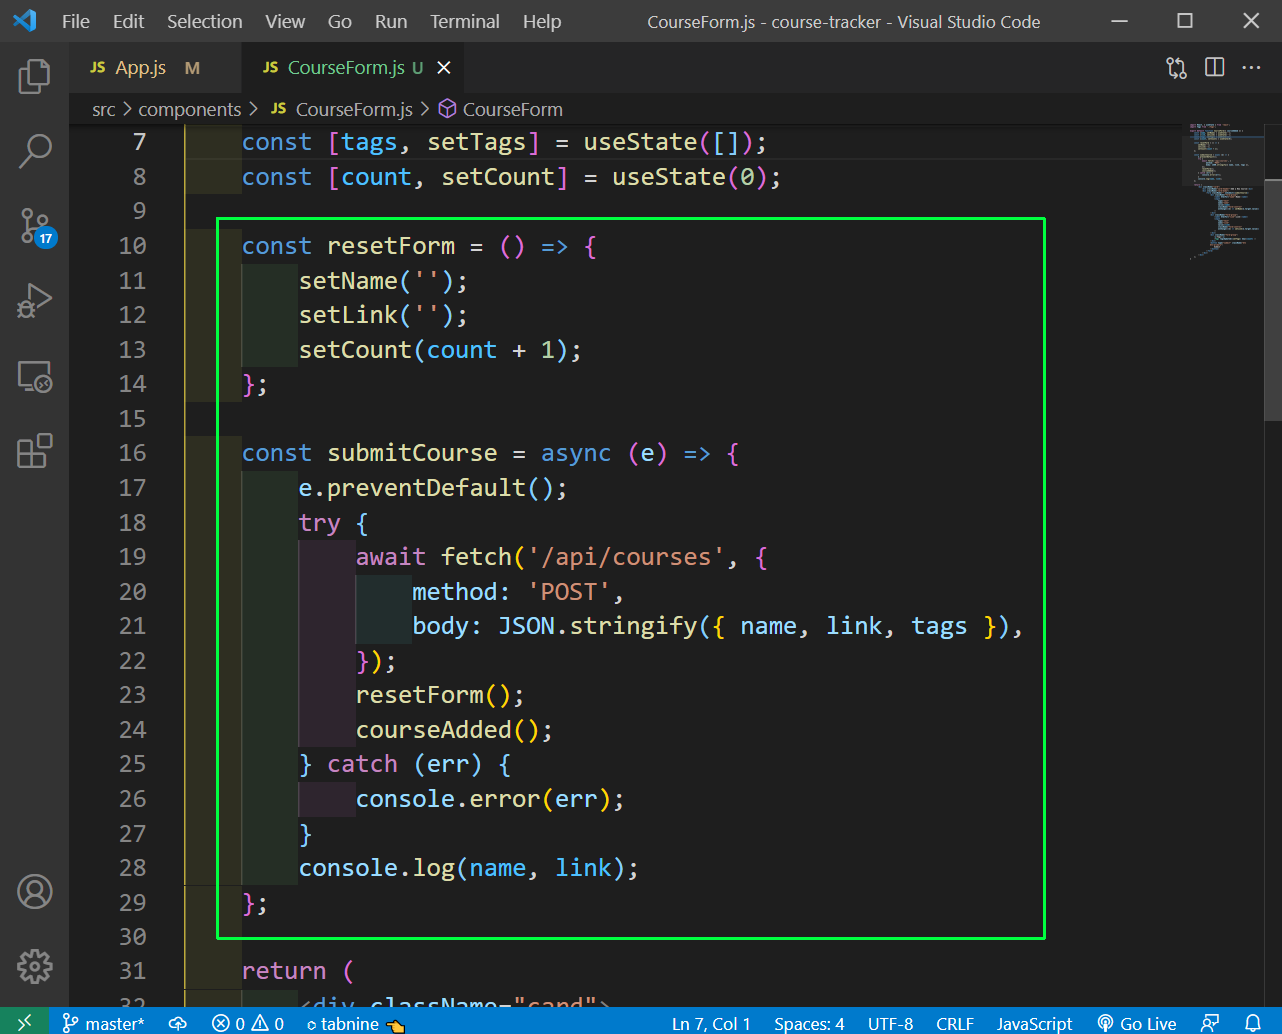
Next, in the CourseForm.js file, we will add the code to make a POST request with all the data from the form. Again, we are using the feth api to make the call.
 CourseForm.js
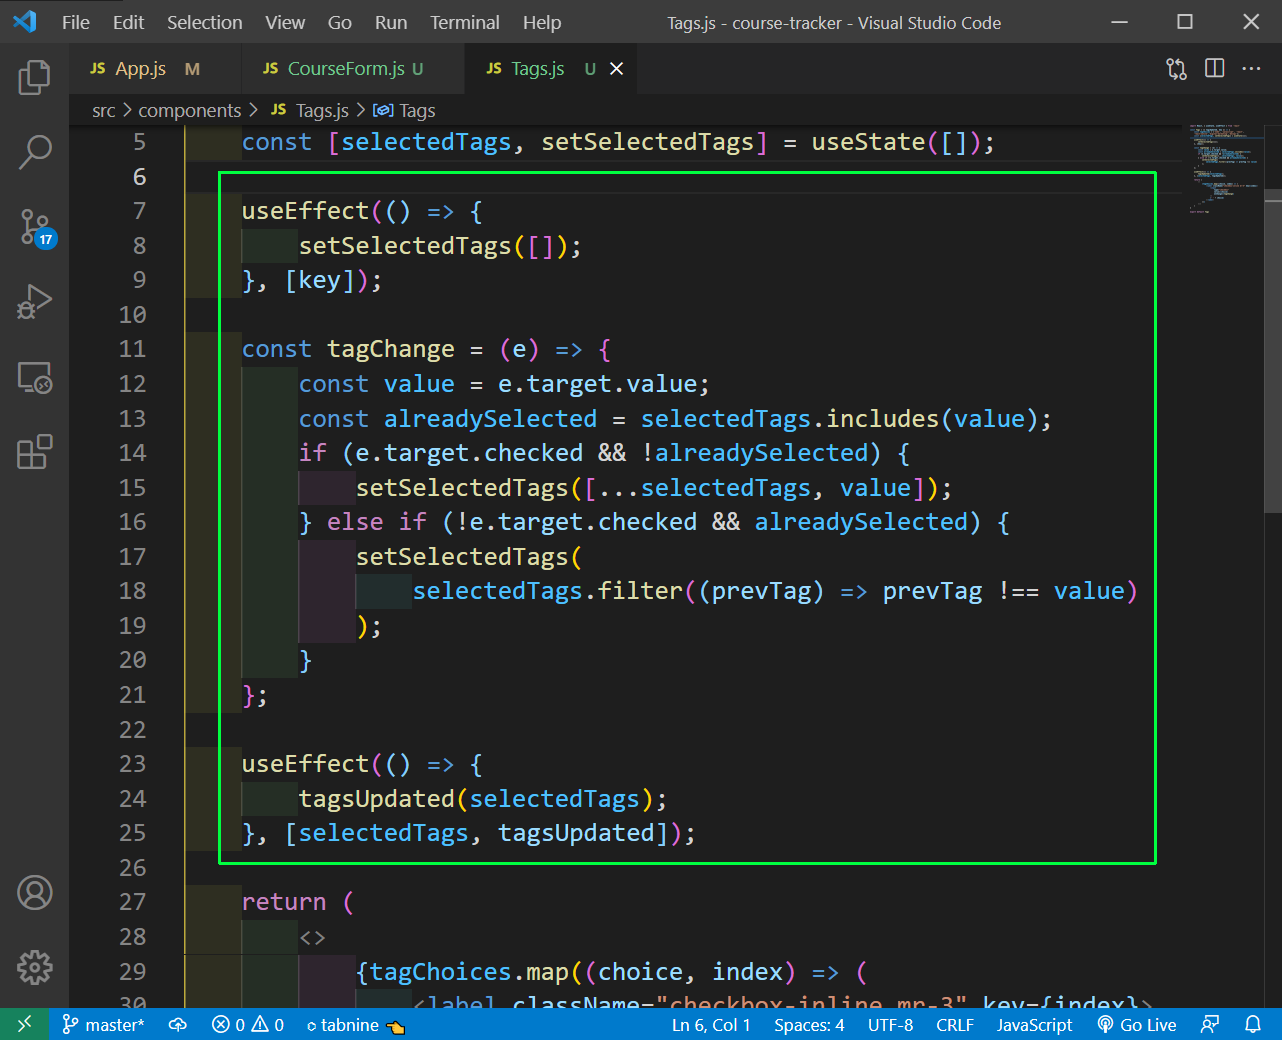
One thing which we missed out earlier, was to update the Tags.js file. Here, we are just updating the value of the tags, when someone clicks on them.
 Tags.js
Next, we have to go and submit another course from localhost and all the courses will be retrieved from airtable and shown.
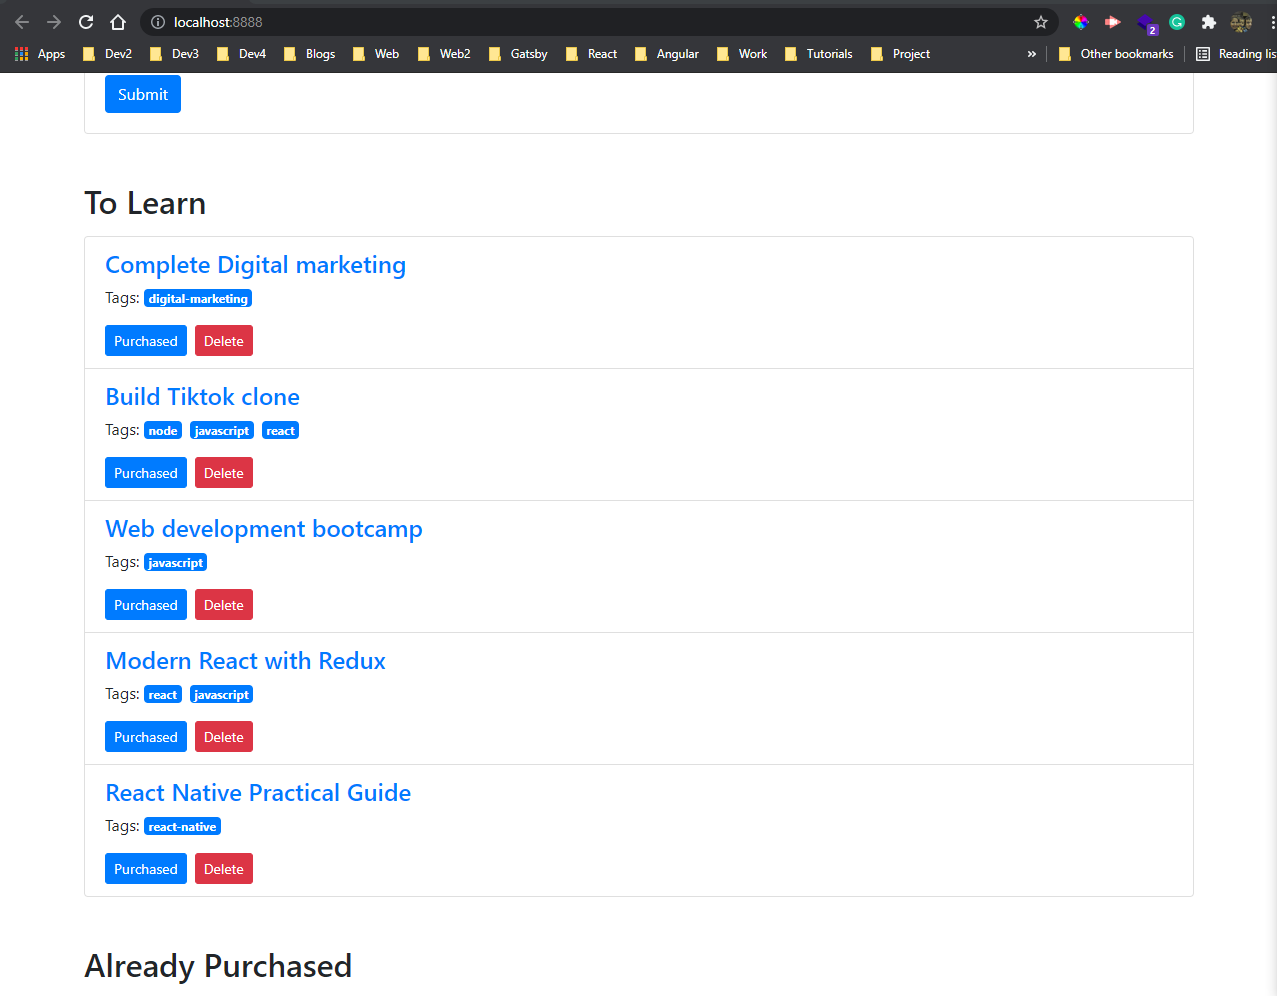 All courses
Lastly, we need to complete the functionalities of Purchased and Delete from the Course.js file. They are simple PUT and DELETE request, again from fetch api.
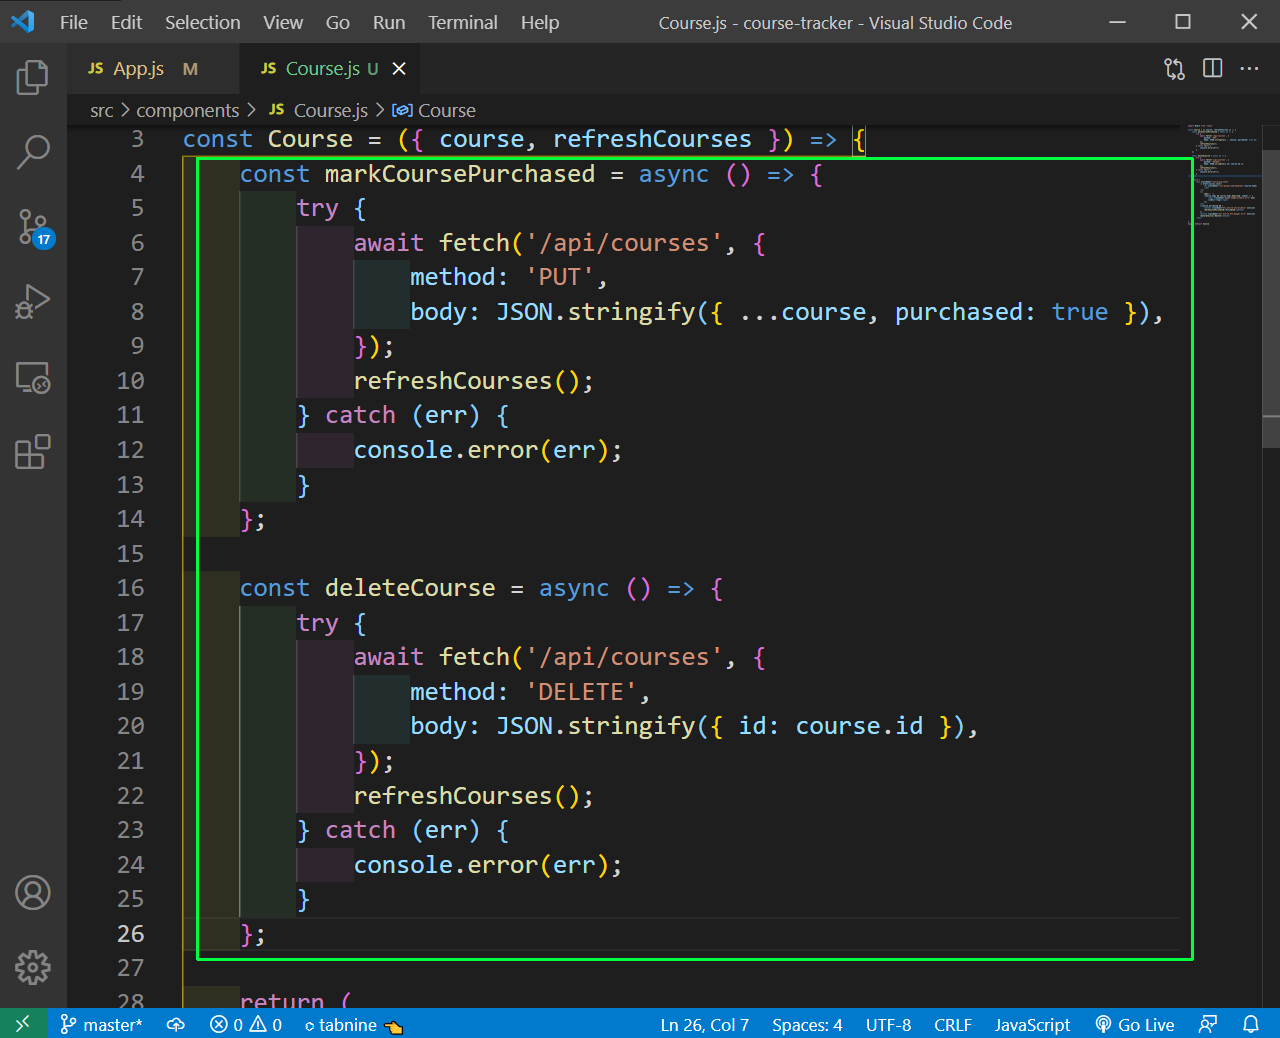 Course.js
Now, go back to localhost and click on purchase and it will move it. Also, the delete is working fine.
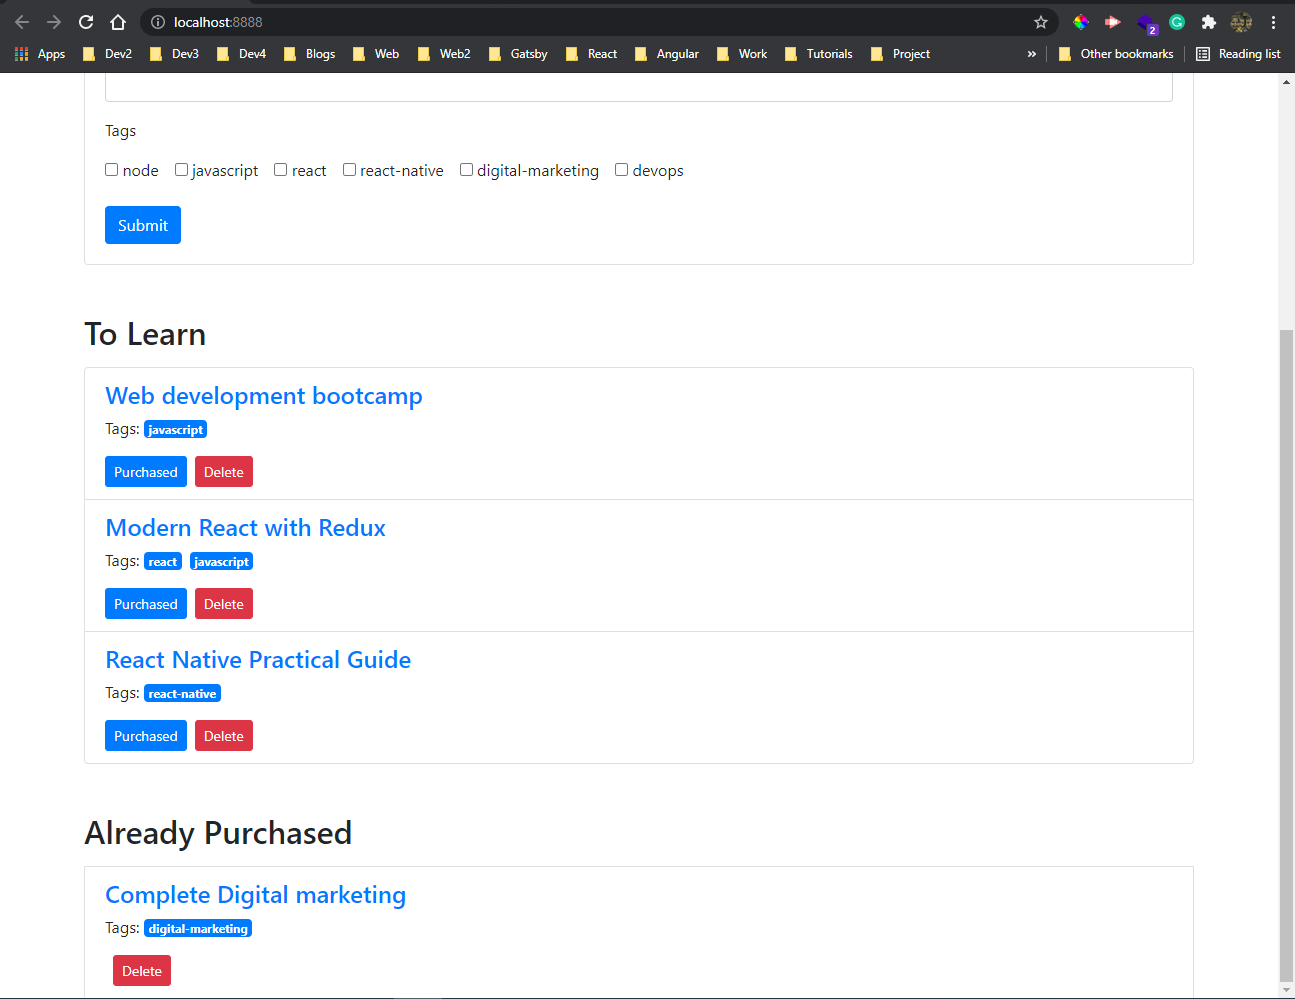 POST and DELETE
Next, we will push our code to github and deploy it. But first include the .env file in the .gitignore or else it will be pushed to github.
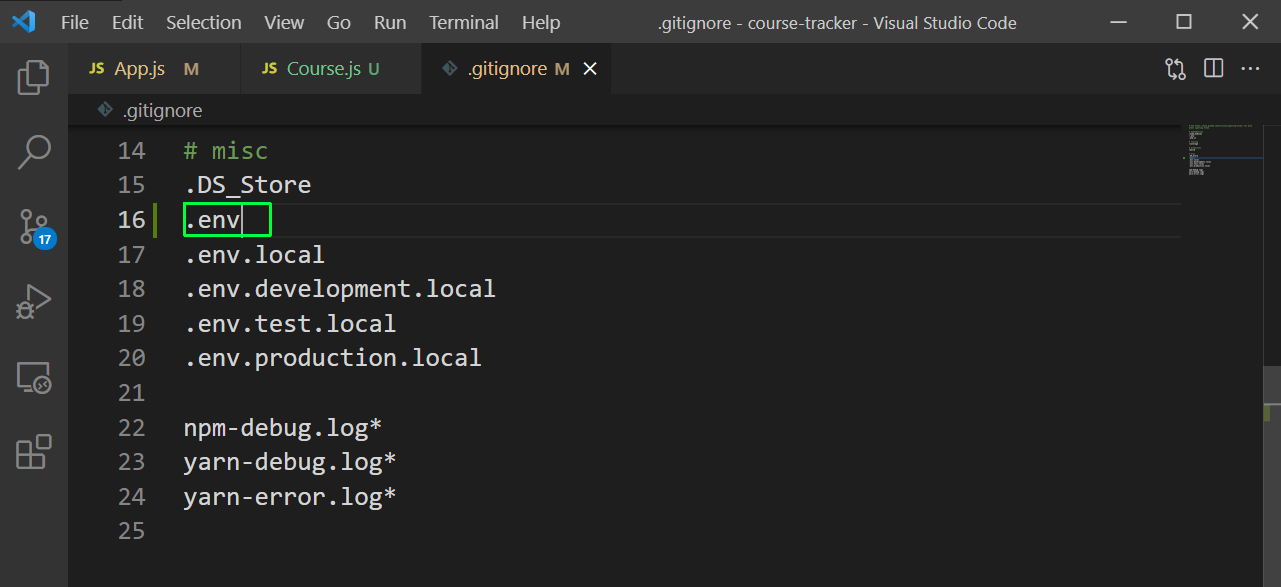 .gitignore
Now, login to your netlify account and click on New site from Git button
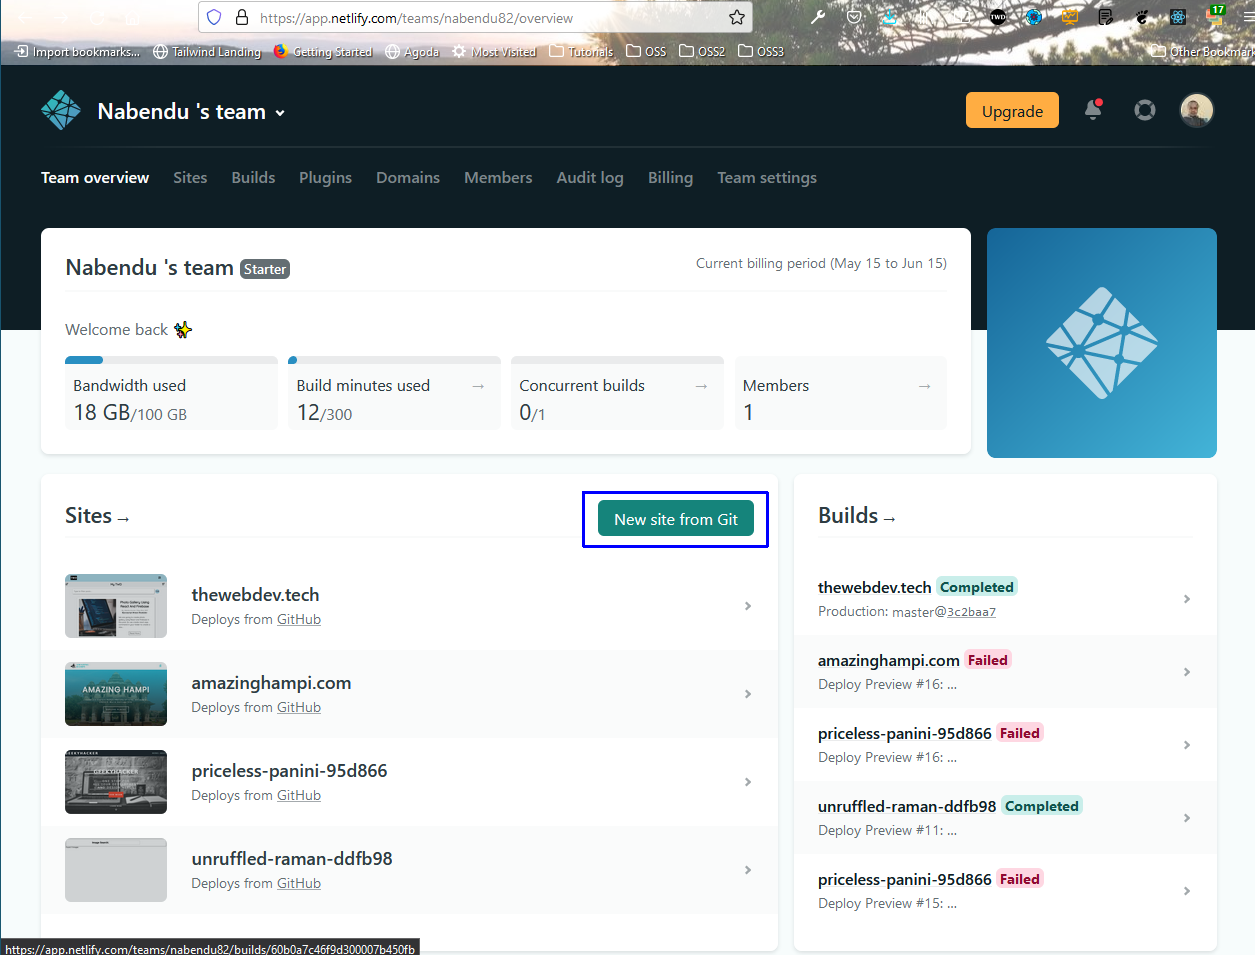 Netlify console
In this screen click on Github, since my code is deployed in github.
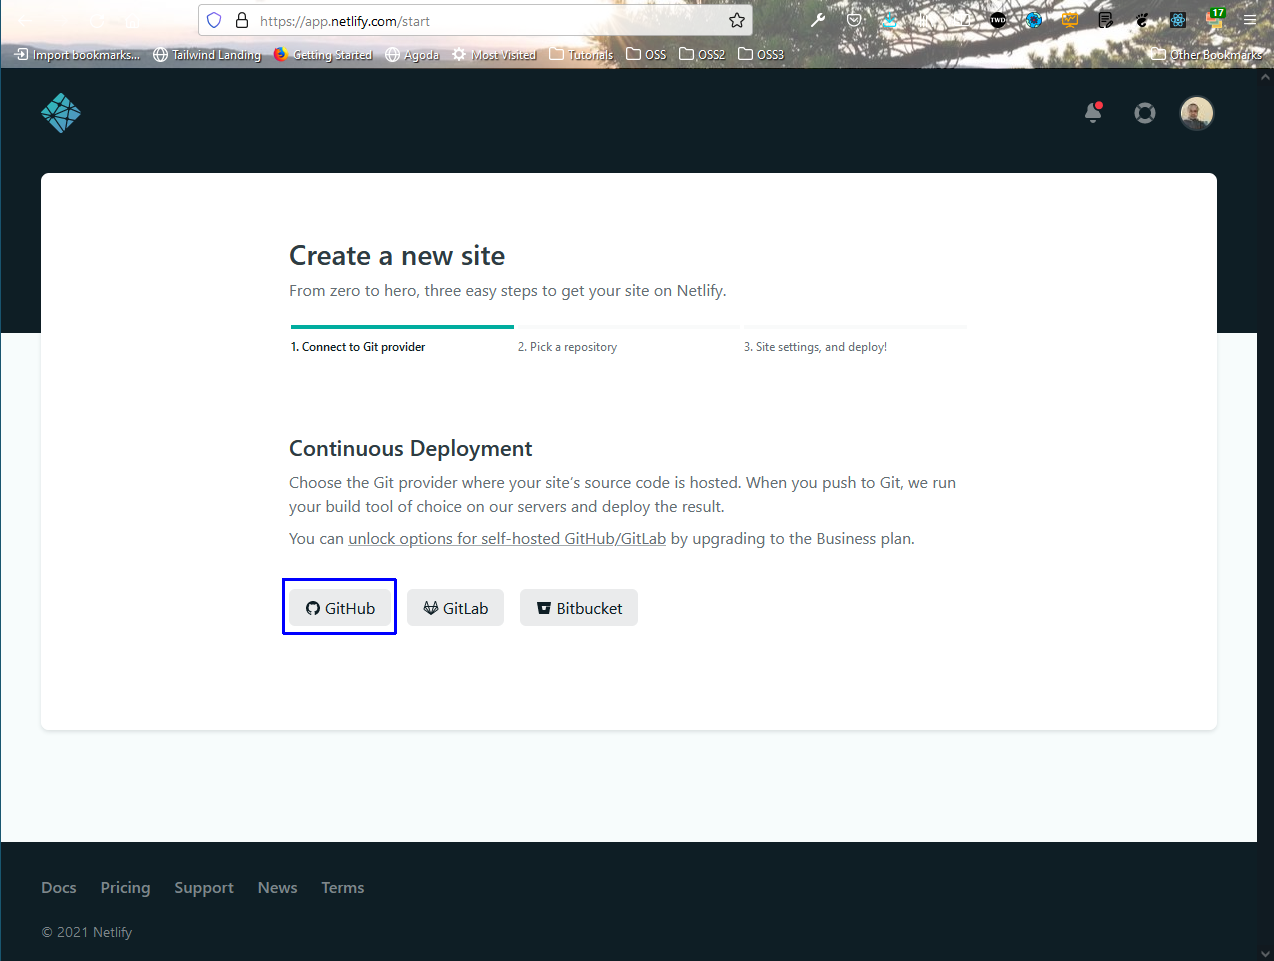 Github
Since, i have a lot of repos i need to search for the repo and click on it.
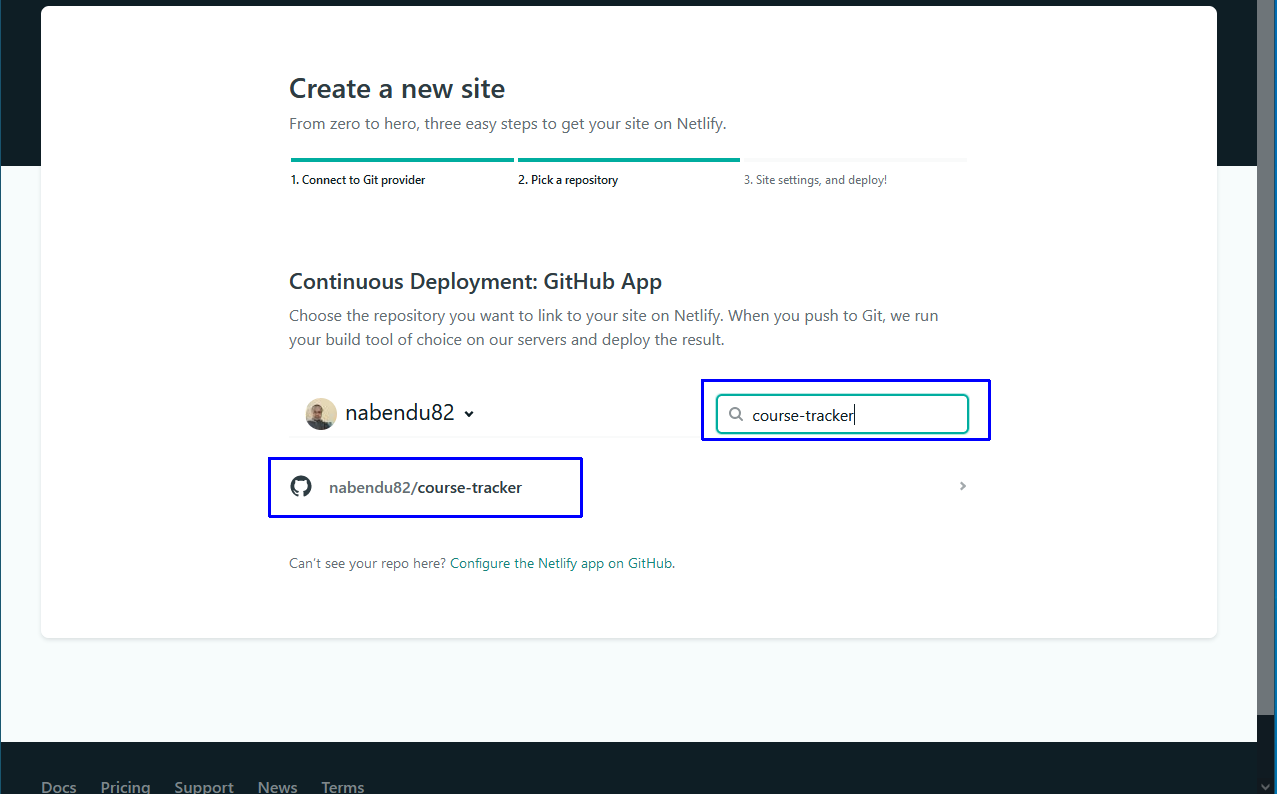 Course tracker
We need to update the Build command the directory and also give the environment variables in this screen.
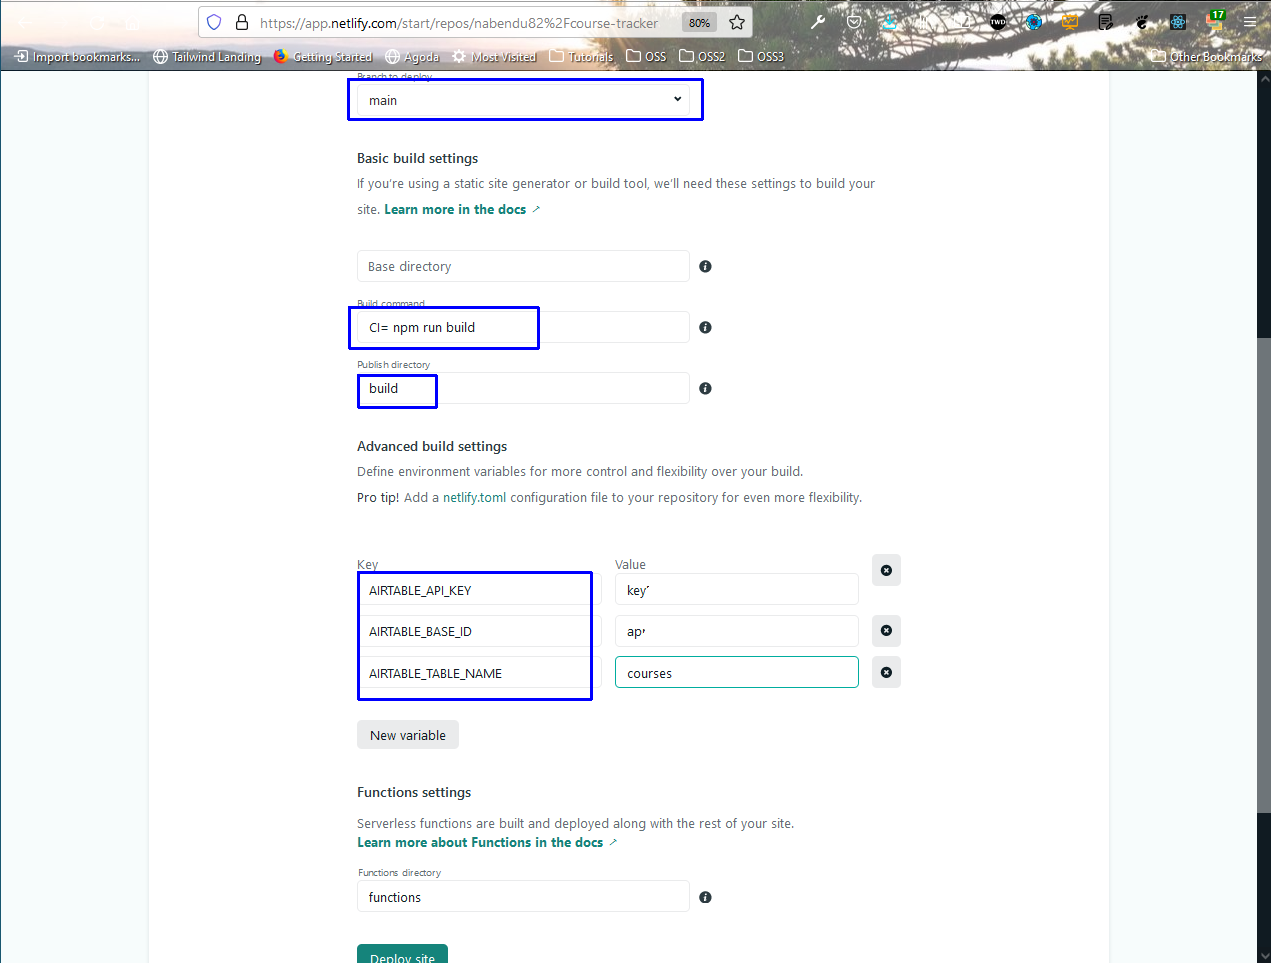 Next
Next
On hitting the Deploy Site, the side got deployed but was not getting the data from /api/courses as in localhost case, but from /.netlify/functions/courses
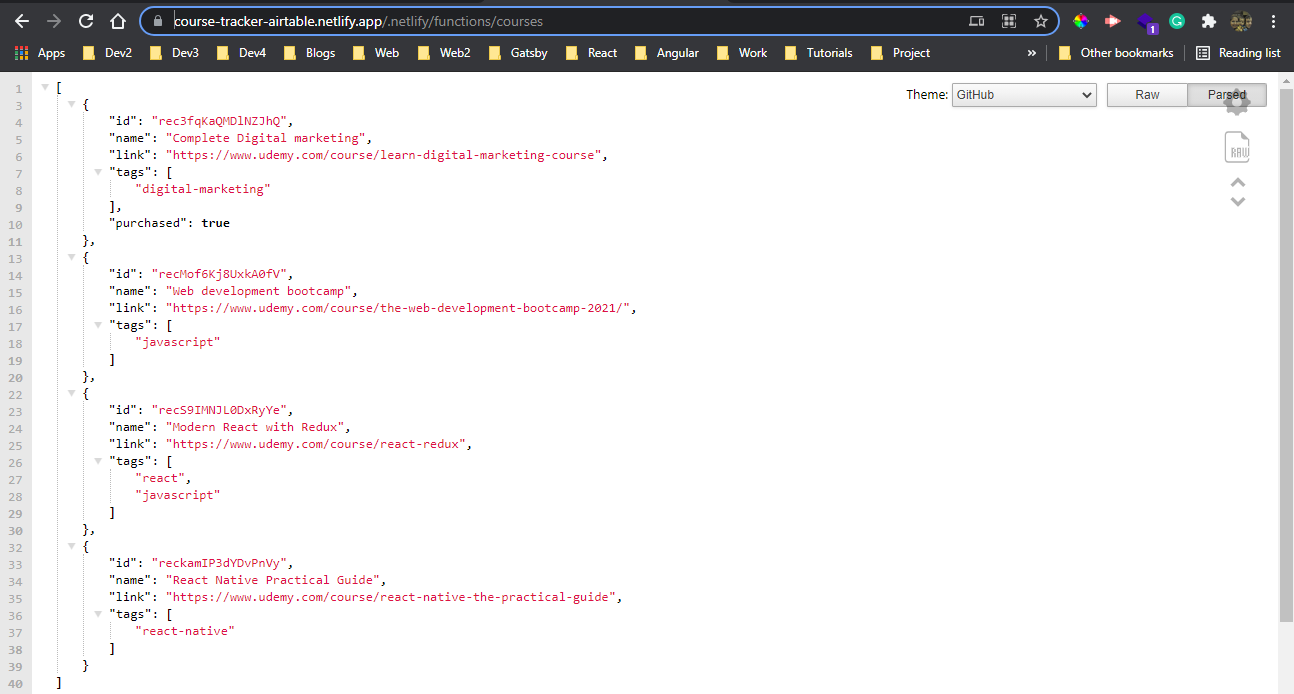 Correct endpoint
Now, in our code we need to update all the references of /api/courses to /.netlify/functions/courses and push to github, which triggers the deployment in netlify.
Also, it seems i missed a samll part in App.js which automatically loads all existing code.
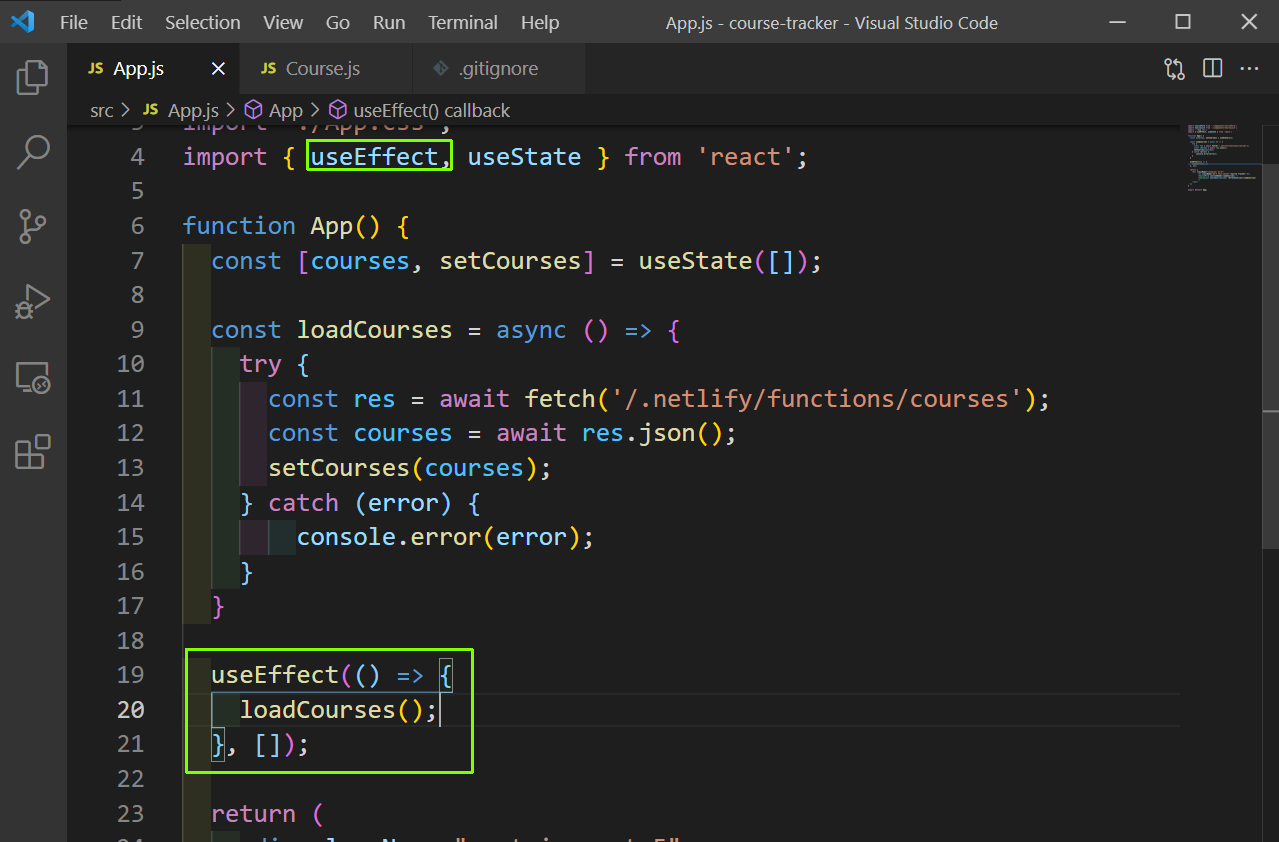 App.js
Our app is now working fine. You can find the code for the same here.
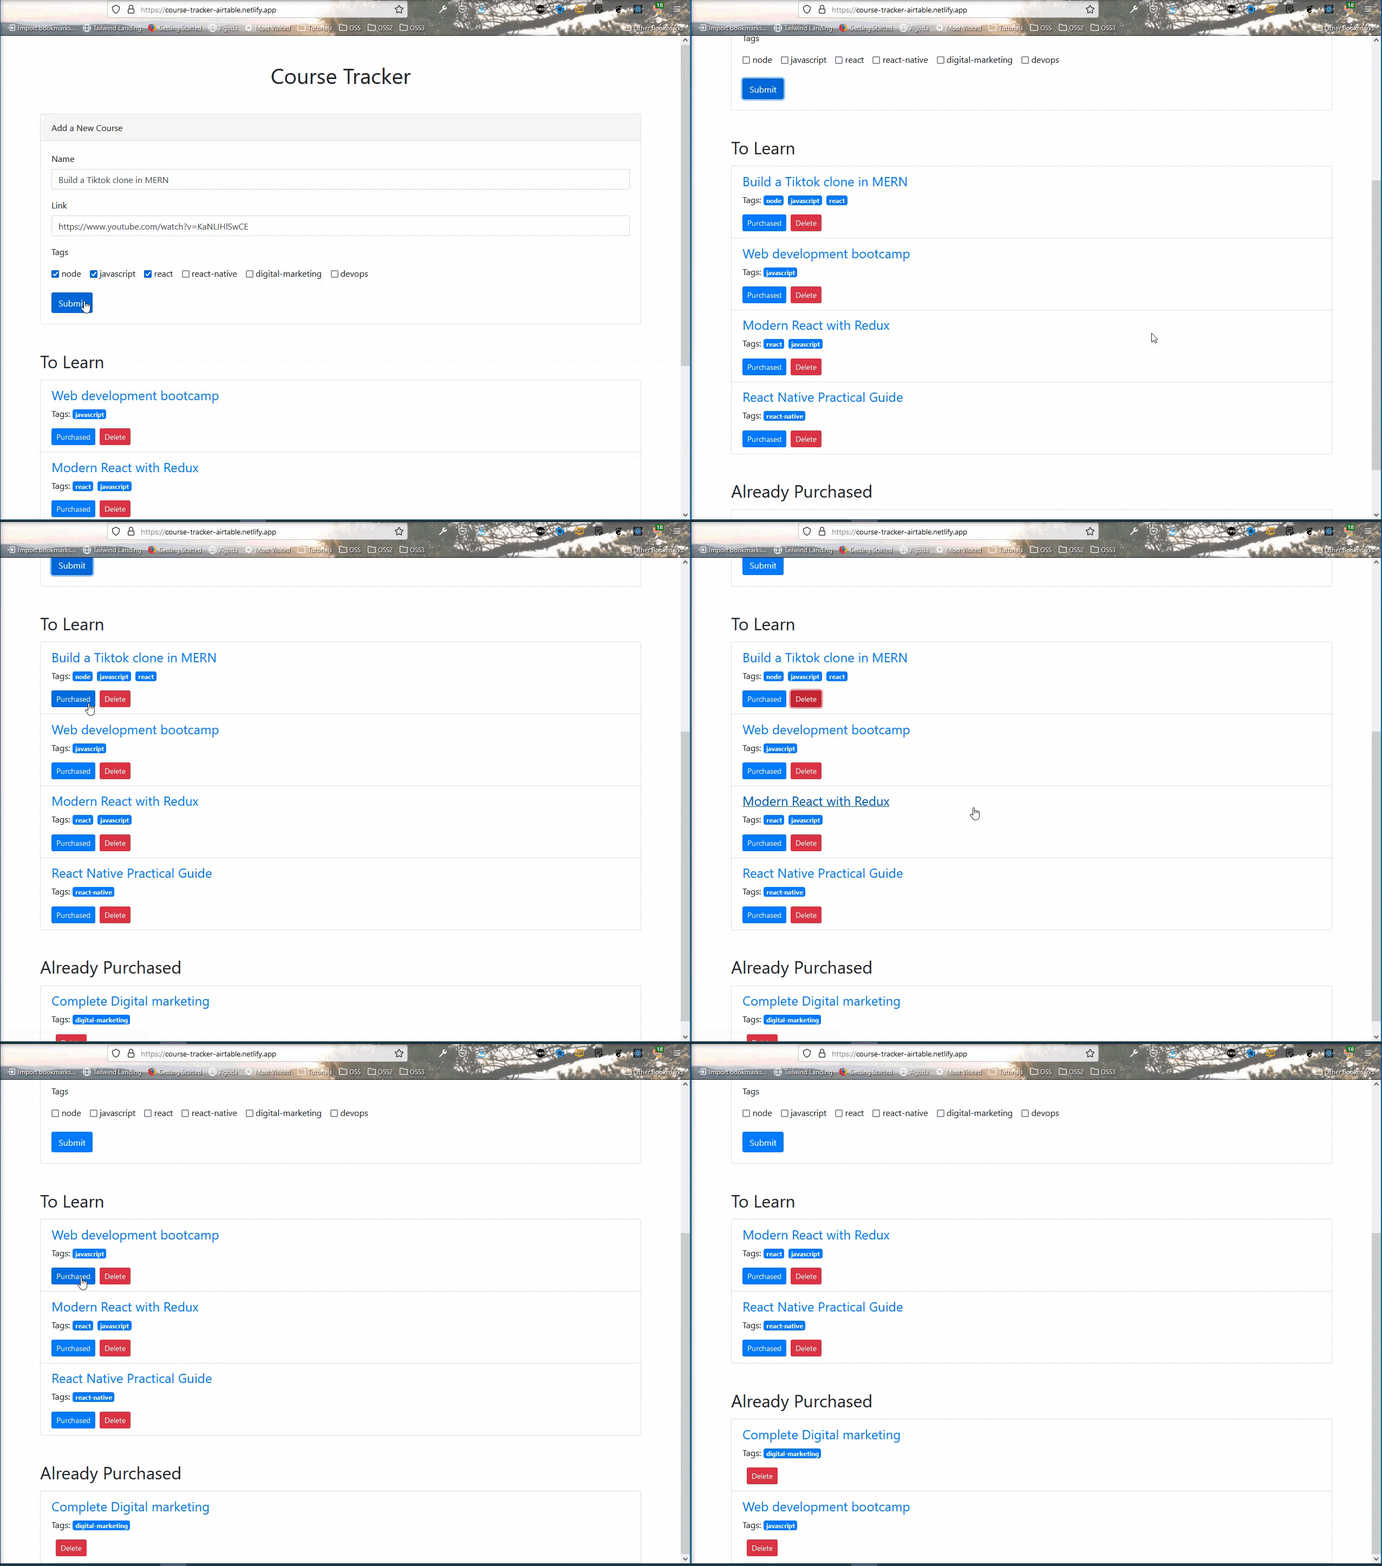 Working