HULU Website Clone using HTML, CSS, and Javascript
by Divya M C M / October 6th, 2021
#css #javascript #webdev
Building a clone of famous websites like hulu.com is really challenging and a good exercise for aspiring front-end developers. Here the challenge is to build out this landing page and get it looking as close to the design as possible.
This challenge focuses mostly on HTML & CSS. There’s a tiny bit of JS included for the Login.
Folder Structure of the project
- index.html — contains the HTML layout which defines the element structure that would be shown on the page.
- image folder — contains images used in our project.
- style.css — contains CSS code for styling. Using CSS we can style the different portions to make them more visually appealing.
- script.js — contains Javascript code.
- favicon.io — Browsers that provide favicon support typically display a page’s favicon in the browser’s address bar
We will take a look at the design of each section
Section 1 : Header
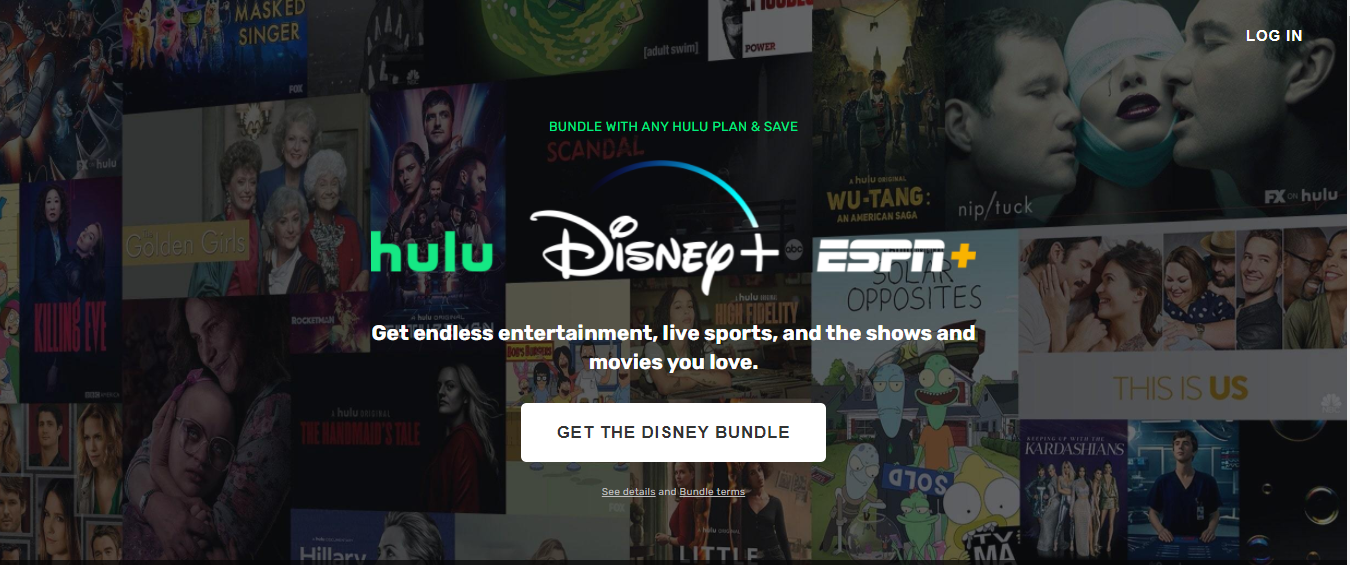 Header section
HTML
Open VSCode and create the basic HTML structure in an index.html file by ! and then pressing tab. Give the title as ‘HULU-CLONE’. Link style.css and script.js to the created HTML file.
We will create a div class top under header tag with the class name header. LOGIN button is placed under nav tag inside the list. Rest of the section is placed under the header_main class. we have a logos image. hulu, Disney and ESPN+ is an image. GET THE DISNEY BUNDLE is a button. header_1 class is for medium-sized text. terms class is for small sized text.
Refer the below HTML code
<header  class="header">

<div  class ="top">

<nav>

<ul>

<li>

<button  class="login">LOG IN</button>

</li>

</ul>

</nav>

<div  class="header_main">

<h4>BUNDLE WITH ANY HULU PLAN & SAVE</h4>

<img  src="image/logos.png"  class="logo">

<div  class="header_1">Get endless entertainment, live sports, and

the shows and movies you love.</div>

<button  class="btn btn-1">GET THE DISNEY BUNDLE</button>

<div  class="terms">  <span  class="terms_1">See details</span>

<span  class="terms_2"> and </span><span  class="terms_1">Bundle terms</span></div>

</div>

</div>
CSS
Use the font-family:Rubik, sans-serif which is close to the one used in original hulu website. The background of this section is an image header.jpg. One more point to note here is hovering on the button GET THE DISNEY BUNDLE the opacity will change.
Refer the below CSS code
@import url('https://fonts.googleapis.com/css2?family=Rubik:wght@300;400;600;700&display=swap');


*{

box-sizing: border-box;

margin: 0;

padding:0;

}


html,body{

font-family:'Rubik', sans-serif ;

background: black;

color: white;

line-height: 1.7;

overflow-x: hidden;

}


a{

color:white;

text-decoration: none;

}


a.hover{

color:#ccc

}


ul{

list-style-type: none;

}


img{

width:100%;

}


.header{

background: url(./image/header.jpg) no-repeat center center / cover;

}


.top{

height: 510px;

}


.top  nav{

display:flex;

justify-content: flex-end;

padding: 20px  40px;

}


.top  nav  .login{

cursor:pointer;

background: none;

border: none;

color:white;

font-weight: bold;

letter-spacing: 1px;

}


.top  .logo{

width: 550px;

margin: 20px  0;

}


.top  .header_main{

display:flex;

flex-direction: column;

justify-content: flex-start;

align-items: center;

margin-top: 40px;

}


.top  .header_1{

font-size: 19px;

font-weight: bold;

width: 600px;

text-align: center;

line-height: 27px;

}


.btn{

display: inline-block;

background: white;

color: #333;

min-width: 135px;

padding: 18px  30px;

font-size: 13px;

font-weight:bold;

border: none;

border-radius: 5px;

letter-spacing: 1px;

cursor:pointer;

}


.btn-1{

margin-top: 25px;

}

.btn-1:hover{

opacity: 0.8;

}


.terms{

font-size: 9px;

color:rgb(190, 190, 190);

margin-top: 20px;

letter-spacing: 0.3px;

}


.terms_1{

text-decoration:underline;

}


h4{

color:#00ed82;

font-size: 12px;

letter-spacing: 0.3px;

font-weight:500;

}
Section 2: Sub-Header

HTML
Create a section tag with the class sub-header which contains the sub-header section. Hulu text in the above screenshot is an image so add img tag which holds the logo.png image. h4 and h3 will hold the header text. START A FREE TRIAL will be a button.
<section  class="sub-header">

<img  src="image/logo.png"  alt="logo"  class="logo-sub-header">

<div>

<h4>TRY UP TO ONE MONTH FREE</h4>

<h3>Here just for Hulu? Get thousands of TV shows and movies</h3>

</div>

<div>

<a  href="#"  class="btn btn-outline">START YOUR FREE TRIAL</a>

</div>

</section>

</header>
CSS
For dividing the sub-header into three sections we are using CSS grid which is divided in the below way.
grid-template-columns: 2fr 3fr 2fr;
START A FREE TRIAL will be a button on hover color will be changed to lighter shade.
/* SUB HEADER*/

a{
color:white;
text-decoration: none;
}

a.hover{
color:#ccc
}

.sub-header{

display: grid;

grid-template-columns: 2fr  3fr  2fr;

gap:40px;

align-items: center;

padding: 20px  40px;

background: linear-gradient(179.81deg, rgba(4,4,4,0.7) .17%, rgba(4,4,4,0.45) 85.02%, rgba(4,4,4,0.3) 112.52%) !important;

text-align: center;

justify-items: center;

}


h3{

margin-top: 5px;

font-size:23px;

font-weight:500;

width: 300px;

line-height: 27px;

}


.logo-sub-header{

width:100px;

align-items: center;

justify-self: flex-end;

}


.btn {

display: inline-block;

background: #fff;

color: #333;

min-width: 135px;

padding: 20px  32px;

font-size: 15px;

font-weight: 600;

line-height: 14px;

border: none;

border-radius: 5px;

letter-spacing: 1px;

cursor: pointer;

text-transform: uppercase;

}


.btn-outline{

background:none;

color: #fff;

border: 2px solid #fff;

padding:15px  30px;

}


.btn-outline:hover{

color: #fff;

border-color: #ccc;

justify-self: flex-start;

}
Section 3: Library
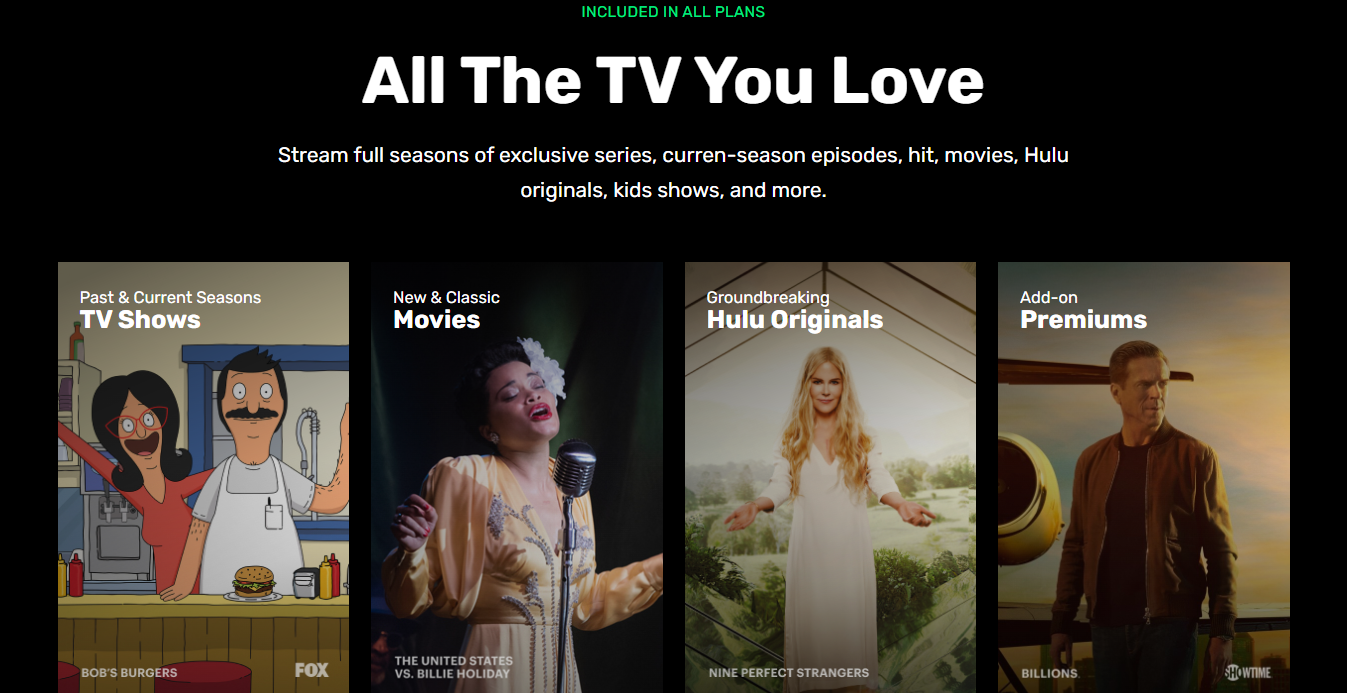
HTML
This section mainly will have categories that will be wrapped under the div class covers. Divided into 4 parts.text-li class is for bigger-sized text. sub-text class is for medium-sized text.
<section  class= "library">

<h4  class="library-h4">INCLUDED IN ALL PLANS</h4>

<div  class="text-li"> All The TV You Love</div>

<div  class="sub-text">

Stream full seasons of exclusive series, curren-season episodes,

hit,

movies, Hulu originals, kids shows, and more.

</div>


<div  class="covers">

<div  class="cover-1">

<div  class= "cover-grad"></div>

<div  class="cover-text">

<div  class="sub-title">Past & Current Seasons</div>

<h3  class="cover-sub-text">TV Shows</h3>

</div>

</div>


<div  class="cover-2">

<div  class= "cover-grad"></div>

<div  class="cover-text">

<div  class="sub-title">New & Classic</div>

<h3  class="cover-sub-text">Movies</h3>

</div>

</div>


<div  class="cover-3">

<div  class= "cover-grad"></div>

<div  class="cover-text">

<div  class="sub-title">Groundbreaking</div>

<h3  class="cover-sub-text">Hulu Originals</h3>

</div>

</div>


<div  class="cover-4">

<div  class= "cover-grad"></div>

<div  class="cover-text">

<div  class="sub-title">Add-on</div>

<h3  class="cover-sub-text">Premiums</h3>

</div>

</div>

</div>

</section>
CSS All 4 cover images are added as a background.
/*Categories*/

.library-h4{

font-size: 14px;

}


.text-li{

font-size: 60px;

font-weight: bolder;

letter-spacing: 0.1px;

}


.sub-text{

max-width:850px;

margin-bottom: 10px;

font-size: 19px;

width:750px;

}

.library{

display: flex;

flex-direction: column;

align-items: center;

text-align: center;

padding: 90px  40px;

justify-content:center ;

}


.library  .covers{

display: grid;

grid-template-columns: repeat(4,1fr);

margin-top: 40px;

gap:20px;

}


.library  .covers > div{

height: 400px;

width: 265px;

position: relative;

}


.library  .cover-grad{

background: linear-gradient(

156.82deg,

rgba(0, 0, 0, 0.6) 4.58%,

rgba(0, 0, 0, 0) 69.61%

),

linear-gradient(24.5deg, rgba(0, 0, 0, 0.2) 4.71%, rgba(0, 0, 0, 0) 71.49%);

position: absolute;

top: 0;

left: 0;

width: 100%;

height: 100%;


}


.library  .cover-text {

position: absolute;

top: 20px;

left: 20px;

text-align: left;

}

.library  .cover-1 {

background: url('./image/cover-1.jpg') no-repeat center center / cover;

}

.library  .cover-2 {

background: url('./image/cover-2.jpg') no-repeat center center / cover;

}

.library  .cover-3 {

background: url('./image/cover-3.jpg') no-repeat center center / cover;

}

.library  .cover-4 {

background: url('./image/cover-4.jpg') no-repeat center center / cover;

}


.cover-sub-text{

font-weight: bolder;

line-height: 4px;

}


.sub-title{

font-size: 15px;

}
Section 4: Live
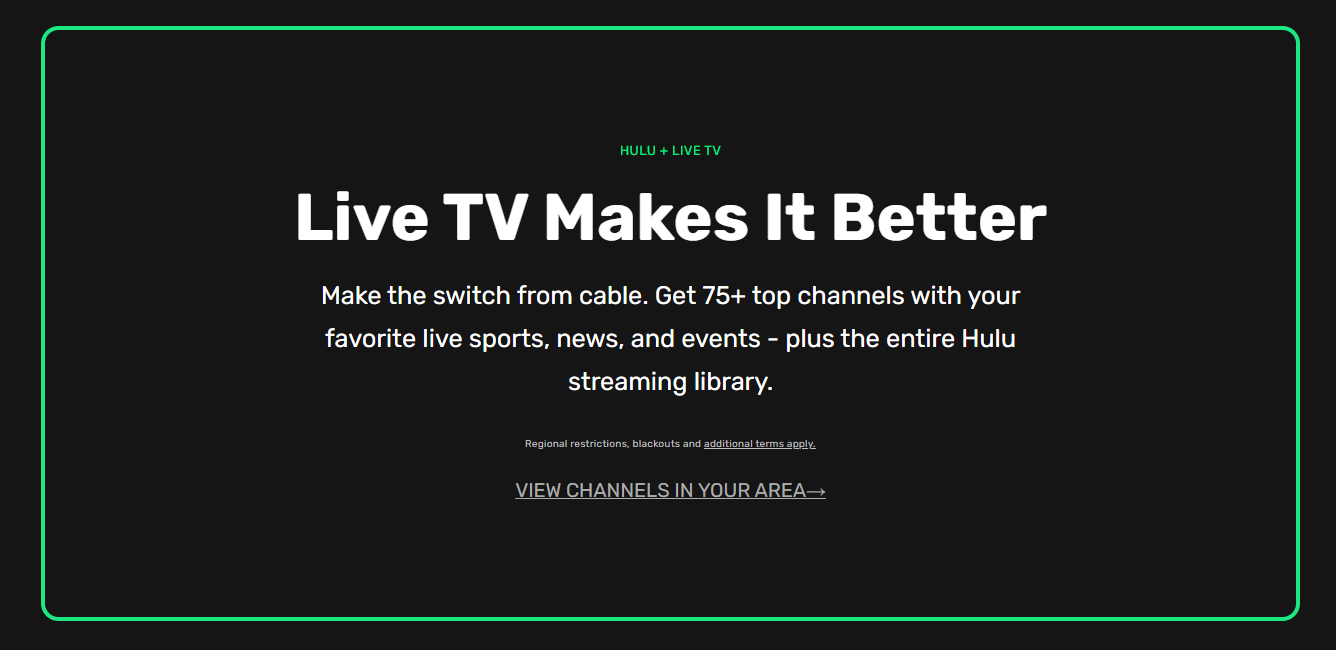
HTML
This section class called live will have mainly div class live-border. h4 for green text. The bigger text will be in the div class text-li. Medium size text in sub-text. The small-sized text under div class terms and contains anchor tag.
<!-- Live section -->

<section  class = "live">

<div  class ="live-border">

<h4> HULU + LIVE TV</h4>

<div  class="text-li">Live TV Makes It Better</div>

<div  class="sub-text">

Make the switch from cable. Get 75+ top channels with your favorite

live sports, news, and events - plus the entire Hulu streaming

library.

</div>

<div  class="terms">

<span  class="terms_2">Regional restrictions, blackouts and </span>

<span  class="terms_1">additional terms apply.</span>

</div>

<a  href="#">View Channels in Your Area→ </a>

</div>

</section>
CSS
/* Live */


.live {

background: #151516;

padding: 40px;

}

.live-border {

border: 4px solid #1ce783;

border-radius: 16px;

padding: 100px;

display: flex;

flex-direction: column;

align-items: center;

justify-content: center;

text-align: center;

}


.live  .sub-text{

font-size: 23px;

width: 640px;

}

.live  a {

text-transform: uppercase;

font-size: 18px;

margin-top: 20px;

text-decoration: underline;

color:rgb(172, 172, 172);

}
Section 5: Live Sports
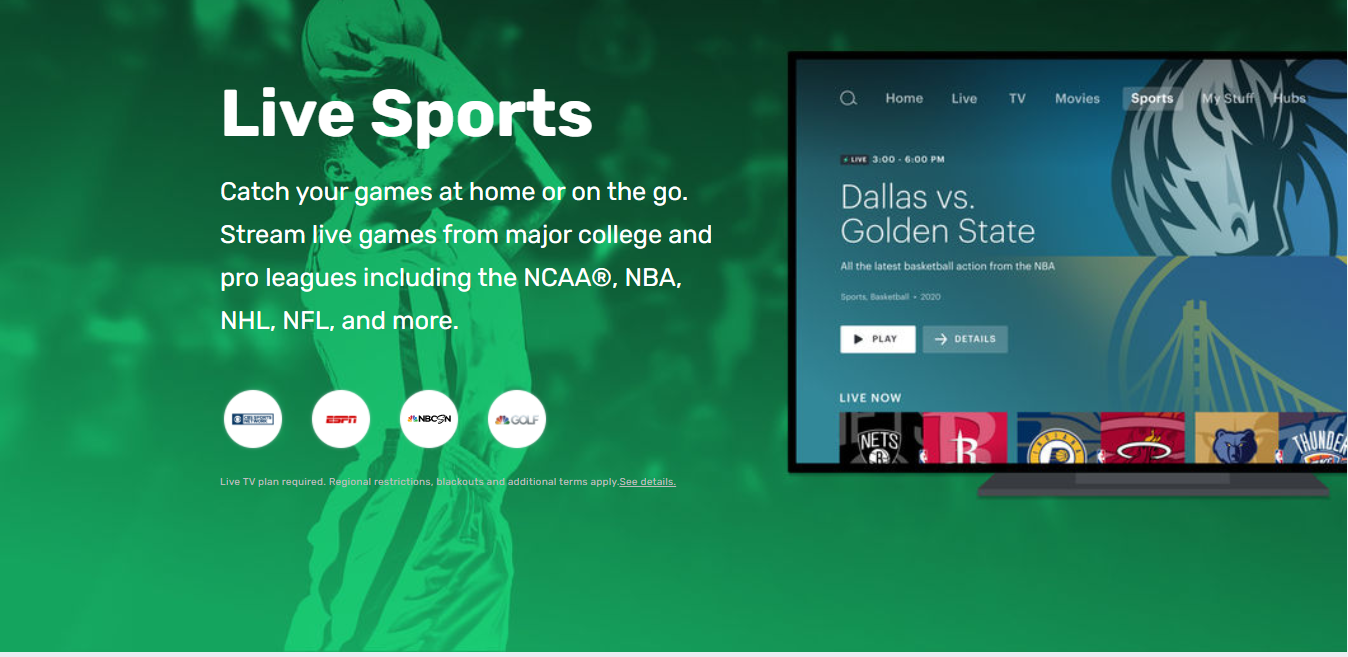
HTML
Div class live-sports wraps all the content of this section. The rest of the HTML and CSS is quite straightforward. There are four small logos under div class live-sports-logos. text-li holds big-sized text, sub-text holds medium-sized text and terms will hold the very small text.
<!-- Live Sports -->

<section  class="live-sports">

<div  class="live-sports-content">

<div  class="text-li">Live Sports</div>

<div  class="sub-text">

Catch your games at home or on the go. Stream live games from major

college and pro leagues including the NCAA®, NBA, NHL, NFL, and more.

</div>


<div  class="live-sports-logos">

<div>

<img  src="image/live-sports-logo-1.png"  alt=""  />

</div>

<div>

<img  src="image/live-sports-logo-2.png"  alt=""  />

</div>

<div>

<img  src="image/live-sports-logo-3.svg"  alt=""  />

</div>

<div>

<img  src="image/live-sports-logo-4.png"  alt=""  />

</div>

</div>


<div  class="terms">

Live TV plan required. Regional restrictions, blackouts and additional

terms apply.<span  class="terms_1">See details.</span>

</div>

</div>

</section>
CSS
/* live-sports */


.live-sports {

background: url('image/live-sports.jpg') no-repeat center center / cover;

height: 700px;

position: relative;

}

.live-sports-content {

position: absolute;

top: 160px;

left: 200px;

max-width: 550px;

}

.live-sports-logos {

width: 300px;

margin-top: 40px;

display: flex;

align-items: center;

justify-content: space-between;

}

.live-sports-logos > div {

background: url('../image/network-logo-bg.png') no-repeat center center / cover;

height: 60px;

width: 60px;

display: flex;

justify-content: center;

align-items: center;

}

.live-sports-logos  img {

width: 40px;

}


.live-sports  .sub-text{

font-size: 23px;

width: 450px;

}
Section 6: footer

HTML
This section will be under the footer tag. div class footer-container wraps the whole footer. This will contain lists that hold anchor tags and also we have div class social icons to hold Facebook, Twitter, Instagram, and youtube icons.
<footer  class="footer">

<div  class="footer-container">

<div  class="footer-lists">

<ul>

<li  class="list-head">BROWSE</li>

<li><a  href="#">Streaming Library</a></li>

<li><a  href="#">Live TV</a></li>

<li><a  href="#">Live News</a></li>

<li><a  href="#">Live Sports</a></li>

</ul>

<ul>

<li><a  href="#">TV Shows</a></li>

<li><a  href="#">Movies</a></li>

<li><a  href="#">Originals</a></li>

<li><a  href="#">Networks</a></li>

<li><a  href="#">Kids</a></li>

<li><a  href="#">FX on Hulu</a></li>

</ul>

<ul>

<li><a  href="#">Hulu, Disney+, and ESPN+</a></li>

<li><a  href="#">Disney Bundle</a></li>

<li><a  href="#">HBO Max</a></li>

<li><a  href="#">Cinimax</a></li>

<li><a  href="#">Showtime</a></li>

<li><a  href="#">STARZ</a></li>

</ul>

<ul>

<li  class="list-head">HELP</li>

<li><a  href="#">Account & Billing</a></li>

<li><a  href="#">Plans & Pricing</a></li>

<li><a  href="#">Supported Devices</a></li>

<li><a  href="#">Accesibility</a></li>

</ul>

<ul>

<li  class="list-head">ABOUT US</li>

<li><a  href="#">Press</a></li>

<li><a  href="#">Jobs</a></li>

<li><a  href="#">Contact</a></li>

</ul>

</div>

<div  class="divider"></div>


<div  class="social-icons">

<a  href="#"><img  src="image/facebook.svg"  alt=""  /></a>

<a  href="#"><img  src="image/twitter.svg"  alt=""  /></a>

<a  href="#"><img  src="image/youtube.svg"  alt=""  /></a>

<a  href="#"><img  src="image/instagram.svg"  alt=""  /></a>

</div>

</div>

</footer>
CSS
/* Footer */

.footer {

background: #ebedf2;

color: #333;

}

.footer  a {

color: rgb(107, 107, 107);

font-size: 12px;

}

.footer-container {

max-width: 1100px;

margin: auto;

padding: 40px;

}

.footer-lists {

display: flex;

justify-content: space-between;

}

.footer-lists  .list-head {

text-transform: uppercase;

font-weight: 600;

margin-bottom: 5px;

font-size: 12px;

}


.divider {

width: 100%;

height: 3px;

border-top: 1px #ccc solid;

margin: 30px  0;

}

.social-icons  img {

width: 25px;

height: 25px;

margin-right: 25px;

}
Section 7: Modal
HTML
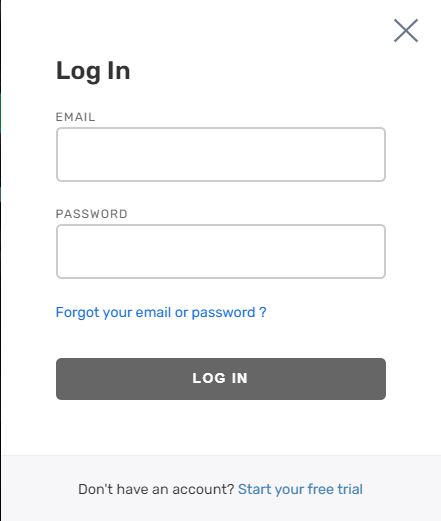
This section is for the modal which opens after clicking on LOGIN button. The implementation also contains javascript code for the opening and closing of the modal.
<div  class="modal">

<div  class="modal-box">

<div  class="modal-body">

<h3>Log In</h3>

<form>

<div  class="form-control">

<label  for="email">Email</label>

<input  type="email"  id="email"  />

</div>

<div  class="form-control">

<label  for="password">Password</label>

<input  type="password"  id="password"  />

</div>

<p><a  href="#">Forgot your email or password ?</a></p>

<button  class="btn btn-dark">Log In</button>

</form>

</div>

<div  class="modal-footer">

<p>Don't have an account? <a  href="#">Start your free trial</a></p>

</div>

<img  class="close"  src="image/close.svg"  alt="close"  />

</div>

</div>
CSS
Added an animation using Keyframes while opening the modal
/* Modal */

.modal {

display: none;

position: fixed;

top: 0;

left: 0;

z-index: 1;

height: 100%;

width: 100%;

background: rgba(0, 0, 0, 0.5);

}

.modal-box {

margin: 10% auto;

width: 400px;

background: #fff;

color: #333;

position: relative;

animation: modalopen 1s;

}

@keyframes modalopen {

from {

opacity: 0;

}

to {

opacity: 1;

}

}

.modal-body {

padding: 50px;

font-size: small;

}

.modal-body  h3 {

font-weight: 600;

}

.modal-body  .btn {

width: 100%;

margin-top: 30px;

padding: 12px ;

font-size: small;

}

.modal  .close {

cursor: pointer;

height: 23px;

width: 23px;

position: absolute;

top: 20px;

right: 20px;

}

.modal  .modal-footer {

background: #f7f7f9;

color: #333;

padding: 20px  0;

border-top: #eee 1px solid;

text-align: center;

font-size: small;

}

.modal  .modal-footer  a {

color: steelblue;

font-size: small;

}


form  a{

color: #176EE1;

font-size: small;

}

/* Form */

.form-control {

margin: 20px  0;

}

.form-control  label {

display: block;

font-size: 11px;

text-transform: uppercase;

color:rgb(107, 107, 107);

letter-spacing: 1px;

}

.form-control  input {

width: 100%;

border: 2px #ccc solid;

border-radius: 5px;

height: 50px;

padding: 5px;

}

.btn-dark {

background: rgb(102, 102, 102);

color: #fff;

}
Javascript
Here we have three functions openModal which triggers when LOGIN button is clicked to open dialog box. closeModal when Close button in the modal is clicked which closes the modal and outsideClick function which closes the modal when clicked outside the modal.
const modal = document.querySelector('.modal')

const loginBtn = document.querySelector('.login')

const closeBtn = document.querySelector('.close')


loginBtn.addEventListener('click', openModal)

closeBtn.addEventListener('click', closeModal)

window.addEventListener('click', outsideClick)


function openModal() {

modal.style.display = 'block'

}


function closeModal() {

modal.style.display = 'none'

}


function outsideClick(e) {

if (e.target == modal) {

closeModal()

}

}
Demo
 click on the image to view the demo
Complete code available in GitHub
This is a modified version of the code from the Traversy Media