DOM Crash Course for Beginners -1
by Nabendu Biswas / August 29th, 2020
#javascript #beginners #webdev
Series: JS-DOM
After learning JavaScript in the previous series, we will learn about DOM(Document Object Model). It is been used to interact with every element of the HTML and can be used to even generate HTML on the fly.
Let’s create a new folder DOMbasics and three files index.html, styles.css and main.js inside it.
 DOMbasics
Since, this is a JavaScript DOM tutorial i am are not tell much about the html and css. So, go ahead and put the below in the index.html file.
    <!DOCTYPE html>
    <html lang="en">
      <head>
        <meta charset="UTF-8" />
        <meta name="viewport" content="width=device-width, initial-scale=1.0" />
        <meta http-equiv="X-UA-Compatible" content="ie=edge" />
        <title>JS For Beginners</title>
        <link rel="stylesheet" href="styles.css">
      </head>
      <body>
        <header>
          <h1>DOM For Beginners</h1>
        </header>

    <section class="container">
          <form id="my-form">
            <h1>Add User</h1>
            <div class="msg"></div>
            <div>
              <label for="name">Name:</label>
              <input type="text" id="name">
            </div>
            <div>
              <label for="email">Email:</label>
              <input type="text" id="email">
            </div>
            <input class="btn" type="submit" value="Submit">
          </form>

    <ul id="users"></ul>

    <!-- <ul class="items">
            <li class="item">Item 1</li>
            <li class="item">Item 2</li>
            <li class="item">Item 3</li>
          </ul> -->
        </section>

    <script src="main.js"></script>
      </body>
    </html>
And the below in styles.css file.
    * {
      margin: 0;
      padding: 0;
      box-sizing: border-box;
    }

    body {
      font-family: Arial, Helvetica, sans-serif;
      line-height: 1.6;
    }

    ul {
      list-style: none;
    }

    ul li {
      padding: 5px;
      background: #f4f4f4;
      margin: 5px 0;
    }

    header {
      background: #f4f4f4;
      padding: 1rem;
      text-align: center;
    }

    .container {
      margin: auto;
      width: 500px;
      overflow: auto;
      padding: 3rem 2rem;
    }

    #my-form {
      padding: 2rem;
      background: #f4f4f4;
    }

    #my-form label {
      display: block;
    }

    #my-form input[type='text'] {
      width: 100%;
      padding: 8px;
      margin-bottom: 10px;
      border-radius: 5px;
      border: 1px solid #ccc;
    }

    .btn {
      display: block;
      width: 100%;
      padding: 10px 15px;
      border: 0;
      background: #333;
      color: #fff;
      border-radius: 5px;
      margin: 5px 0;
    }

    .btn:hover {
      background: #444;
    }

    .bg-dark {
      background: #333;
      color: #fff;
    }

    .error {
      background: orangered;
      color: #fff;
      padding: 5px;
      margin: 5px;
    }
I had started the project with the help of Live Server extension and it looks like below.
 Live Server
Next, open your main.js file and in the browser open the console. We are logging out the window object. As we can see it contains many important things like alert, fetch, localStorage and document.
 window
Now, to grab a single element from the HTML, we can use the document.getElementById(). We have to pass the id name within quotes. And as shown in the console, we will get the form.
 getElementById()
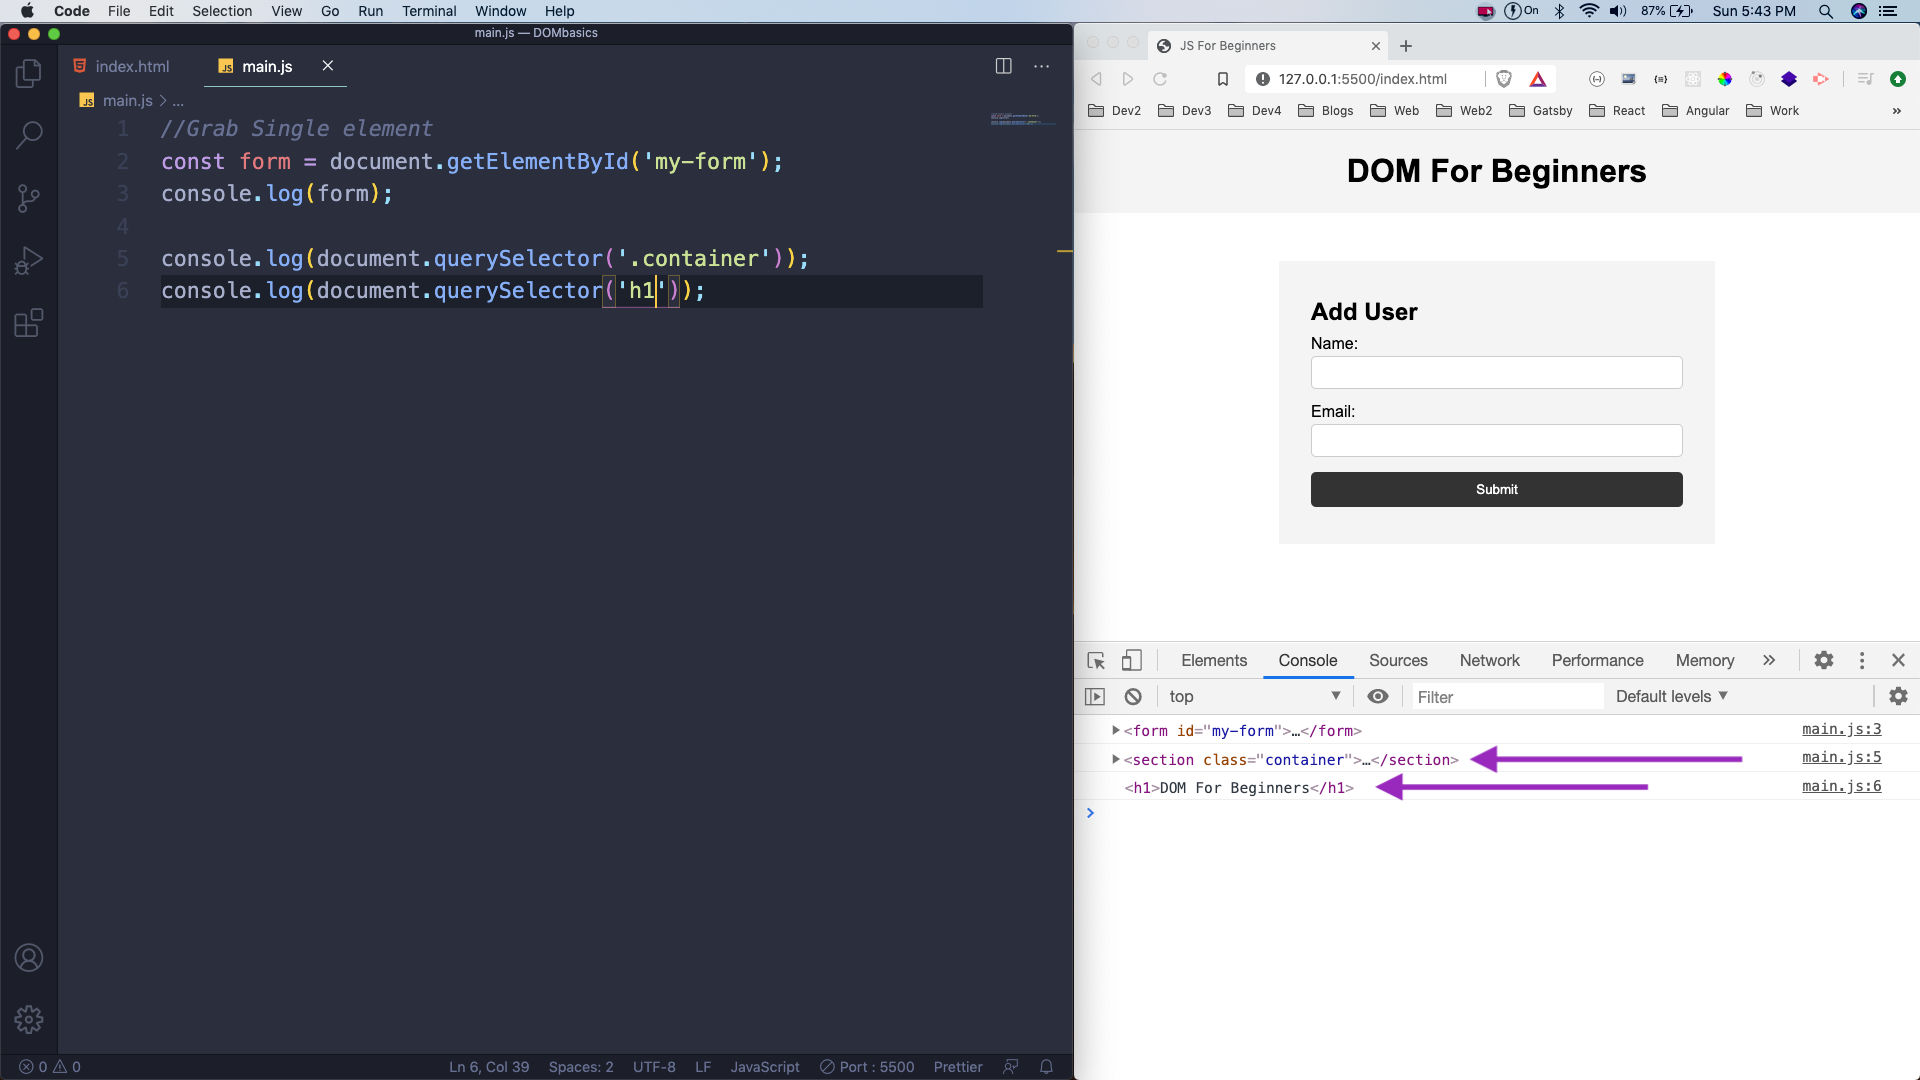
We also have document.querySelector() to get the single HTML element. Here, if we target a class we have to use dot(.) followed by class name. Similarly, for id we have to use hash(#) followed by id name. We can also directly target an element by using it’s name as h1.
 querySelector()
Open the index.html and uncomment the ul tags, as we are going to use them.
 ul tags
Now, we will learn how to select multiple items. The first thing is document.querySelectorAll(), which returns a NodeList of all matching items.
Here, we are targeting the all the item from the below in index.html file.
    <ul class="items">
            <li class="item">Item 1</li>
            <li class="item">Item 2</li>
            <li class="item">Item 3</li>
     </ul>
 item
item
Now, to select multiple items we also have document.getElementsByClassName() and document.getElementsByTagName()
 getElements
As you might have noticed above they returns HTMLCollection, instead of NodeList as in querySelectorAll()
Now, this have a huge drawback, because higher order array methods like forEach doesn’t works directly on HTMLCollection. But we can use them on NodeList, as shown in below figure.
 NodeList
But if we convert the variable containing the HTMLCollection to an array, we can use forEach in it.
We are converting colItems into array by using Spread operator.
 Spread
This completes part-1 of the series. You can find code for the same here.