Building a Recipe Book app in Angular-1
by Nabendu Biswas / November 29th, 2021
#javascript #angular #webdev
We are going to build a recipe book app by using the concepts of Angular we learnt earlier. This app will be build in multiple posts, so keep a look for other posts.
Now, go to any folder in your computer and in the terminal type the below command to create the Angular project.
ng new recipe-book --no-strict
It will ask us a bunch of questions. Let’s answer them as mentioned below.
 recipe-book
Next, we will add bootstrap(version 3) in our project by giving the below command.
npm i bootstrap@3
Next, we need to add styles for bootstrap in angular.json file.
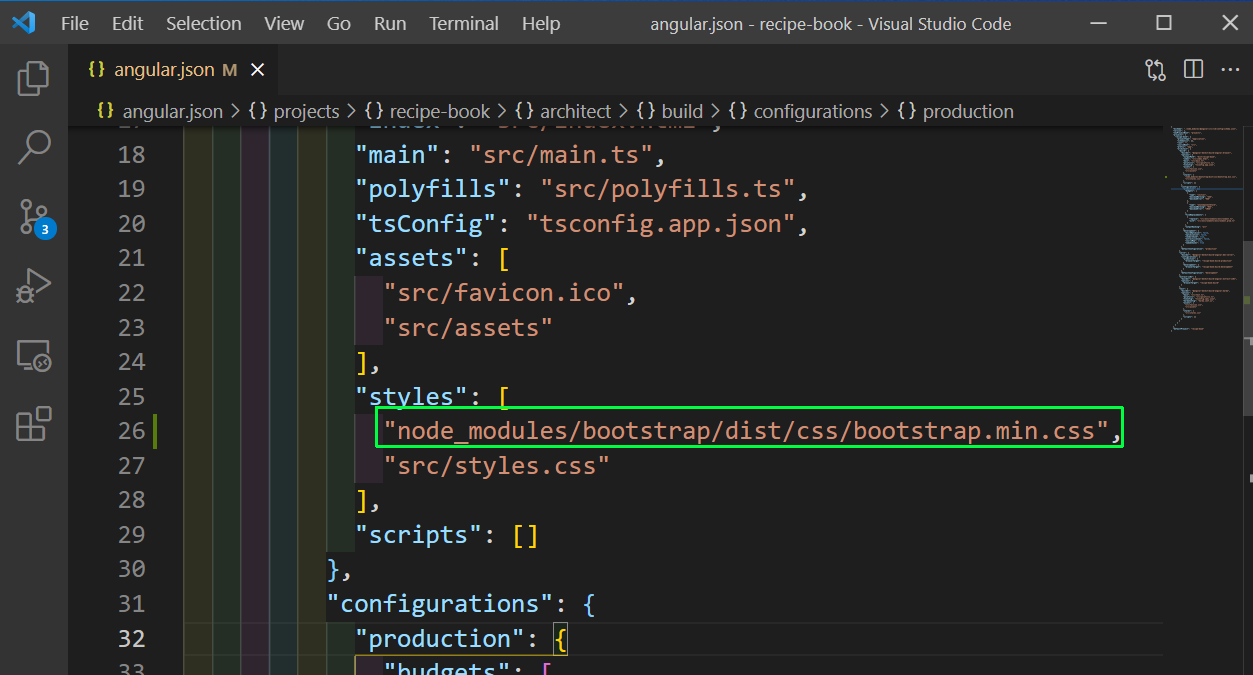 angular.json
Now, make sure that ng serve is running. Create a header component with below command in src->app folder.
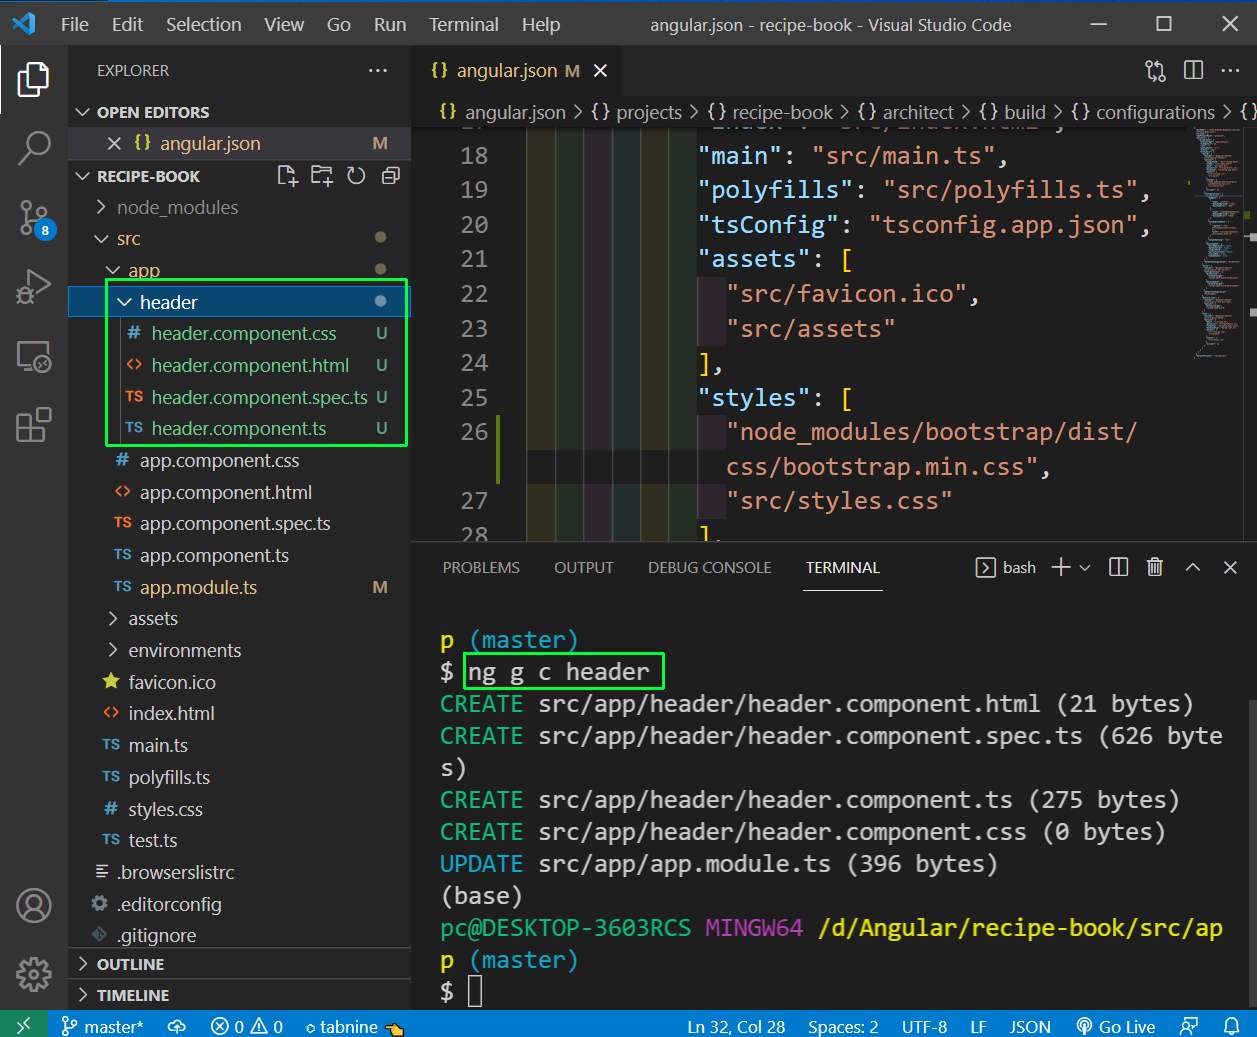 ng g c header
Now, go to app.component.html file and remove everything and add the below code.
<app-header></app-header>
<div class="container">
  <div class="row">
    <div class="col-md-12">
      <p>App component</p>
    </div>
  </div>
</div>
Now, let’s create the complete structure by giving the below commands.
ng g c recipes
ng g c recipes/recipe-detail
ng g c recipes/recipe-list
ng g c recipes/recipe-list/recipe-item
ng g c shopping-list
ng g c shopping-list/shopping-edit
Next, we will get the basic structure of the project. First add the below in app.component.html file.
<app-header></app-header>
<div class="container">
  <div class="row">
    <div class="col-md-12">
      <app-recipes></app-recipes>
      <app-shopping-list></app-shopping-list>
    </div>
  </div>
</div>
Next, in recipes.component.html file add the below.
<div class="row">
    <div class="col-md-5">
        <app-recipe-list></app-recipe-list>
    </div>
    <div class="col-md-7">
        <app-recipe-detail></app-recipe-detail>
    </div>
</div>
Now, in recipie-list.component.html add the below.
<app-recipe-item></app-recipe-item>
Lastly in shopping-list.component.html add the below.
<div class="row">
    <div class="col-xs-10">
        <app-shopping-edit></app-shopping-edit>
        <hr>
        <p>The List</p>
    </div>
</div>
Now, our basic app with bootstrap styles look like below.
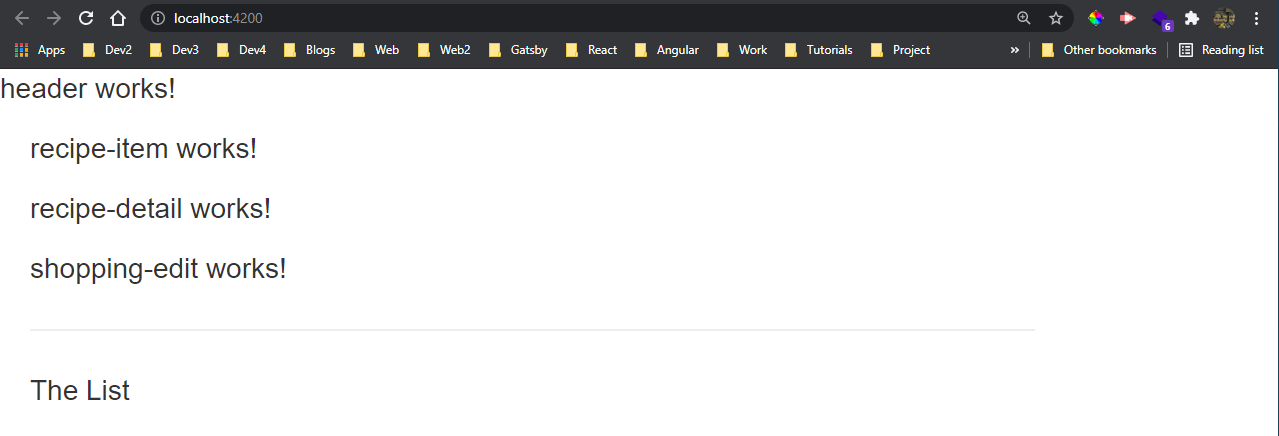 bootstrap
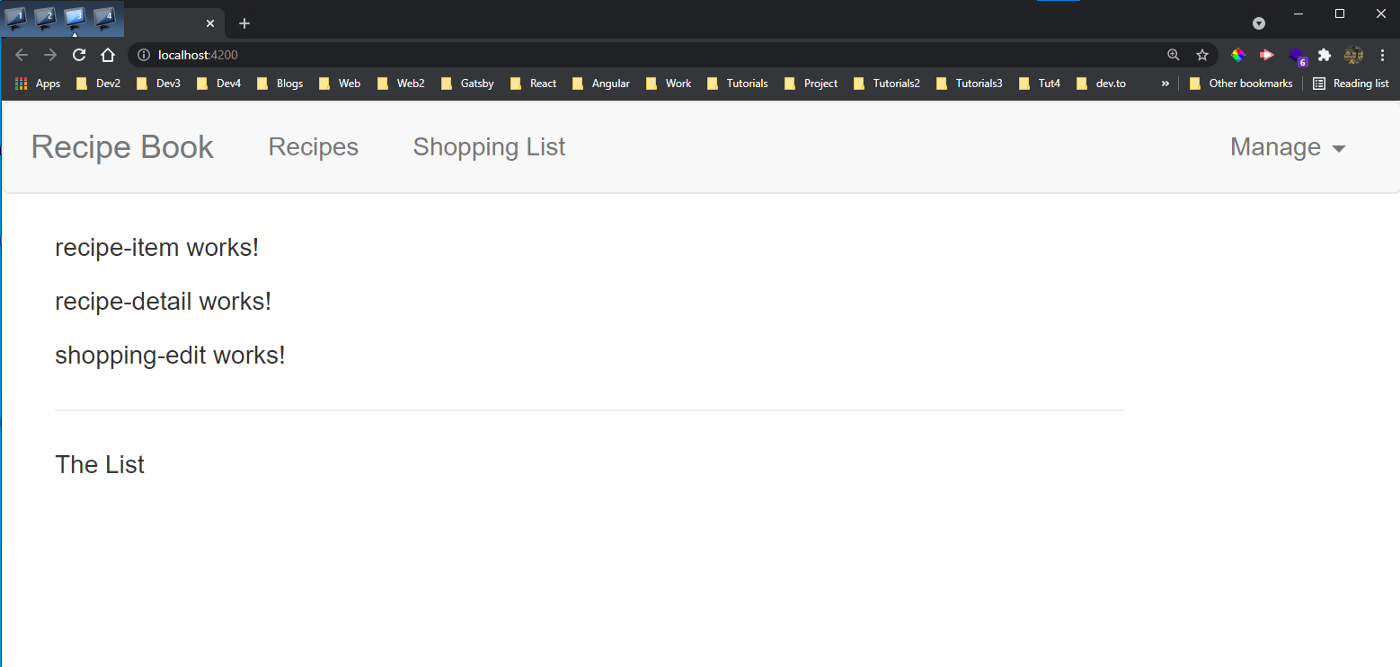
Now, first we will work on the header to make it look nice. Add the below in header.component.html file. It is basically taken from bootstrap and is a navbar code.
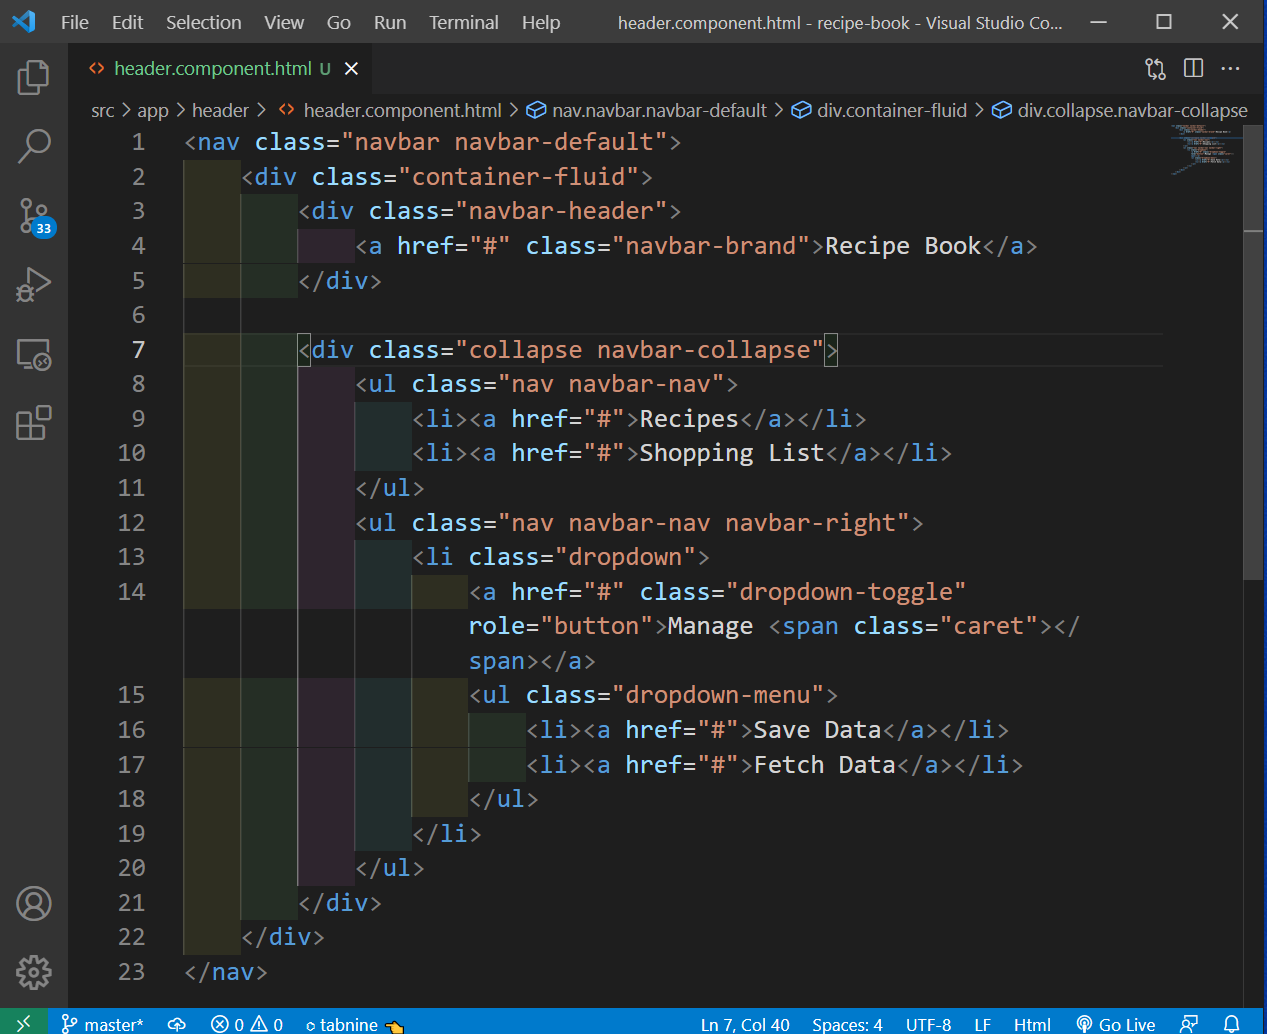 header.component.html
Now, we will see this nice header in localhost.
 header
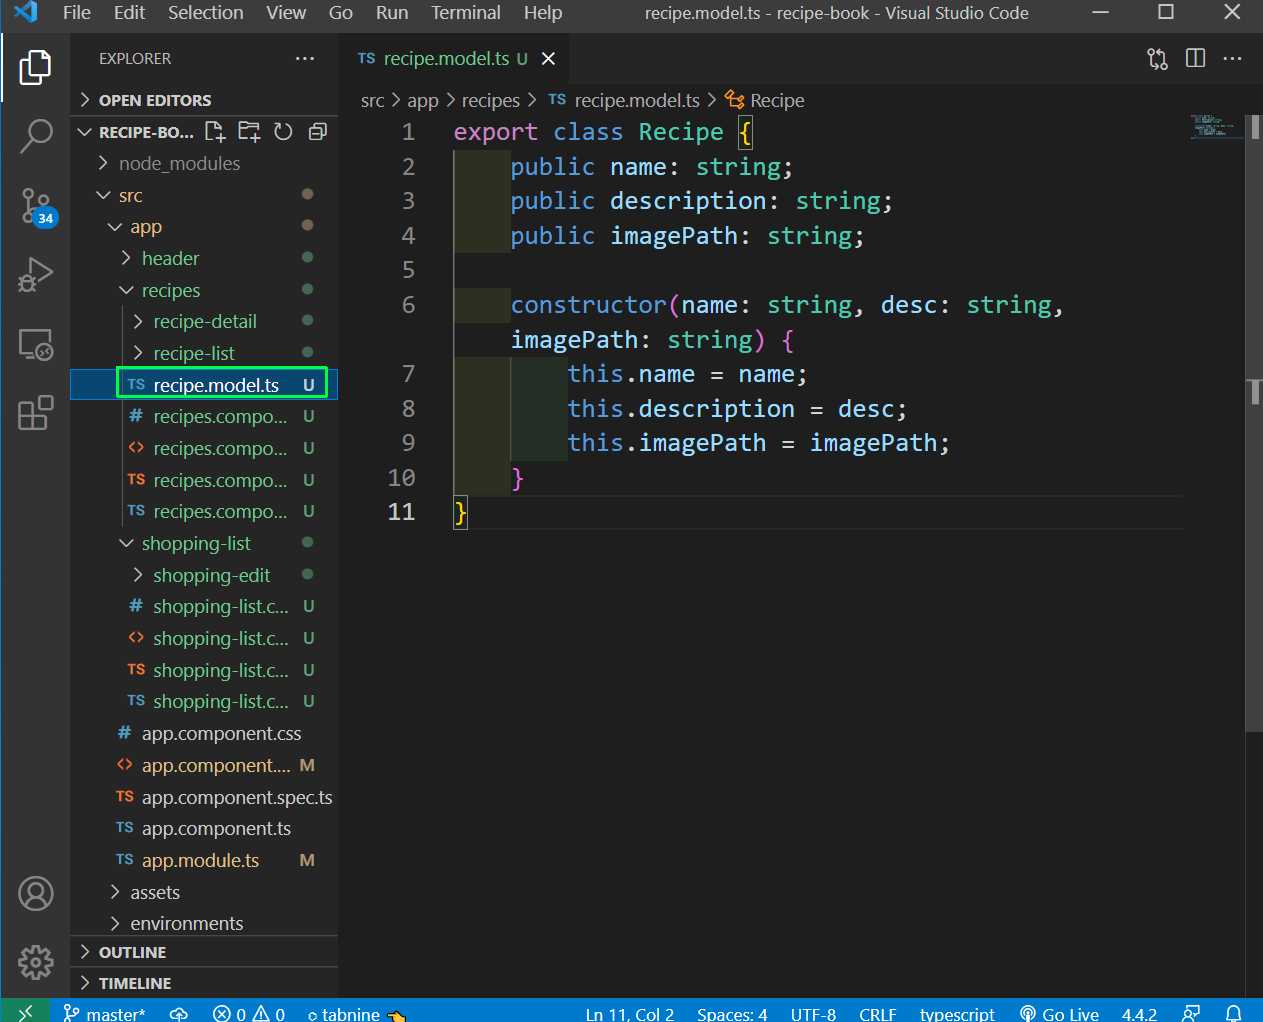
We will have a common recipe model for our project. So, create a file recipe.model.ts in recipes folder and add the below content in it.
 recipe.model.ts
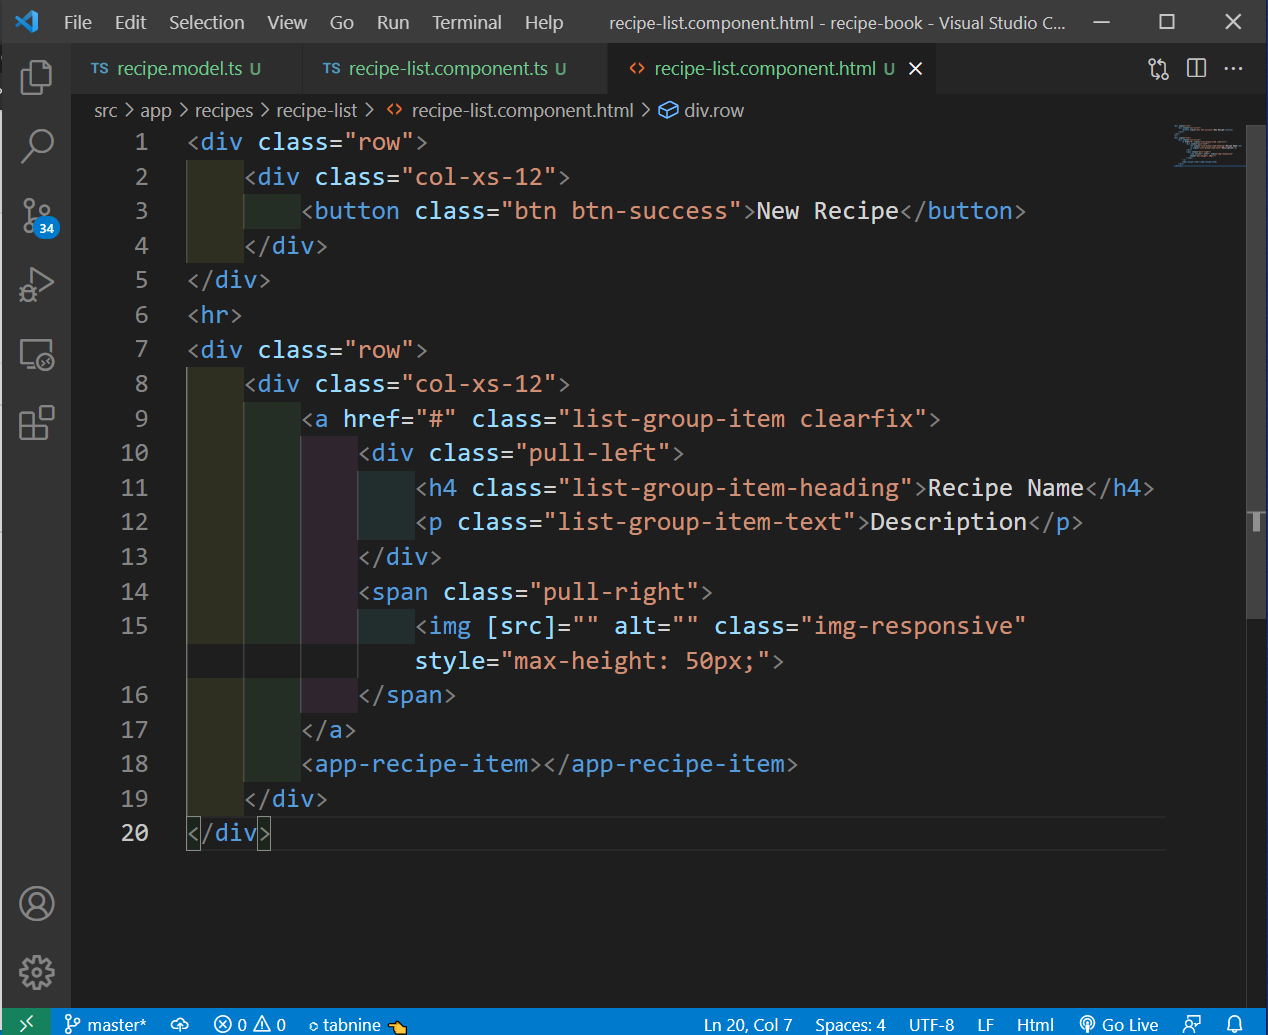
Next, we will update the code for recipe-list.component.html file. Here, we are just adding the skeleton to show a button and name and description of the recipe.
 recipe-list.component.html
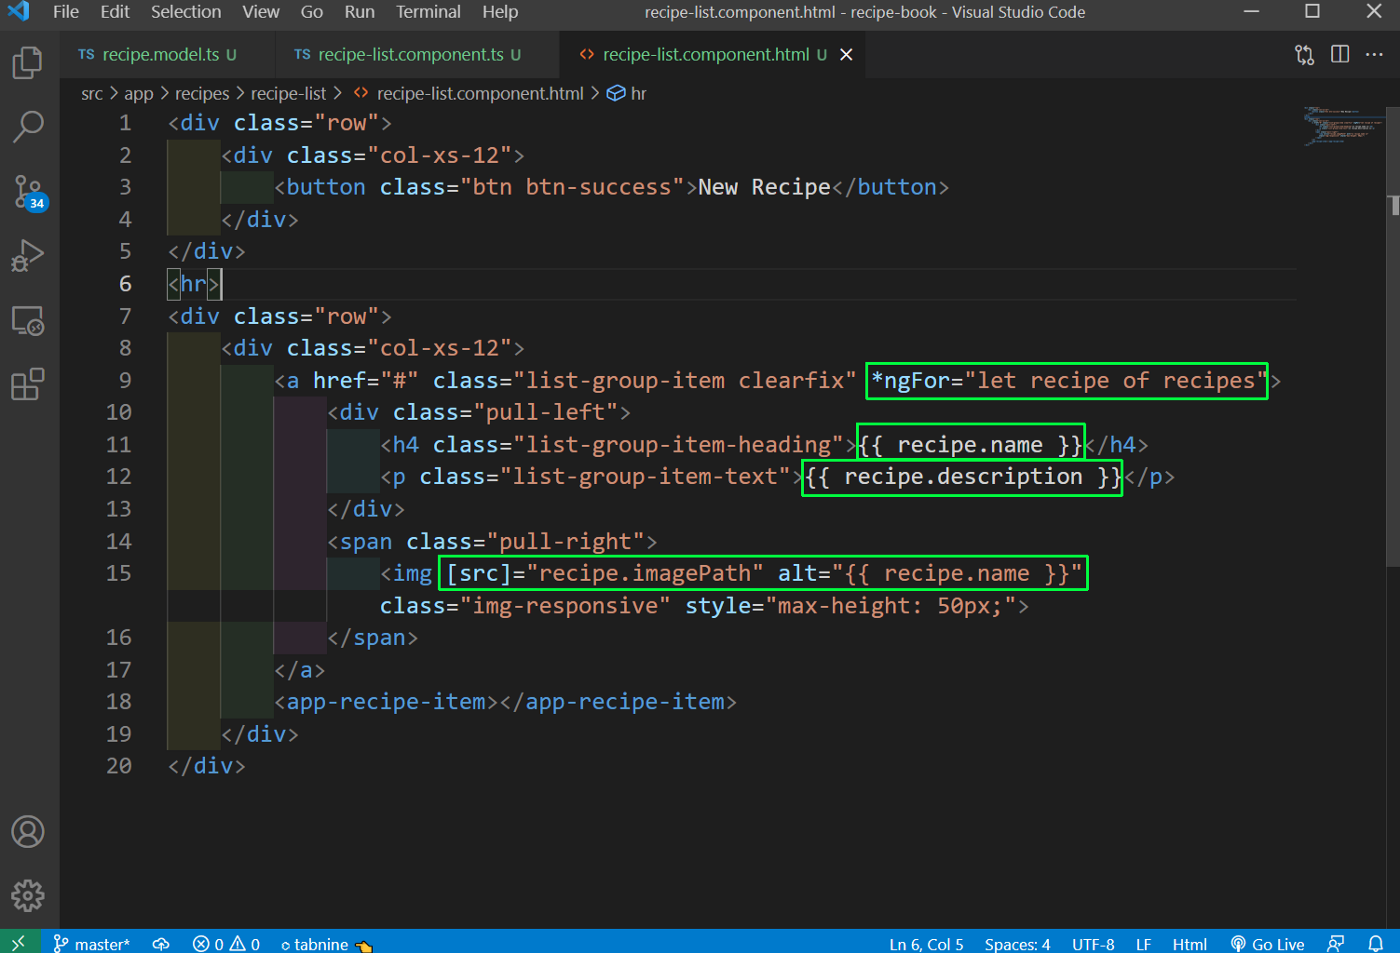
Now, we will complete the bindings for the recipe-list.component.html file.
 recipe-list.component.html
Now, our two recipes are showing properly.
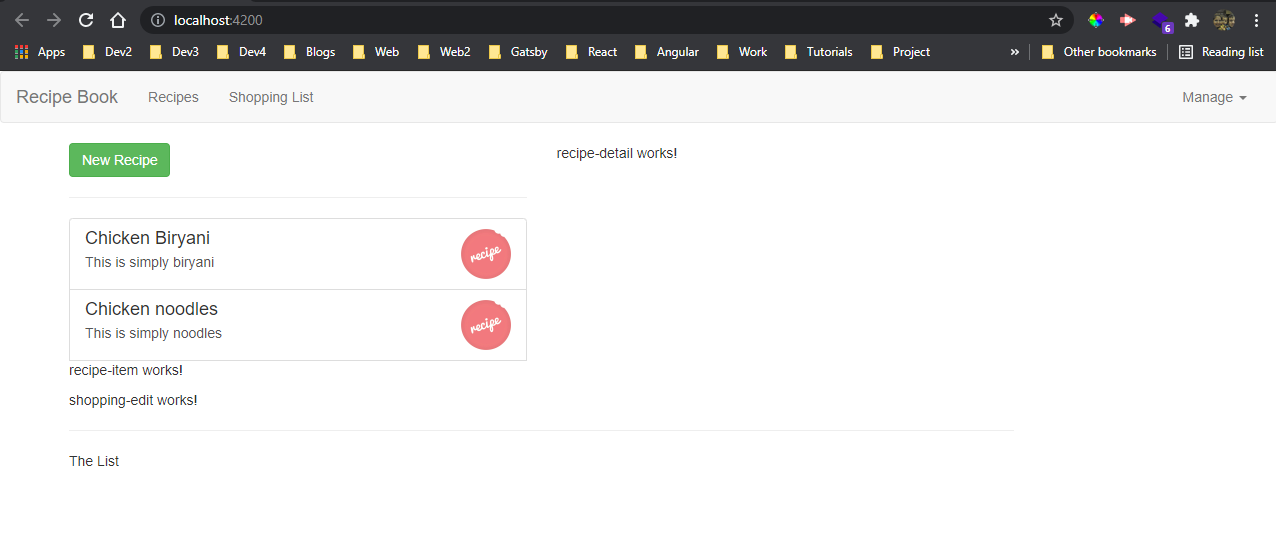 Two recipes
Now, we will add the code for recipe-detail.component.html , which is again a static code now. It contains details of each recipe.
<div class="row">
    <div class="col-xs-12">
        <img src="" alt="" class="img-responsive">
    </div>
</div>
<div class="row">
    <div class="col-xs-12">
        <h1>Recipe Name</h1>
    </div>
</div>
<div class="row">
    <div class="col-xs-12">
        <div class="btn-group">
            <button type="button" class="btn btn-primary dropdown-toggle">Manage Recipe <span class="caret"></span></button>
            <ul class="dropdown-menu">
                <li><a href="#">To Shopping List</a></li>
                <li><a href="#">Edit Recipe</a></li>
                <li><a href="#">Delete Recipe</a></li>
            </ul>
        </div>
    </div>
</div>
<div class="row">
    <div class="col-xs-12">
        Description
    </div>
</div>
<div class="row">
    <div class="col-xs-12">
        Ingredients
    </div>
</div>
Now, our app is looking more perfect with the Recipe details.
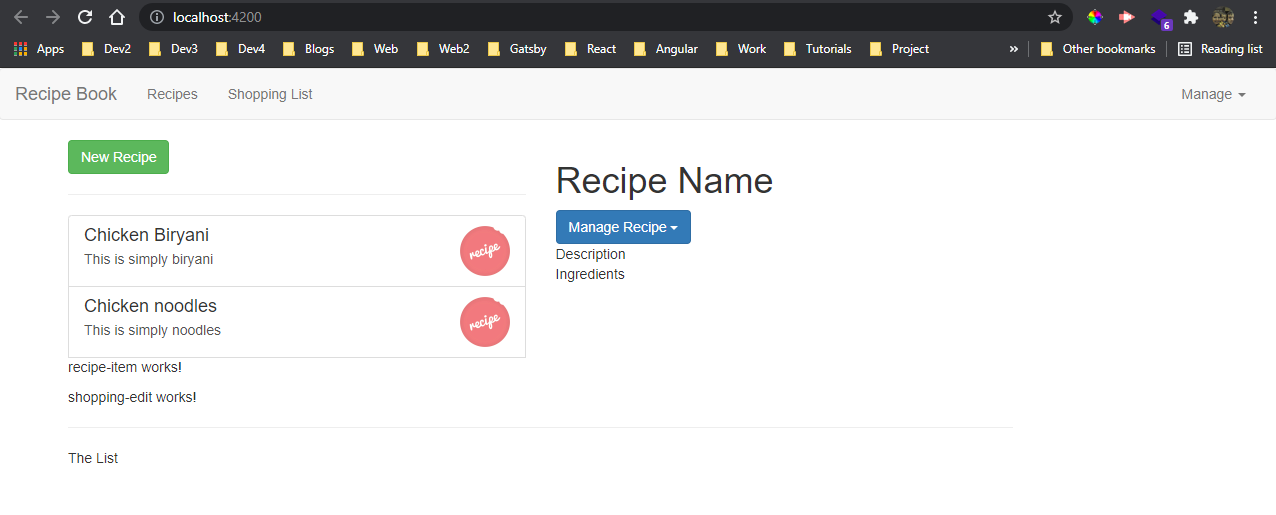 Details
Now, we will work on the shopping-list.component.html file which will contain ingredient.
But first we need to create the model file. The ingredients will be used in recipes also, so we will create ingredient.model.ts inside a new shared folder in app.
export class Ingredient {
    constructor(public name: string, public amount: number) { }
}
Now, we will update the shopping-list.component.ts file to use the ingredients.
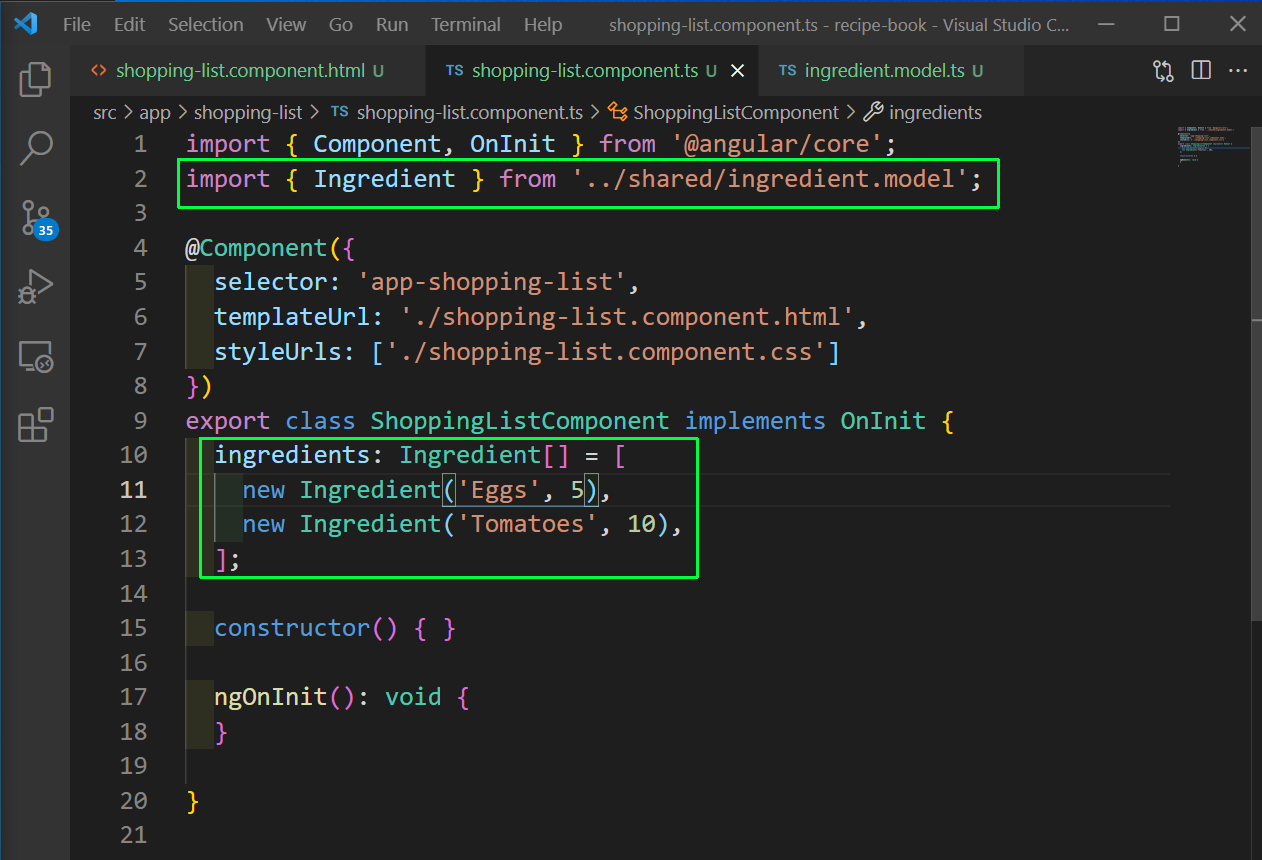 shopping-list.component.ts
Next, we will update the shopping-list.component.html file to show the ingredient.
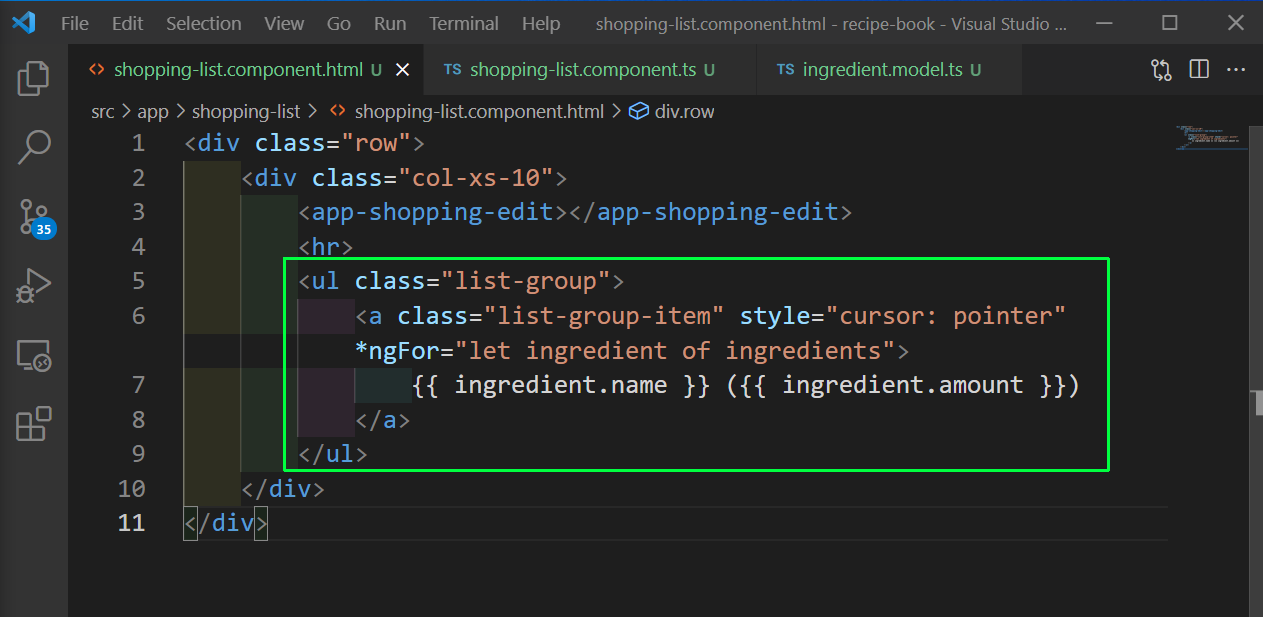 shopping-list.component.html
Now, our ingredients will be shown in localhost.
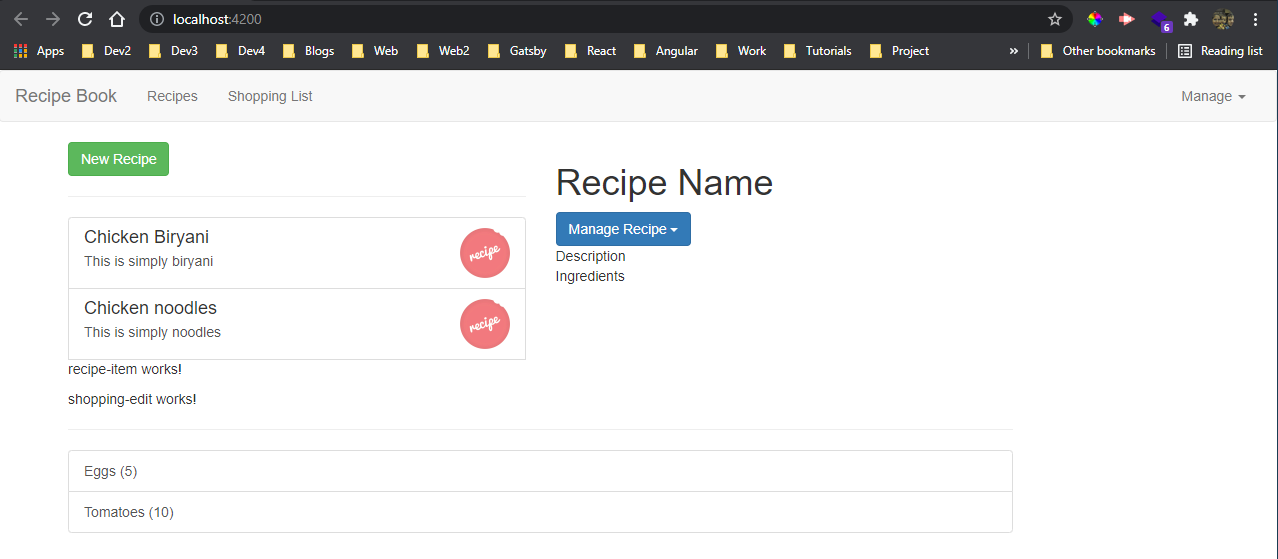 localhost
We will now make the shopping-edit.component.html file and will add two input box in it and three buttons.
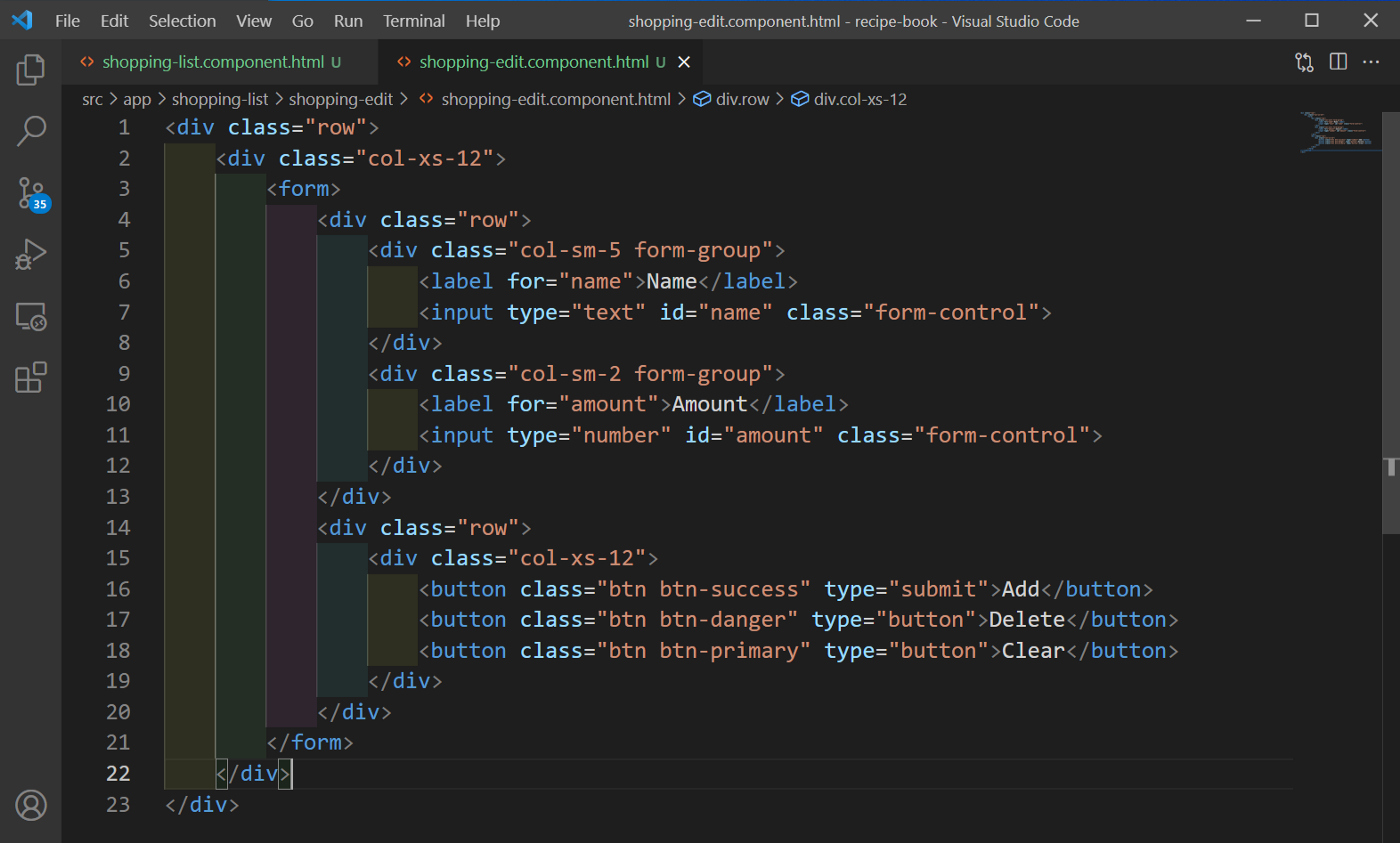 shopping-edit.component.html
Our app looks like below now.
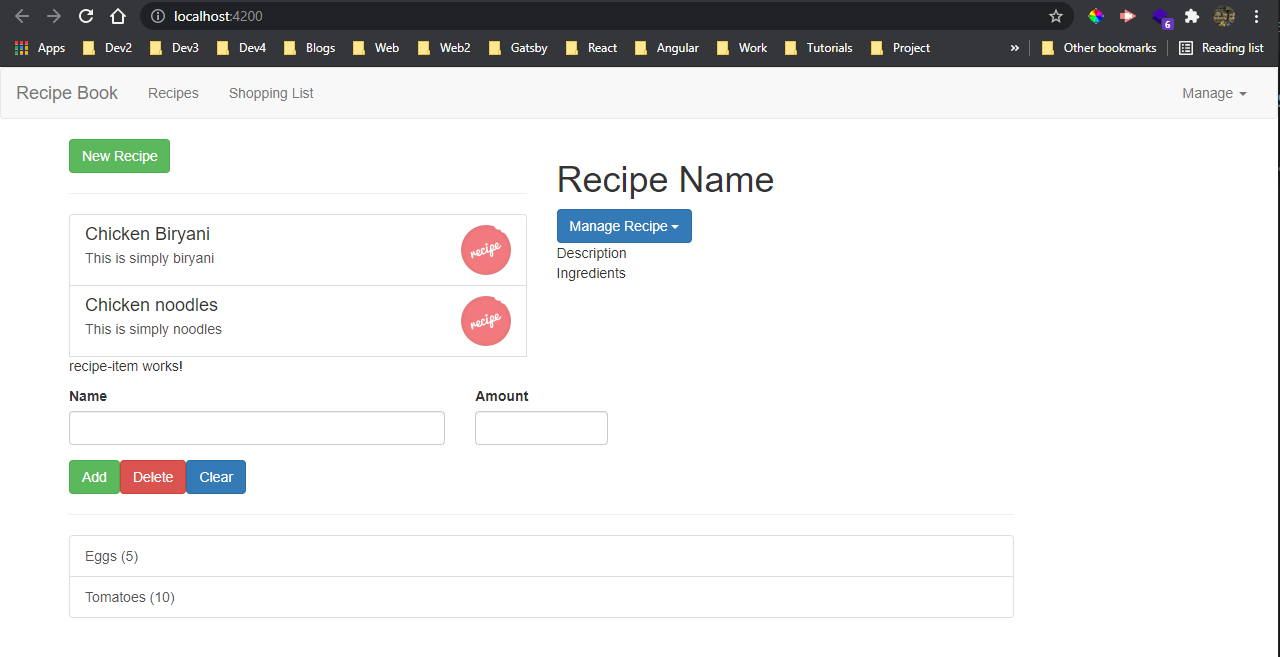 Our App
Now, we will add the logic for showing the Recipes or Shopping List component on click of it in the navigation bar. So, open header.component.html file and add eventlistener to both.
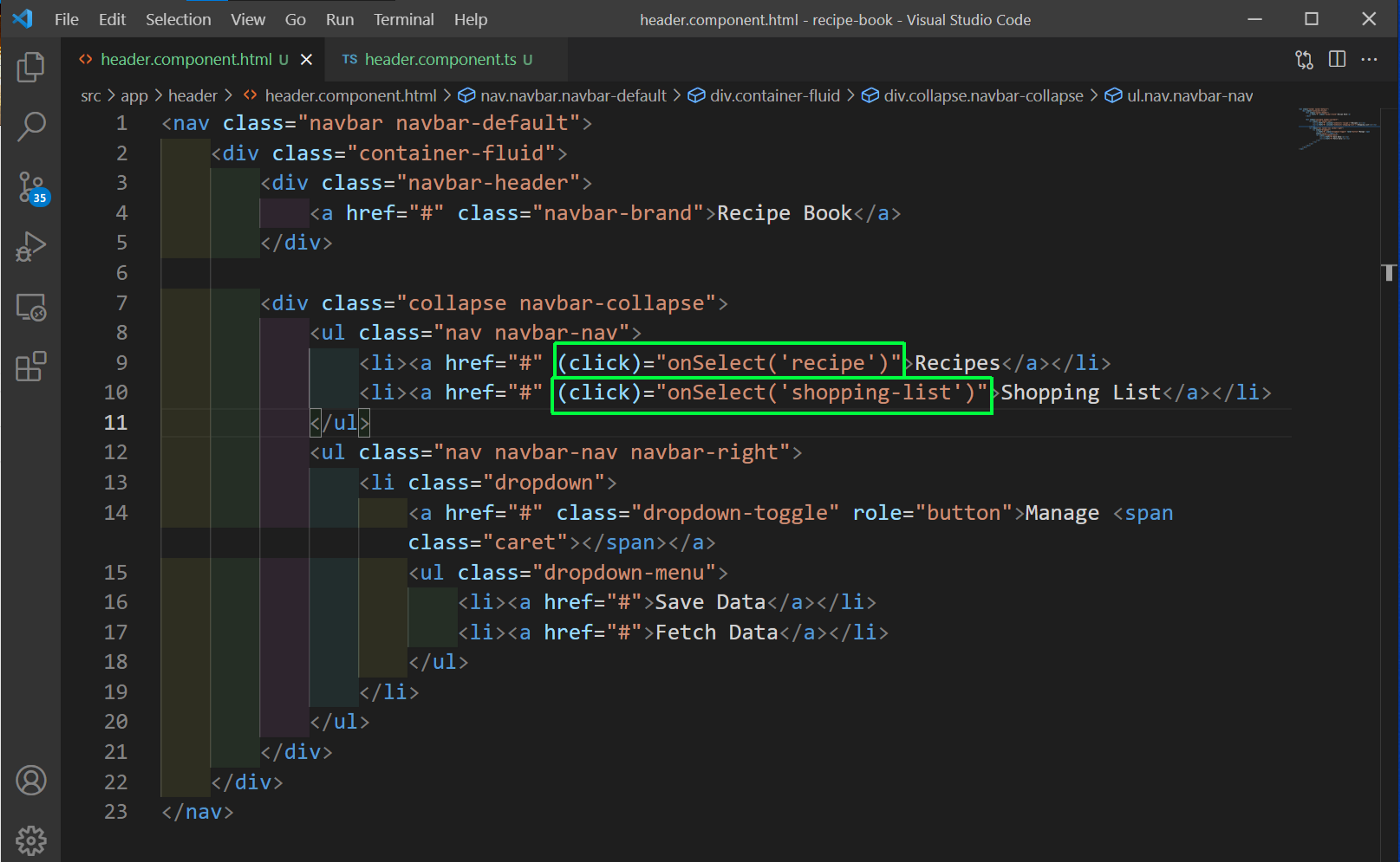 header.component.html
Now, in the header.component.ts file, we will add an EventEmitter, which will be called in the onSelect().
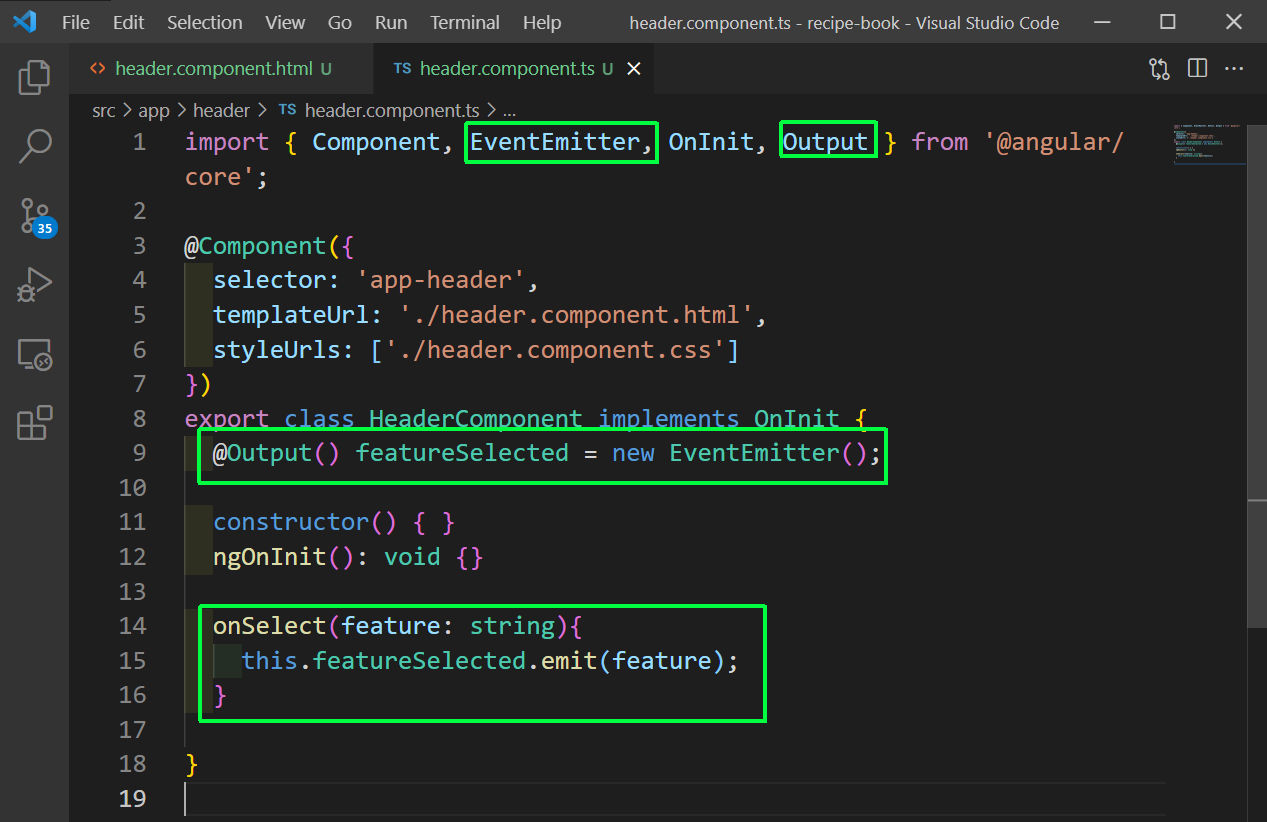 header.components.ts
Now, we will go to the parent app component and in the app.component.ts file add a variable loadedFeature equal to recipe. Also, add an onNavigate(), which will make this loadedFeature equal to, whatever is passed from the header component.
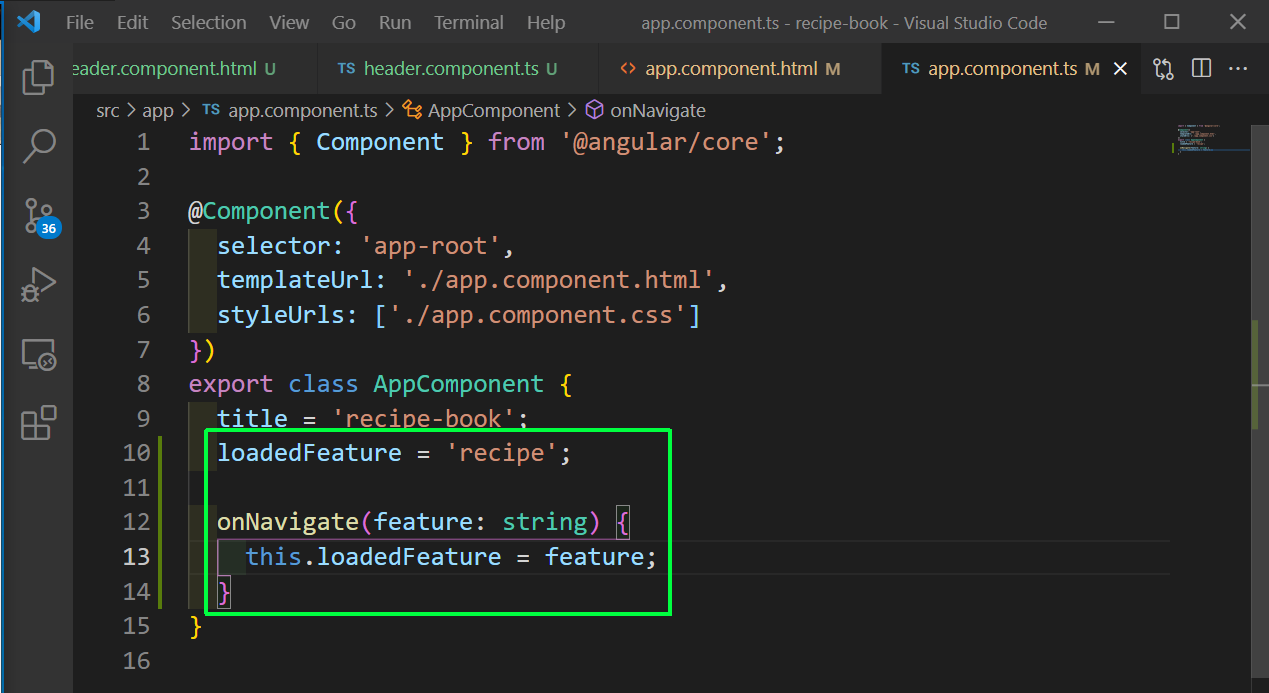 app.component.ts
Now, in the app.component.html file we will get the featureSelected from the header component and call the onNavigate() with the event.
Now, we are showing app-recipes if recipe was passed or app-shopping, if shopping-list was passed.
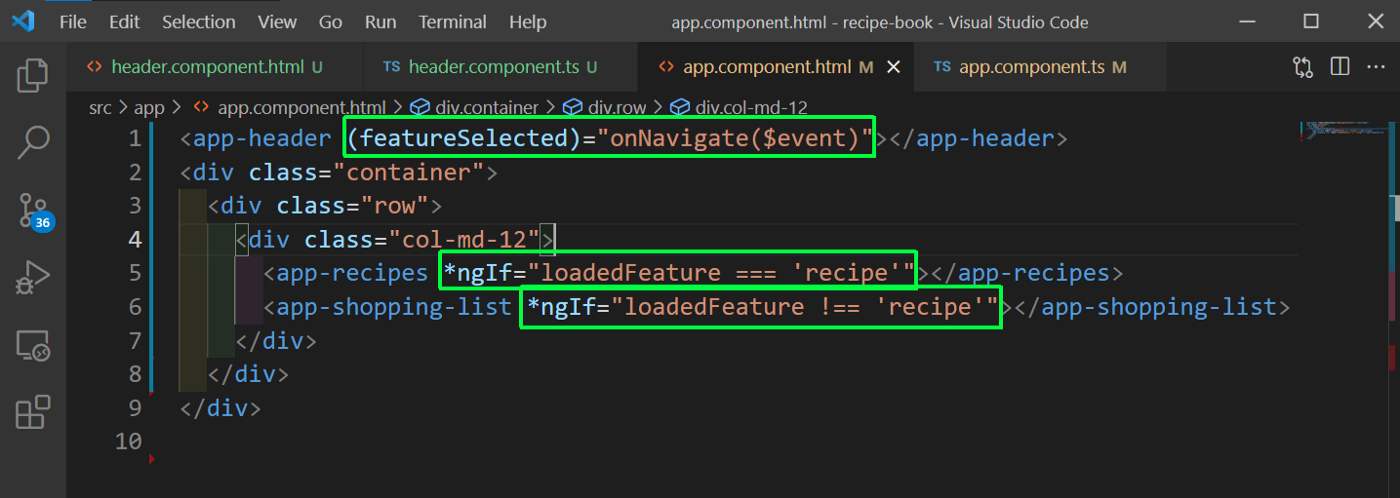 app.component.html
Now, our navigation is working properly in localhost and showing the respective component on click.
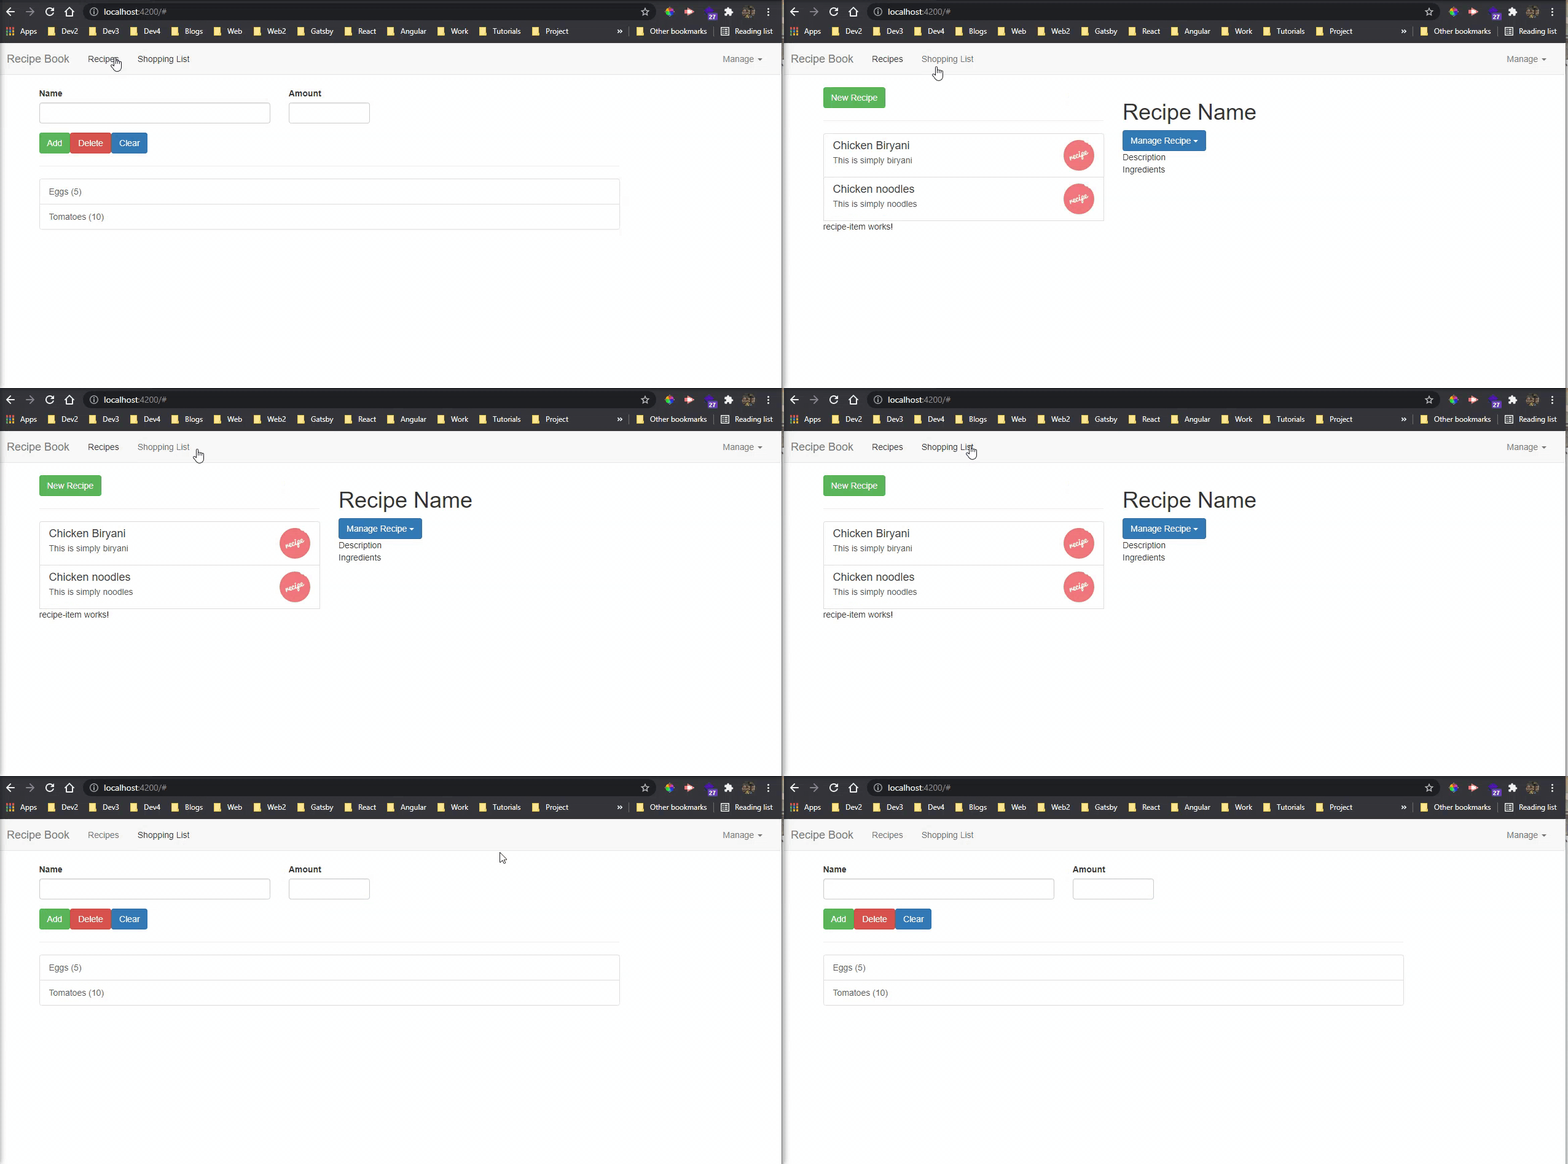 Working
Now, we will also refactor our code . We will cut the code for a recipes from recipe-list.component.html file.
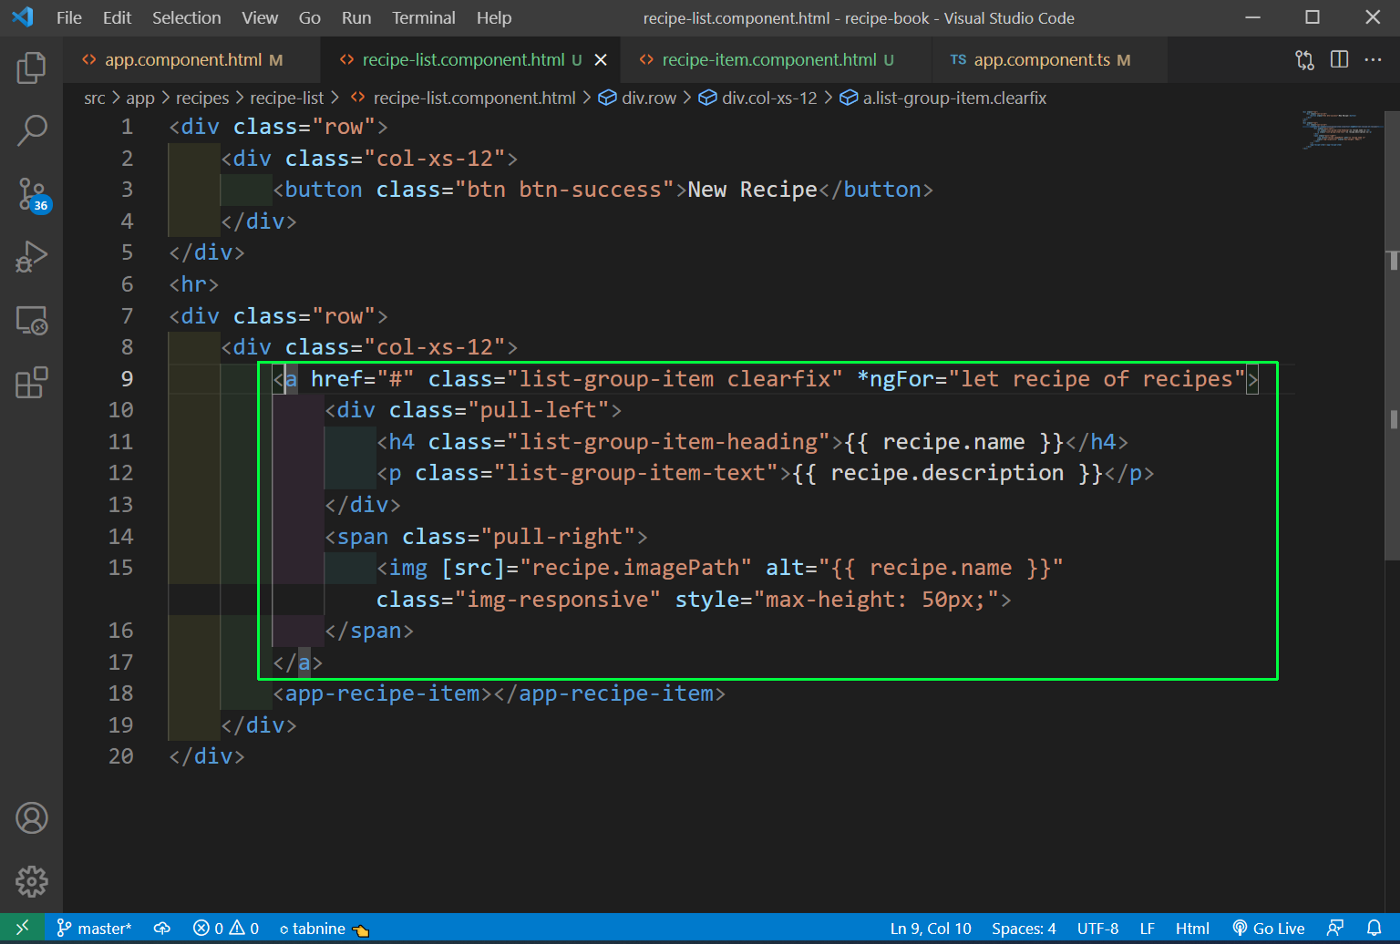 recipe-list.component.html
We are putting the code in recipe-item.component.html file, but without the ngFor.
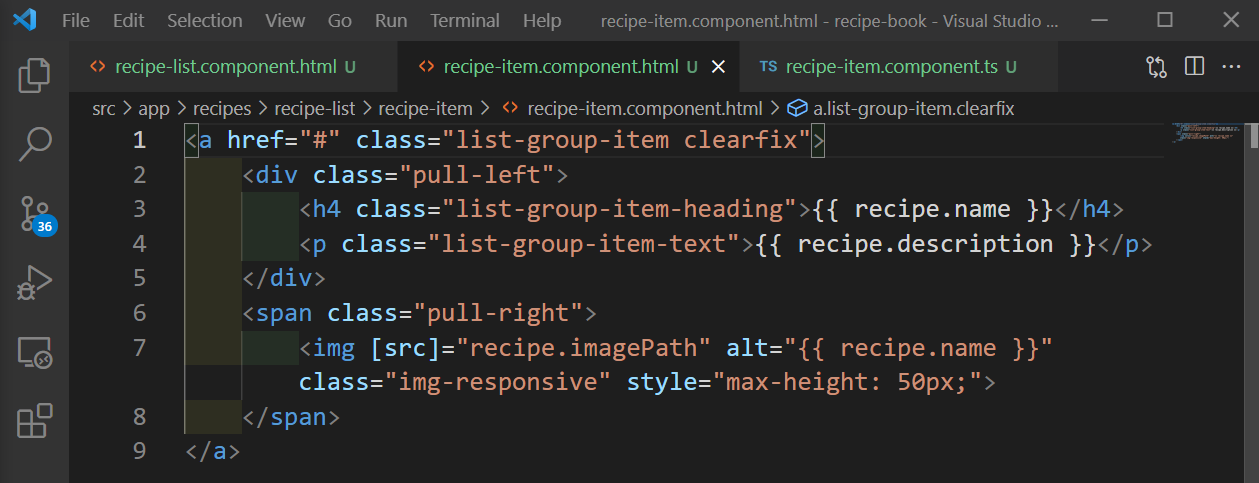 recipe-item.component.html
Now, in the recipe-item.component.ts file we are adding the recipe element, which is an Input type and will pass from recipe list component.
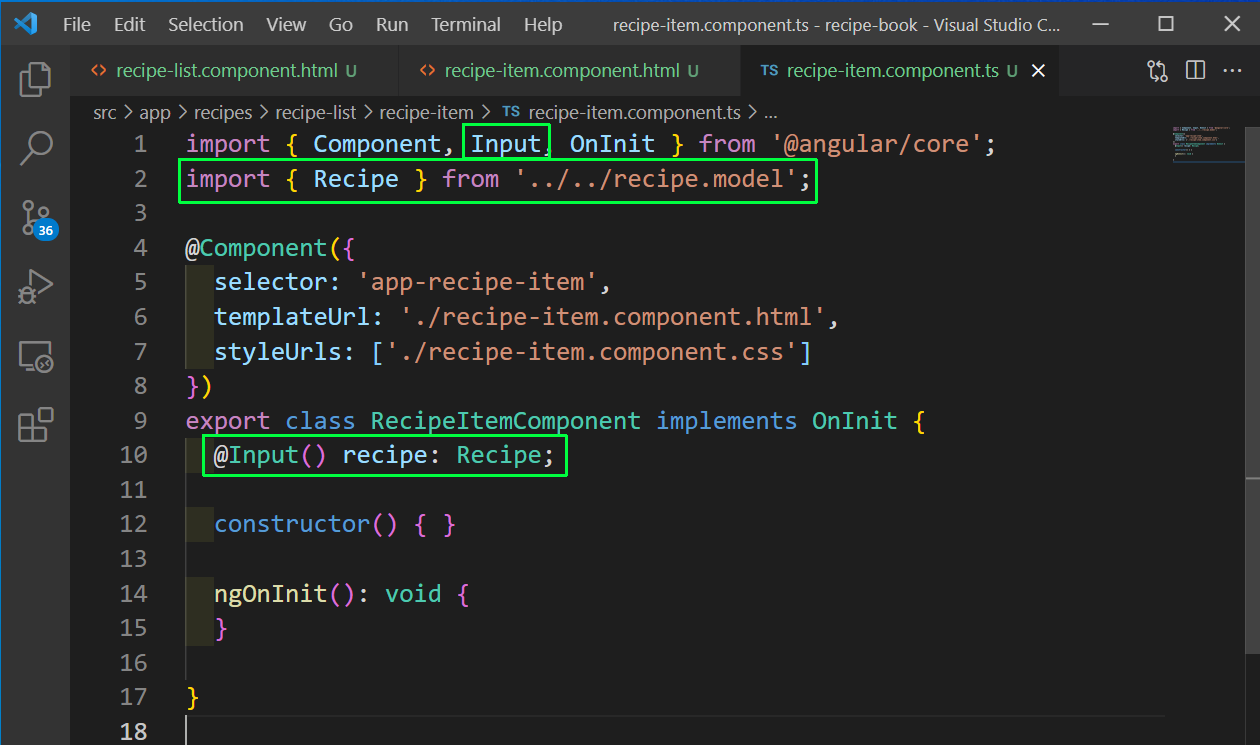 recipe-item.component.ts
Now, back in the recipe-list.component.html file we are passing the individual recipe by looping through recipes array.
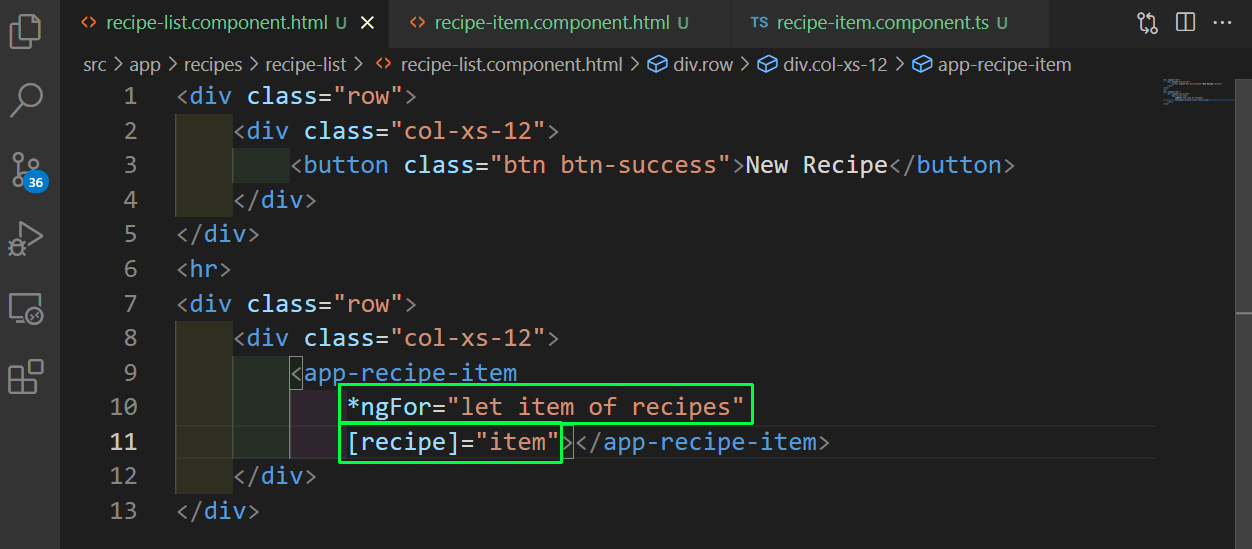 recipe-list.component.html
After this refactoring our app is working as usual. Now, from a recipe item component, we will pass the click to recipe detail component and show an individual recipe.
So, first in the recipe-item.component.html file add a click handler, which will call a function onSelected.
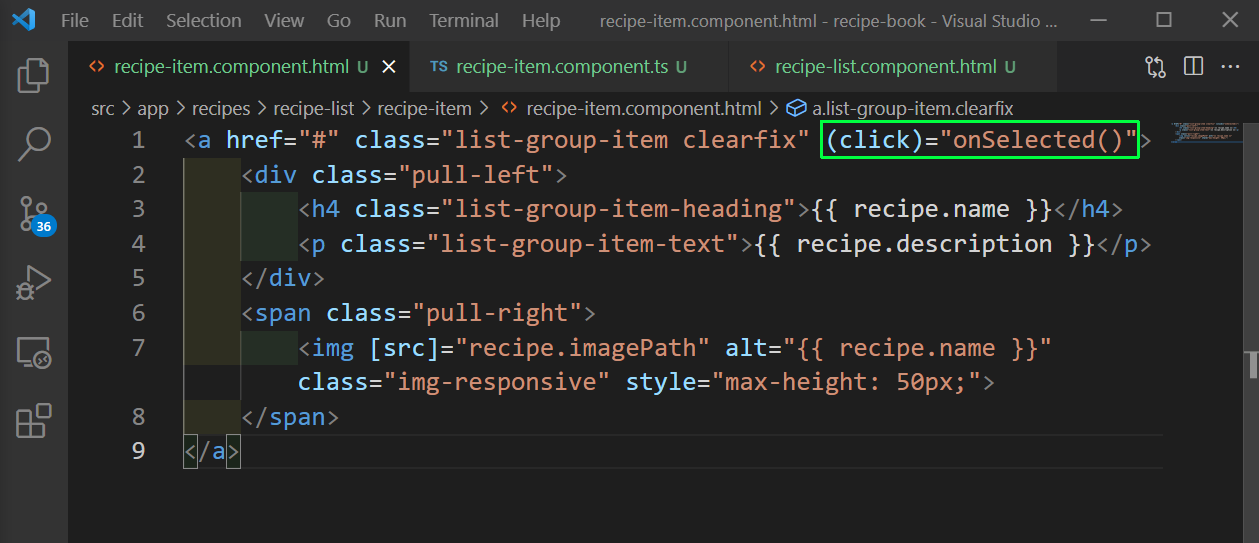 recipe-item.component.html
Now, in recipe-item.component.ts file, we will add an Output decorator and emit the recipeSelected event.
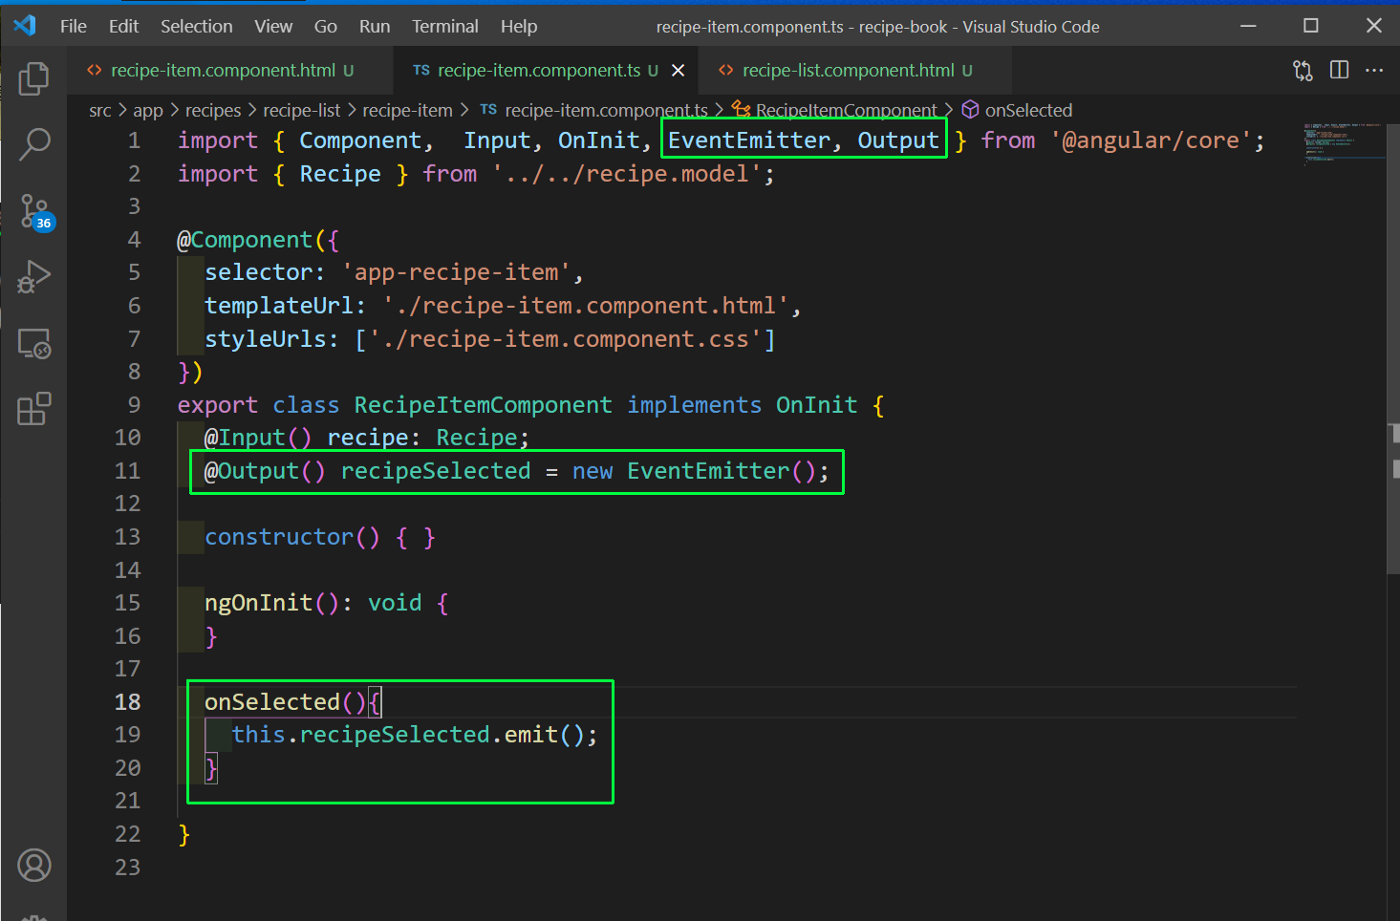 recipe-item.component.ts
Now, in the recipe-list.component.html file, we will bind the recipeSelected event to call a function onRecipeSelected, with the current recipe.
 recipe-list.component.html
Now, from the recipe-list.component.ts file, we have to emit this recipe again, so we are using the Output decorator.
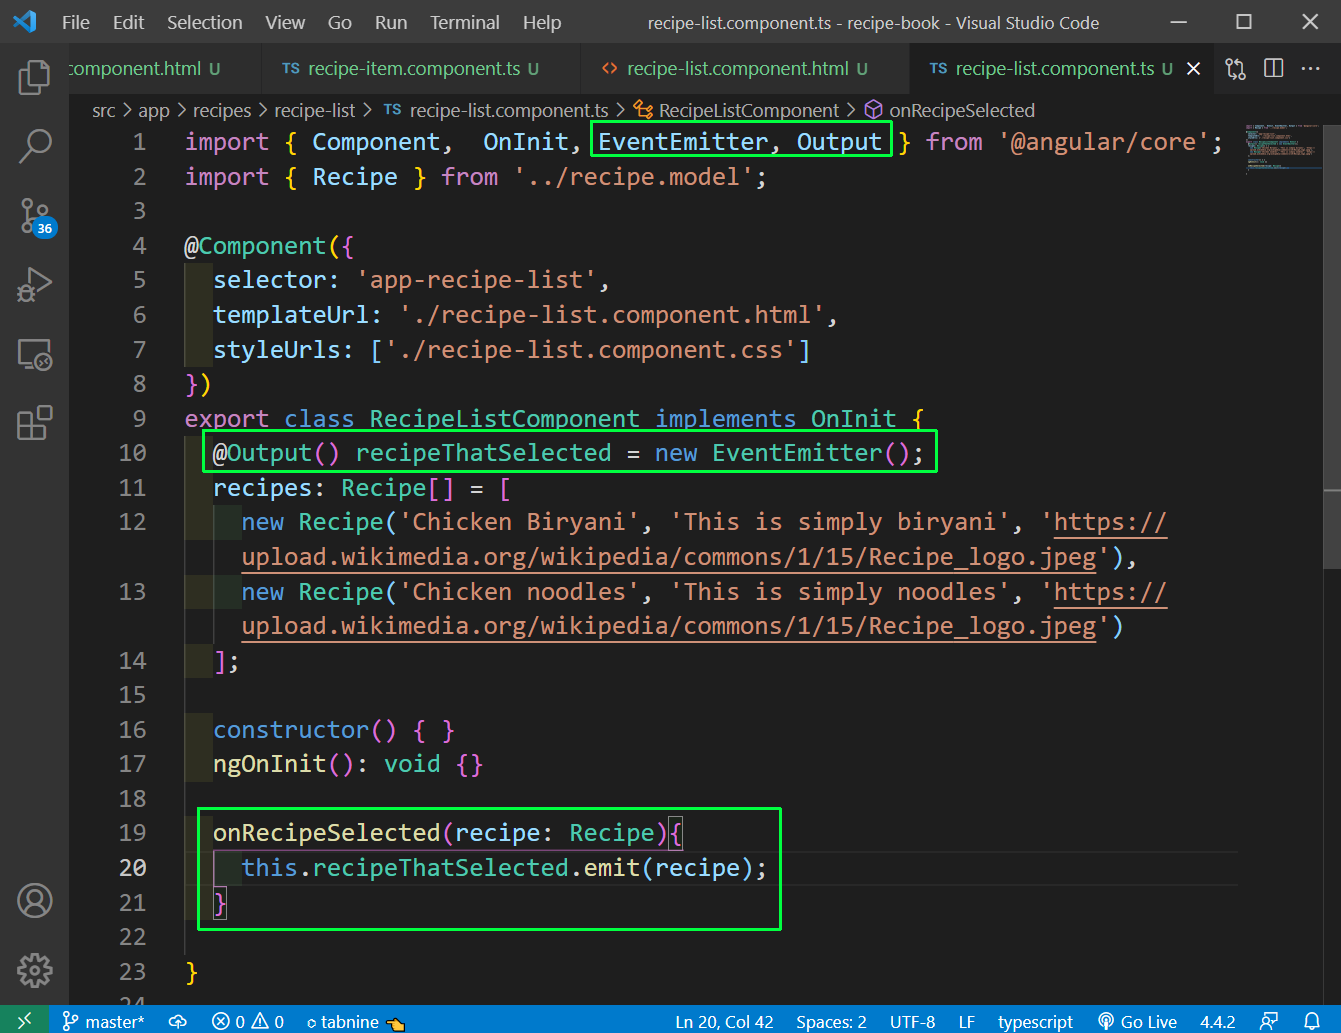 recipe-list.component.ts
Now, we will bind the recipeThatSelected in recipe-list.component.html file to a selectedRecipe event.
After that we are using it to show the recipe detail component.
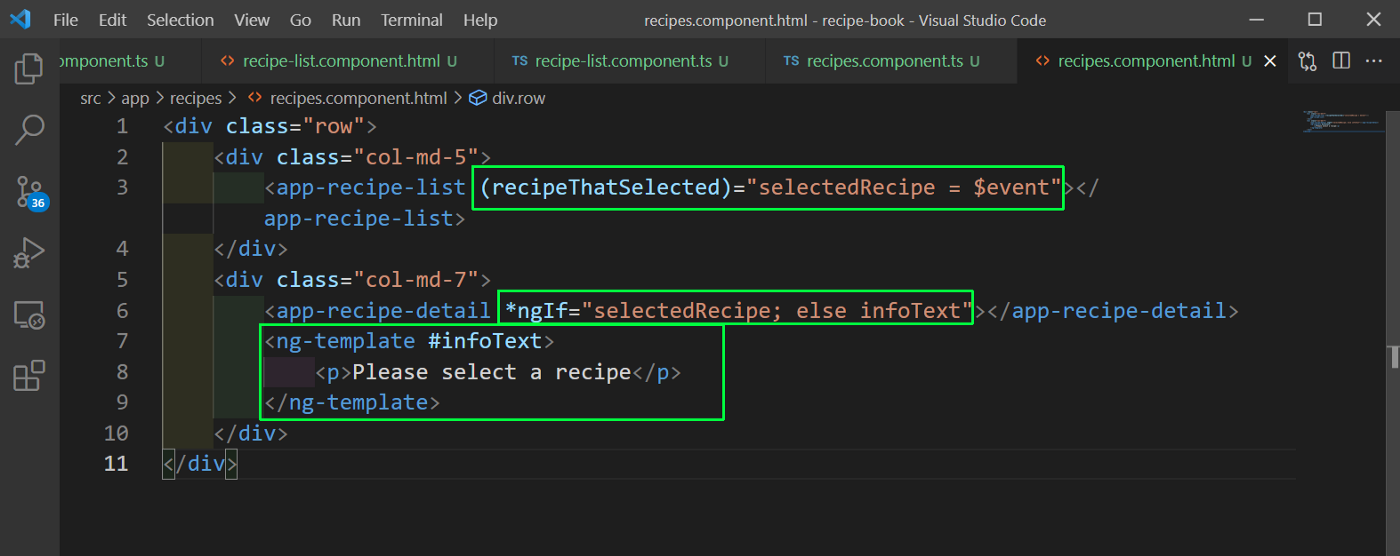 recipe-list.component.html
In the recipe-detail.component.ts file add the recipe element.
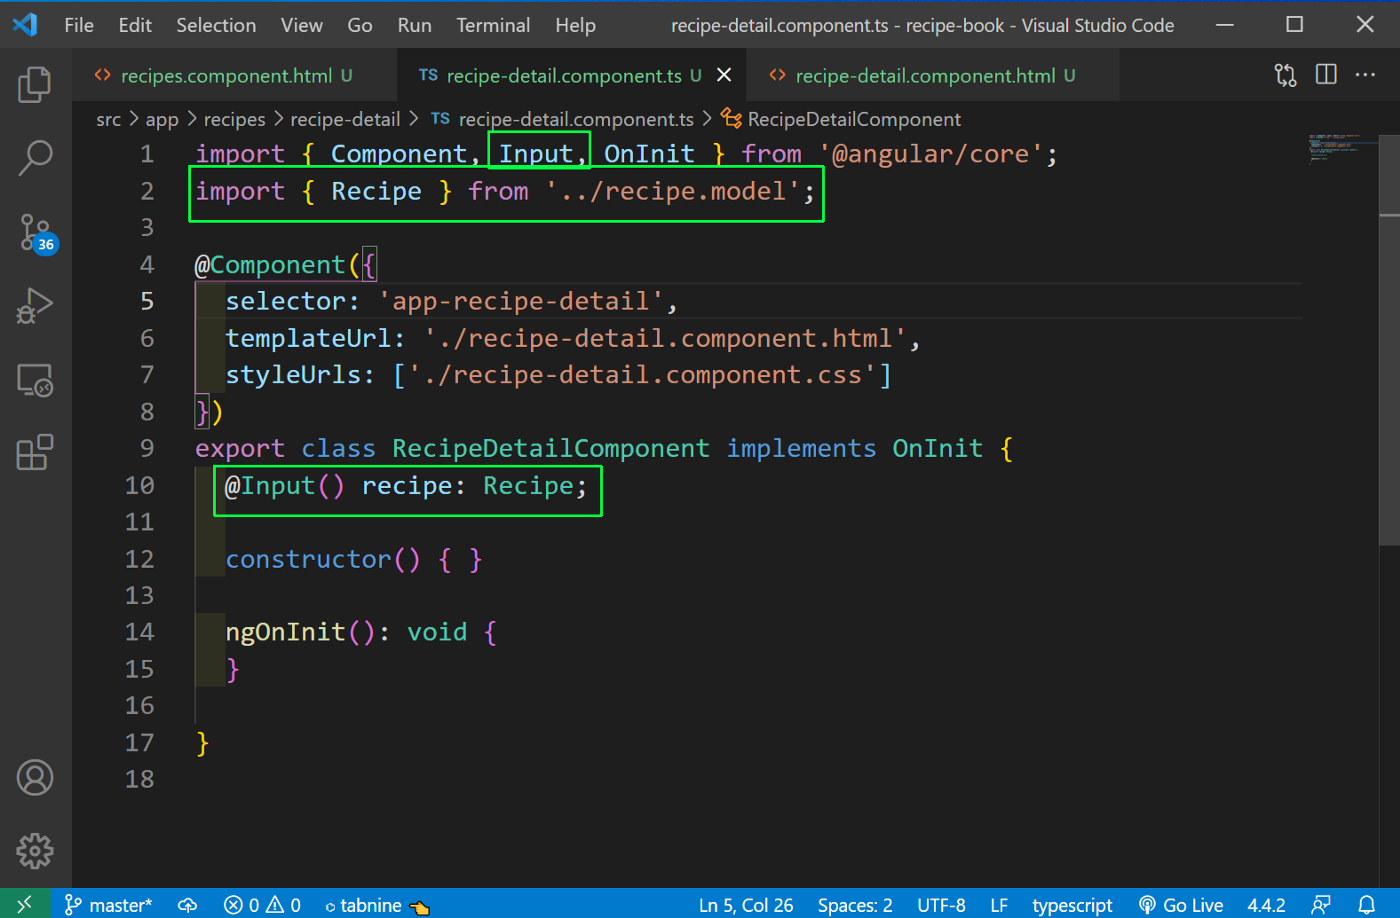 recipe-detail.component.ts
Now, in the recipe-detail.component.html file we can use the different values of recipes.
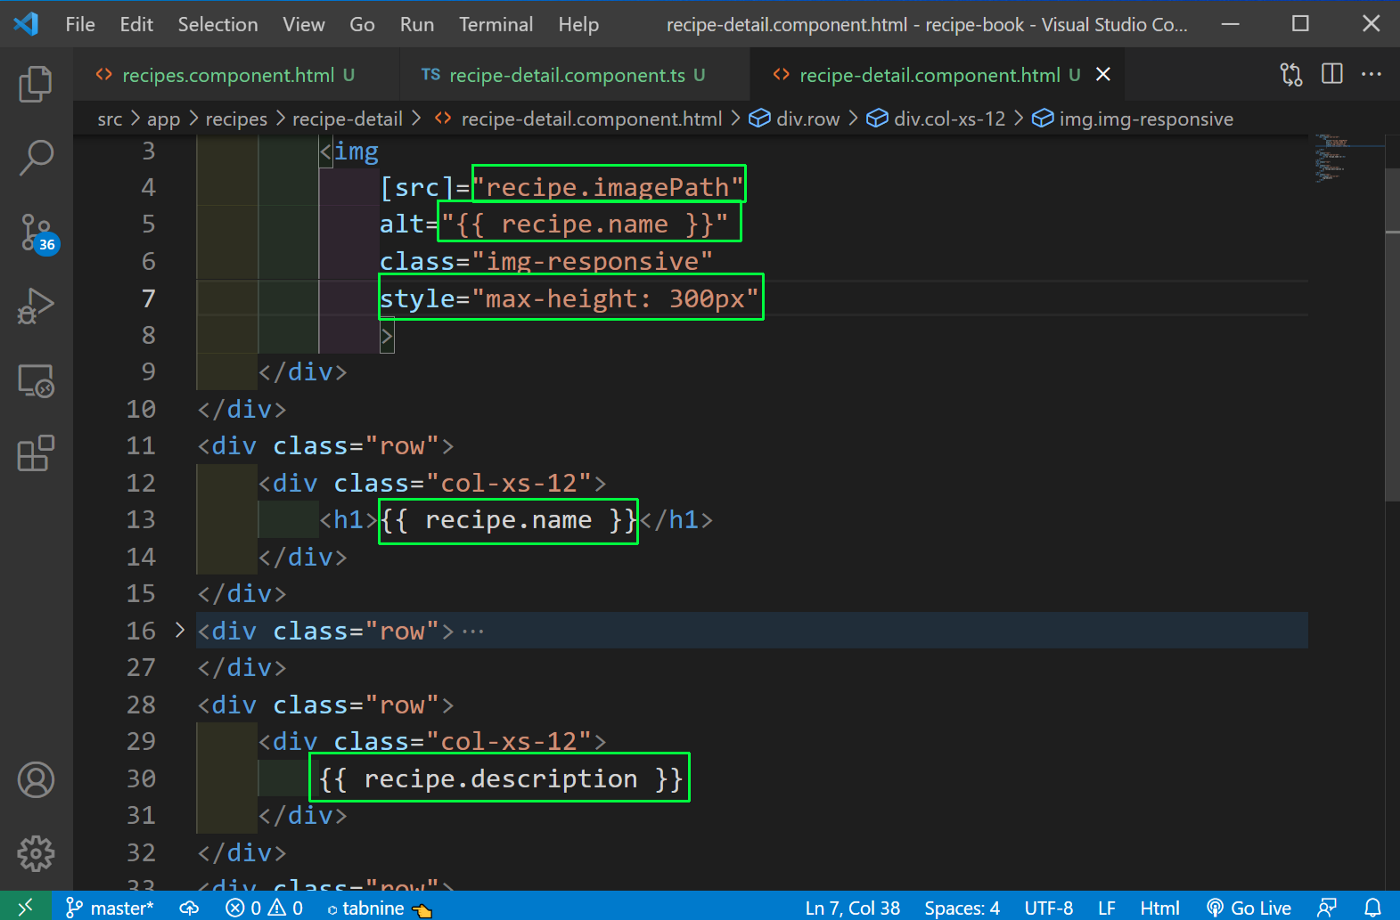 recipe-detail.component.html
Now, i localhost the recipes are been shown perfectly. I have also changed the image links.
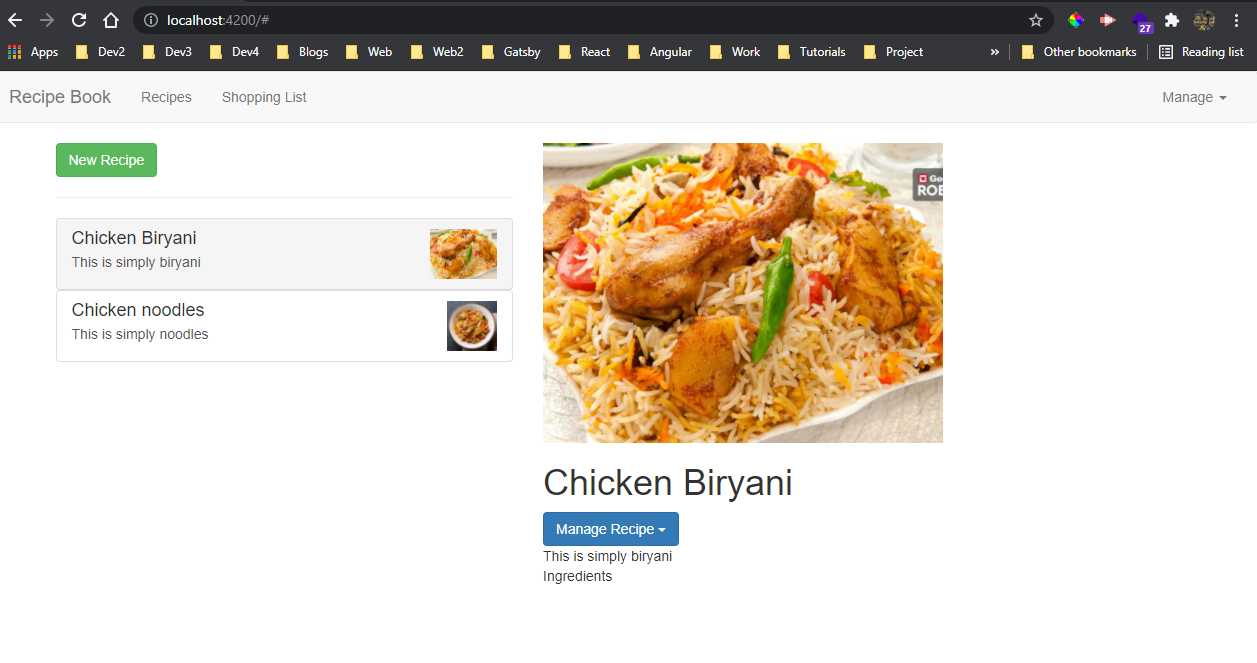 localhost
Now, we will code the functionality to add ingridients in Shopping list. We will be working with reference for this. So, first in shopping-edit.component.ts file add references and a click event.
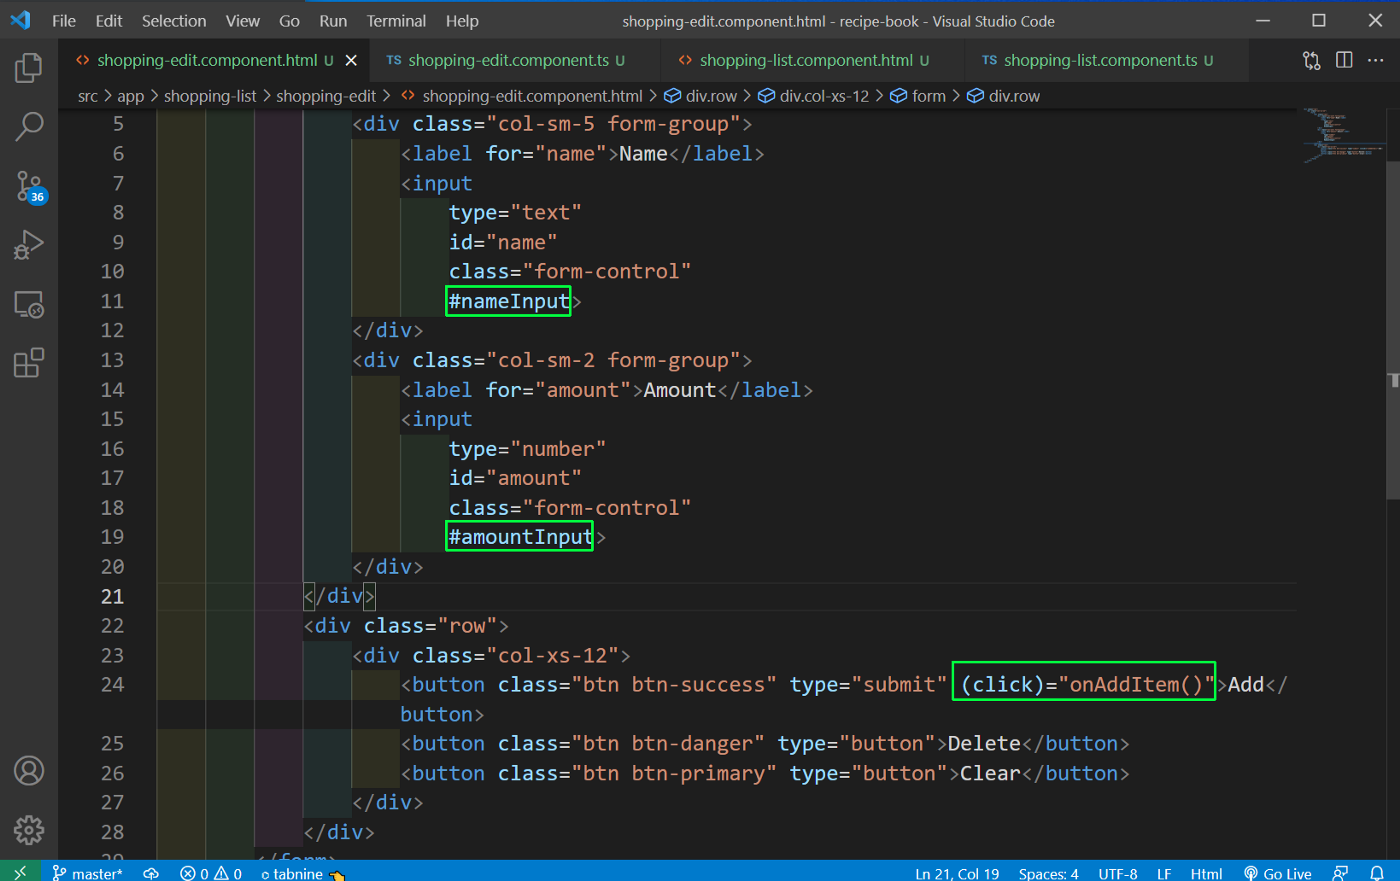 shopping-edit.component.ts
Now, in shopping-edit.component.html file, we will be working with ViewChild directive to get the value and also after that emit it.
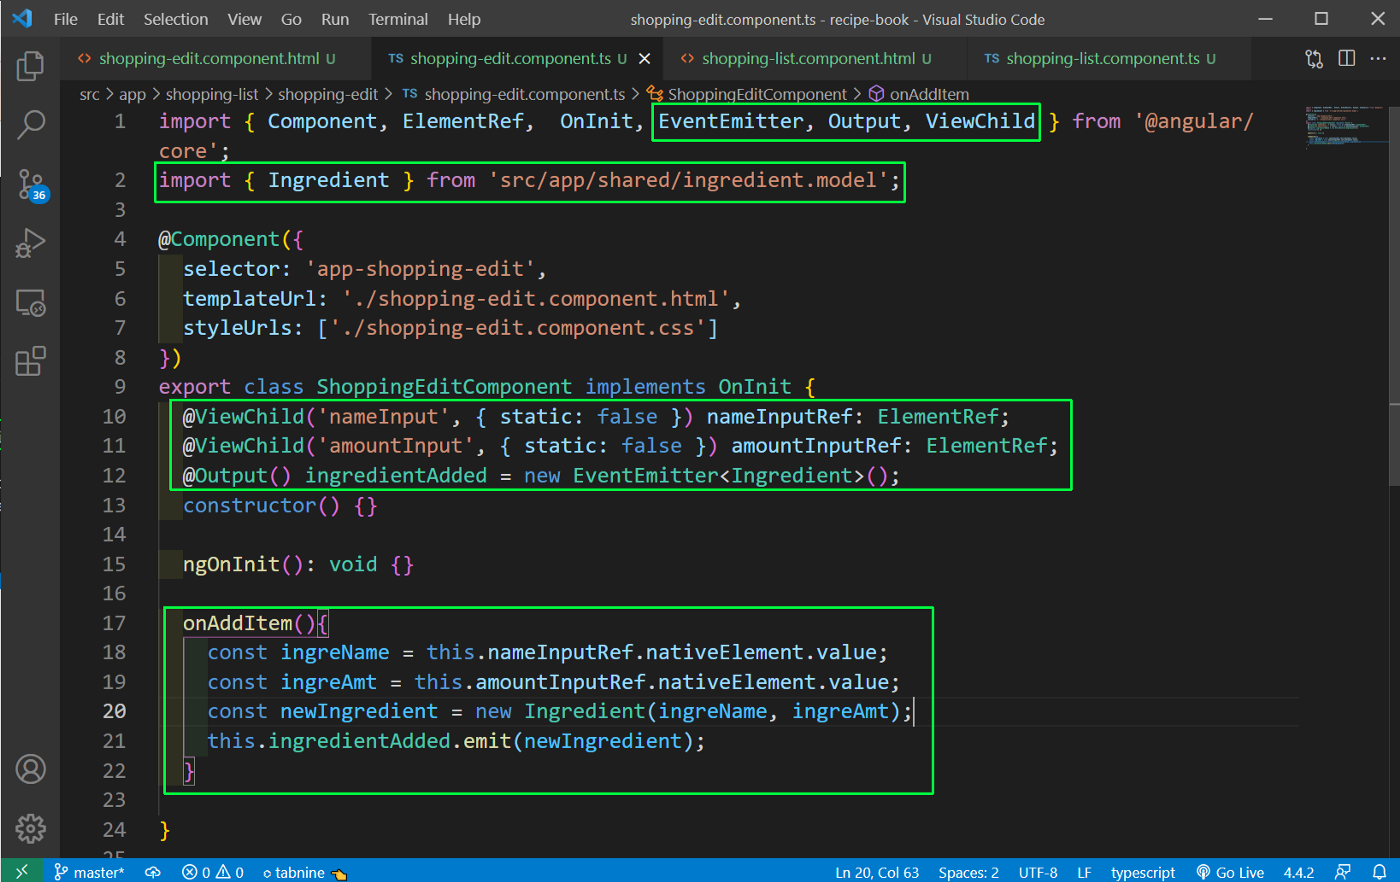 shopping-edit.component.html
Now, in shopping-list.component.html file, we will be binding the ingredientAdded and calling onIngredientAdded.
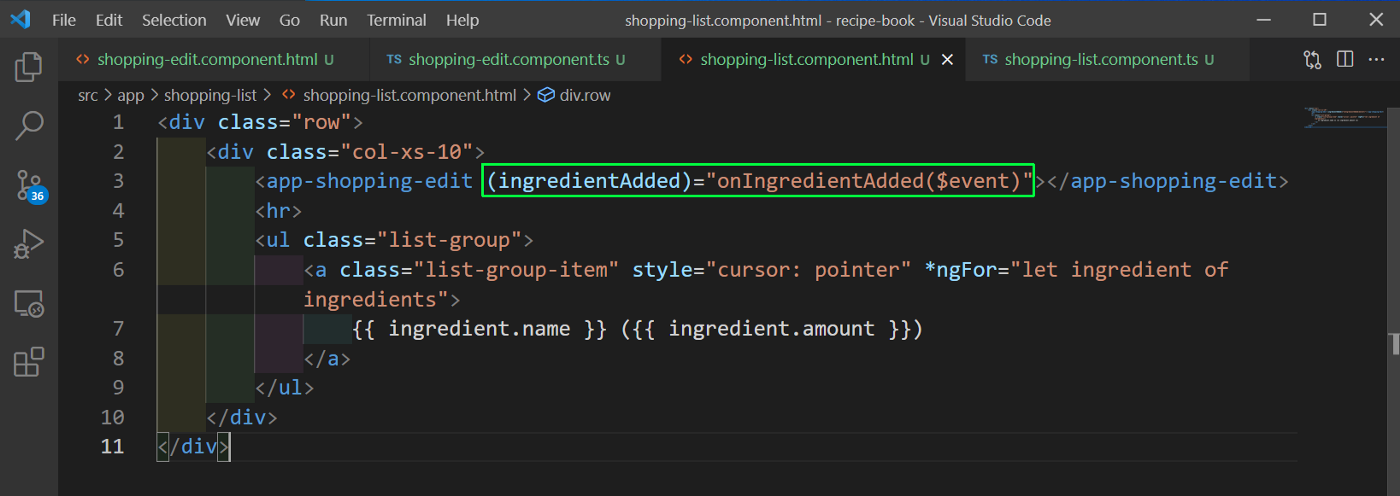 shopping-list.component.html
Finally in shopping-list.component.ts file, we will add items to the ingredients array.
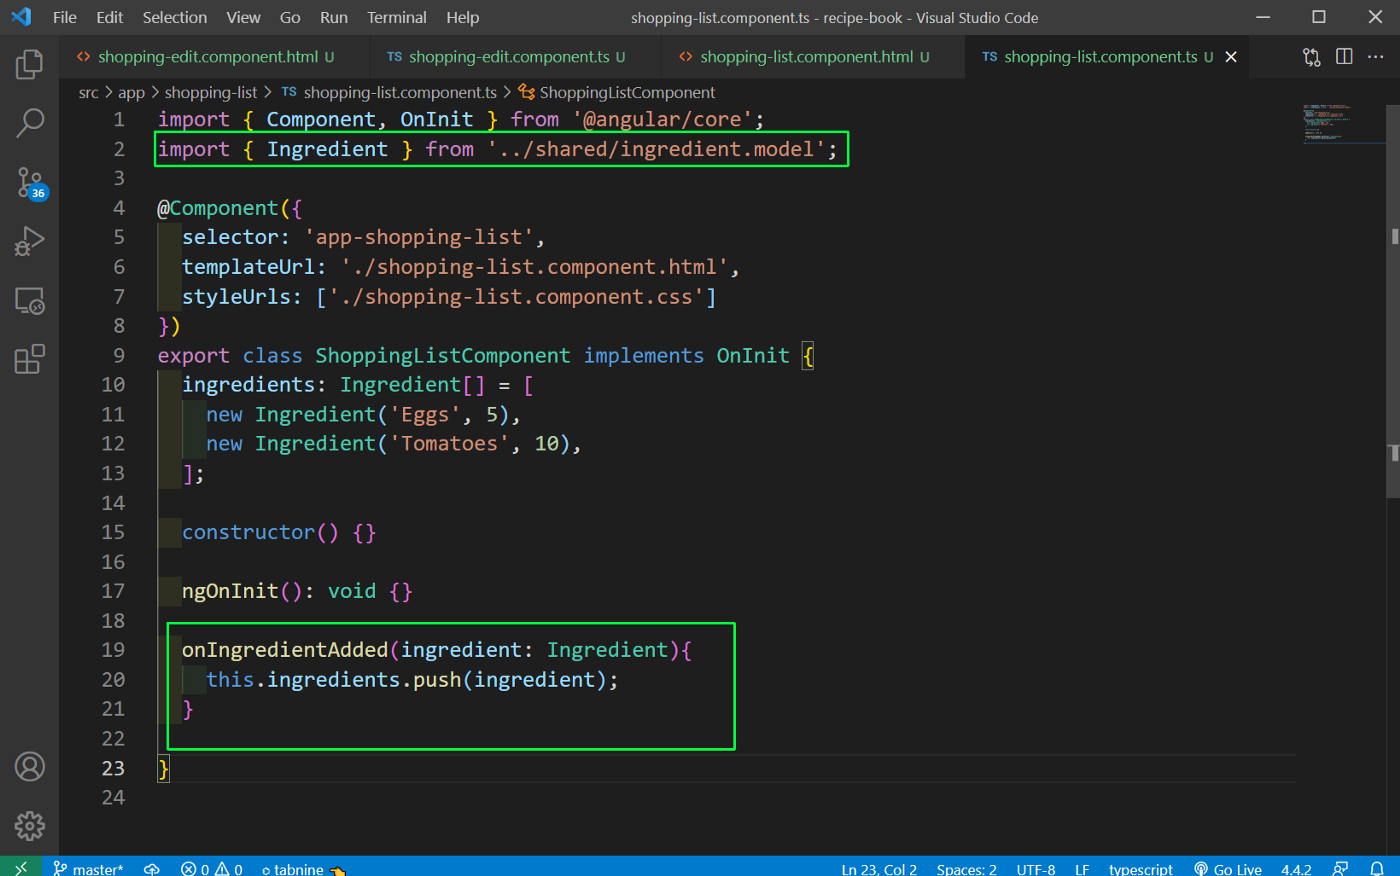 shopping-list.component.ts
We have created an functional app, but still a lot of improvements needed to be done. We will do it in part-2. You can find the code for the same in this github link.