Build a Snippets App with Next.js, FaunaDB, Tailwind CSS & Auth0
by Nabendu Biswas / May 29th, 2021
#javascript #react #nextjs
In this post, we will build a Snippet app in Next.js. We will store and retrieve our data from FaunaDB and also use Tailwind CSS in the project. We will also be using the awesome authentication service of Auth0 in the project
So, open your terminal and create a new Next.js application by using the command below.
npx create-next-app snippet-app-nextjs
Now, as per the instructions, change to the newly created folder. I have also opened the project in VS Code. After that, run npm run dev to start the project.
 config
But before moving forward, we will be installing the required packages by npm. Here, we are installing FaunaDB for database, react-hook-form for nice form validations and SWR for fetching data in real-time. You can read more about SWR here.
So, open your terminal and install the packages.
npm i faunadb react-hook-form swr
We will also set up Tailwind CSS in our project. So, open the terminal and install the below dependencies.
npm install --save-dev tailwindcss postcss-preset-env postcss
The next command to run to initialize Tailwind is below.
npx tailwindcss init
It will create a tailwind.config.js file in our root directory. After that create a postcss.config.js file in the root directory and add the below code.
    module.exports = {
        plugins: ['tailwindcss', 'postcss-preset-env'],
    }
Lastly, we need to go to globals.css file in the styles folder and remove everything and add the below for tailwind.
    @tailwind base;
    @tailwind components;
    @tailwind utilities;

    body {
        margin: 0;
        padding: 0;
    }
After that update the _app.js file in the pages folder as below. Here, we are using all Tailwind CSS elements.
    import '../styles/globals.css'

    function MyApp({ Component, pageProps }) {
        return (
            <div className="bg-yellow-600 w-full p-10 min-h-screen">
                <div className="max-w-2xl mx-auto">
                    <Component {...pageProps} />
                </div>
            </div>
        );
    }

    export default MyApp
Now, also remove everything in index.js in the pages folder and update with the below content.
    import Head from 'next/head'
    import Link from 'next/link';

    export default function Home() {
        return (
            <div>
            <Head>
                <title>Snippet App</title>
                <link rel="icon" href="/favicon.ico" />
            </Head>
            <main>
                <div className="my-12">
                <h1 className="text-red-100 text-2xl">
                    TheWebDev Code Snippets
                </h1>
                <p className="text-red-200">
                    Create and browse snippets in Web Development!
                </p>
                <Link href="/new">
                    <a className="mt-3 inline-block bg-yellow-800 hover:bg-yellow-900 text-white font-bold py-2 px-4 rounded focus:outline-none focus:shadow-outline">
                    Create a Snippet!
                    </a>
                </Link>
                </div>
            </main>
            </div>
        )
    }
We will now now see this beautiful page in our localhost, with a button.
 localhost
Before moving forward, we will set up FaunaDB. So, head to fauna.com and sign up. After you sign up, you will be taken to this screen where you need to click on the NEW DATABASE button.
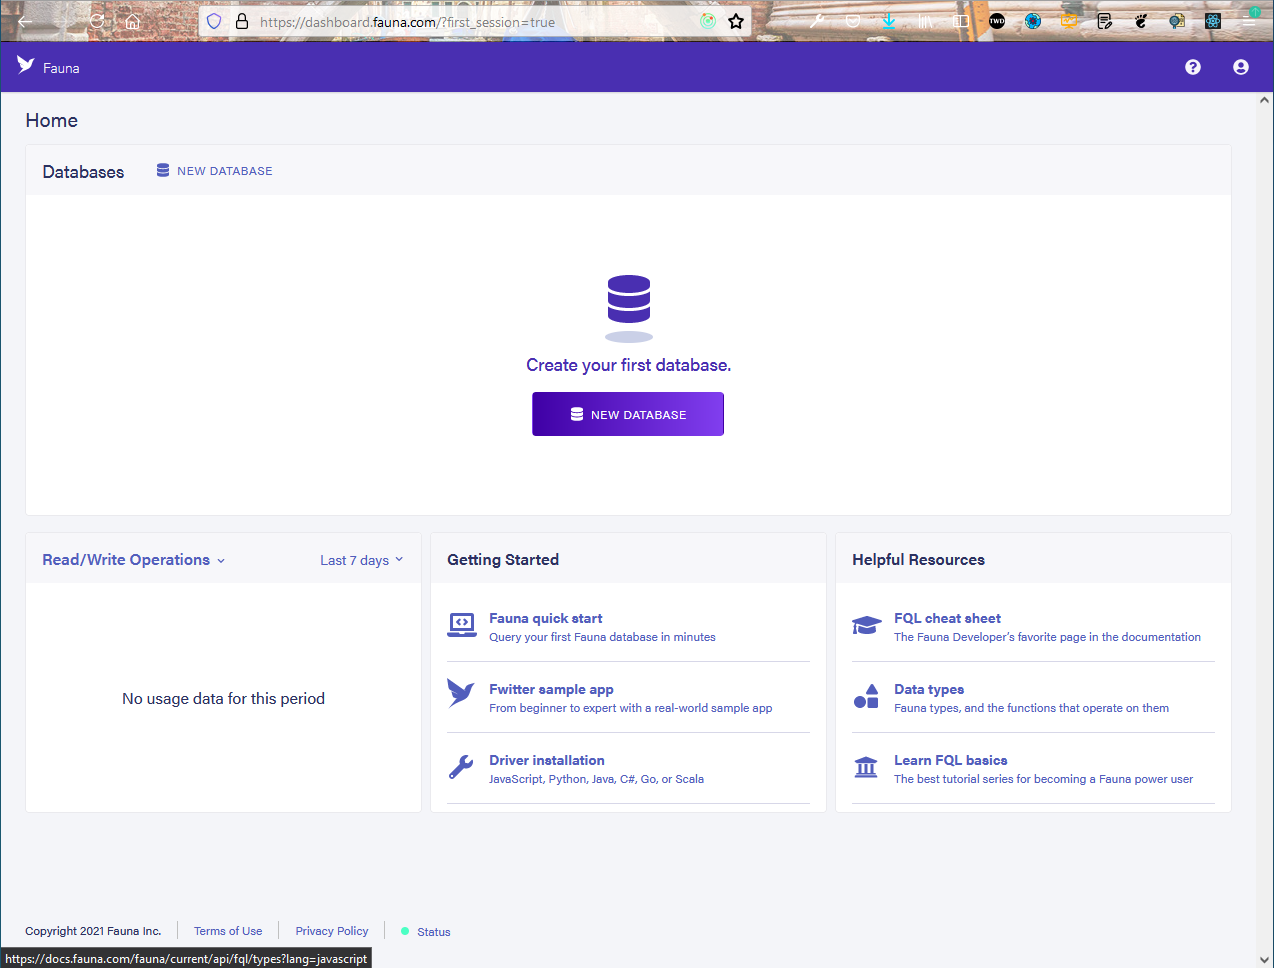 Database
Next, we need to give the database a name. I am giving it the name snippet-app-fauna. After that, click on the SAVE button.
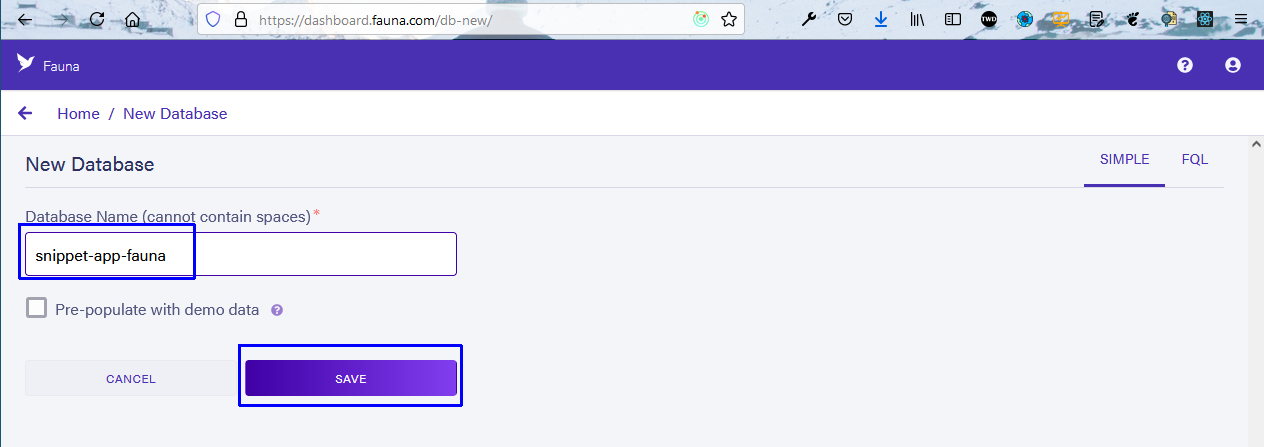 Database name
On the next screen, click on the NEW COLLECTION button.
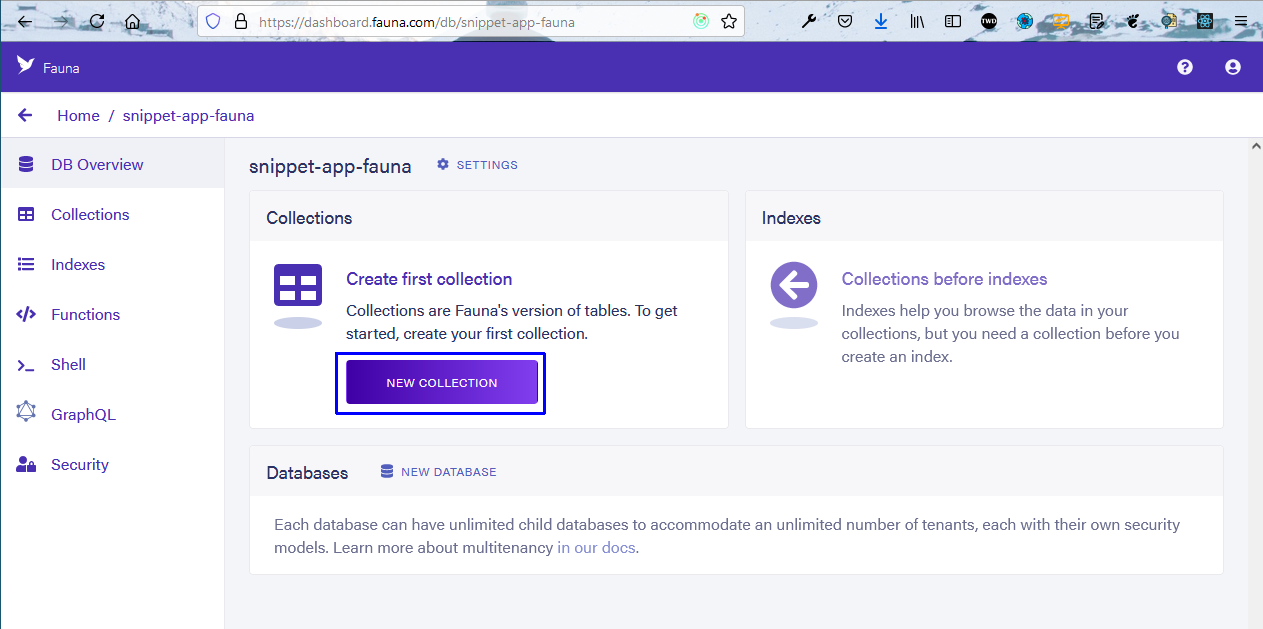 New Collection
Here, I have given the collection name as snippets and clicked on the SAVE button.
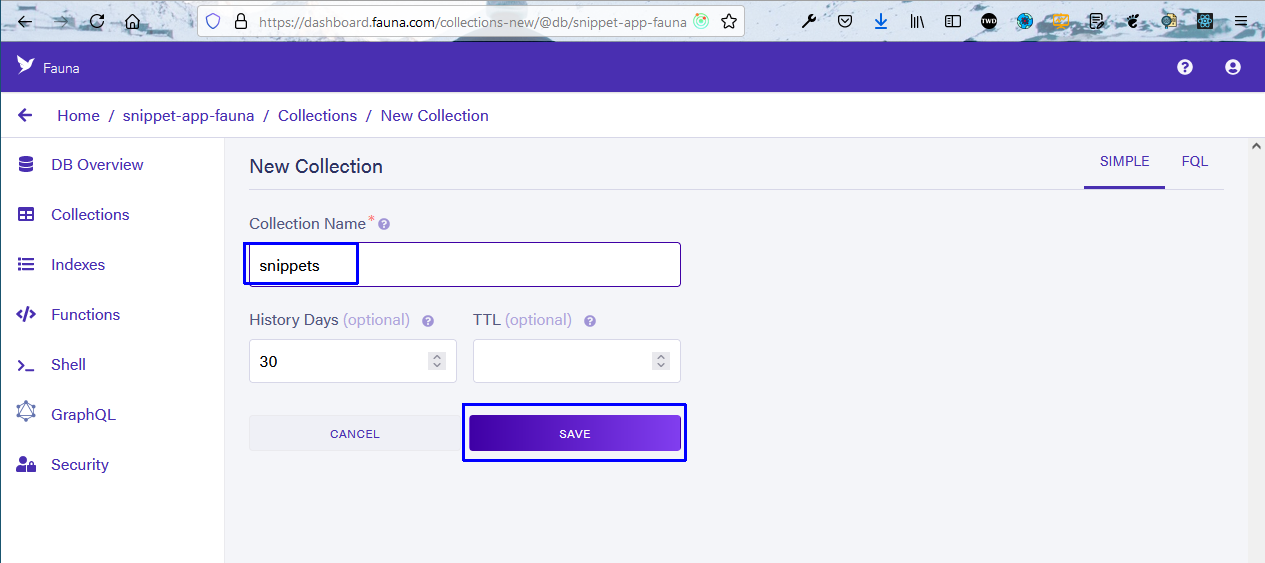 snippets
Now, we will create a document first from the database and then move the logic to the frontend. So, click on the NEW DOCUMENT button.
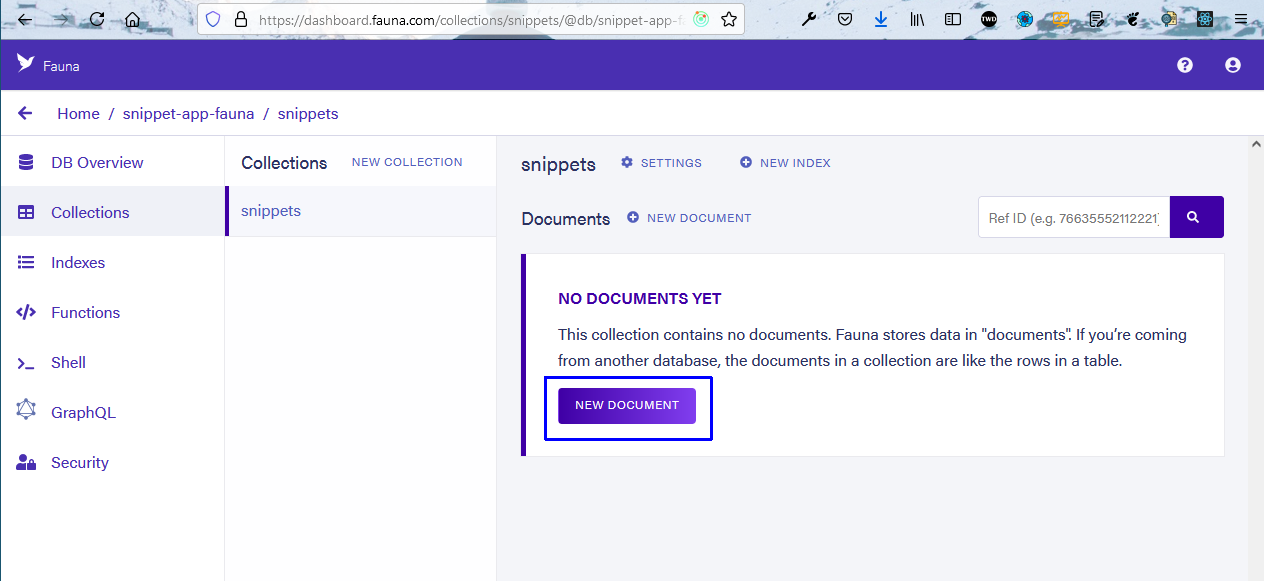 New Document
In the next window, we will have an editor where we will give data in JSON format. Later on, we will send this data from the frontend.
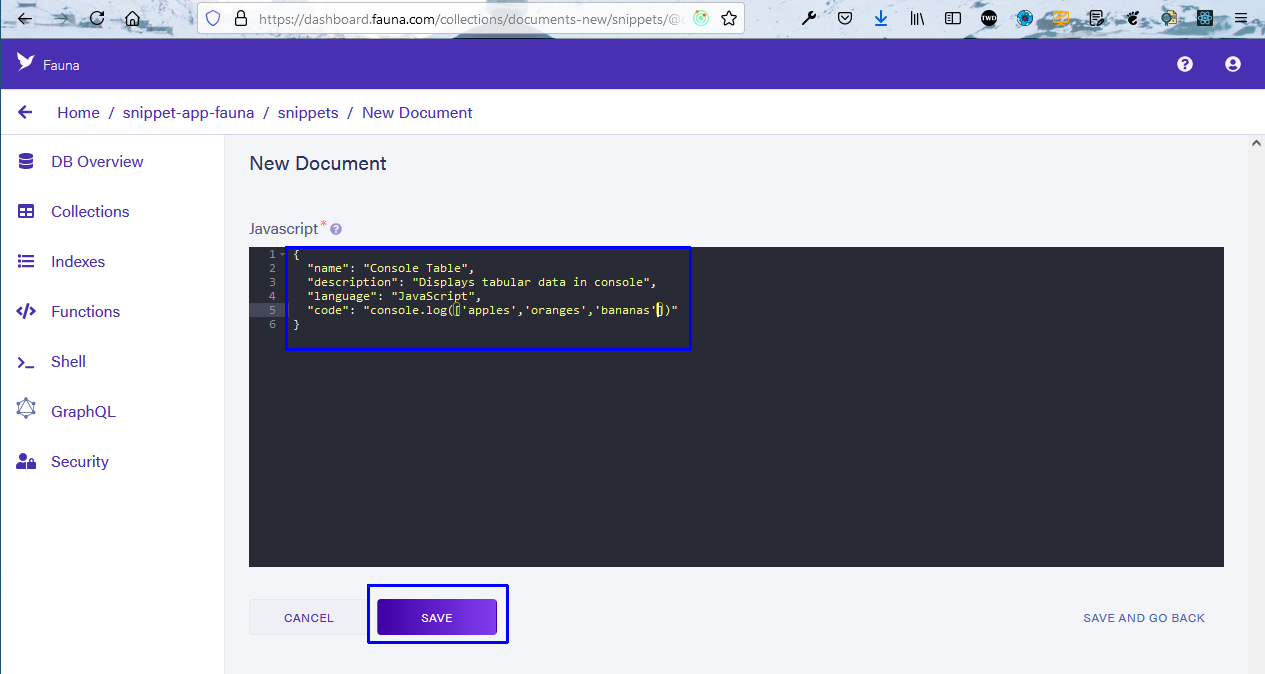 Editor
Next, in Collection -> Snippet, we can see our document.
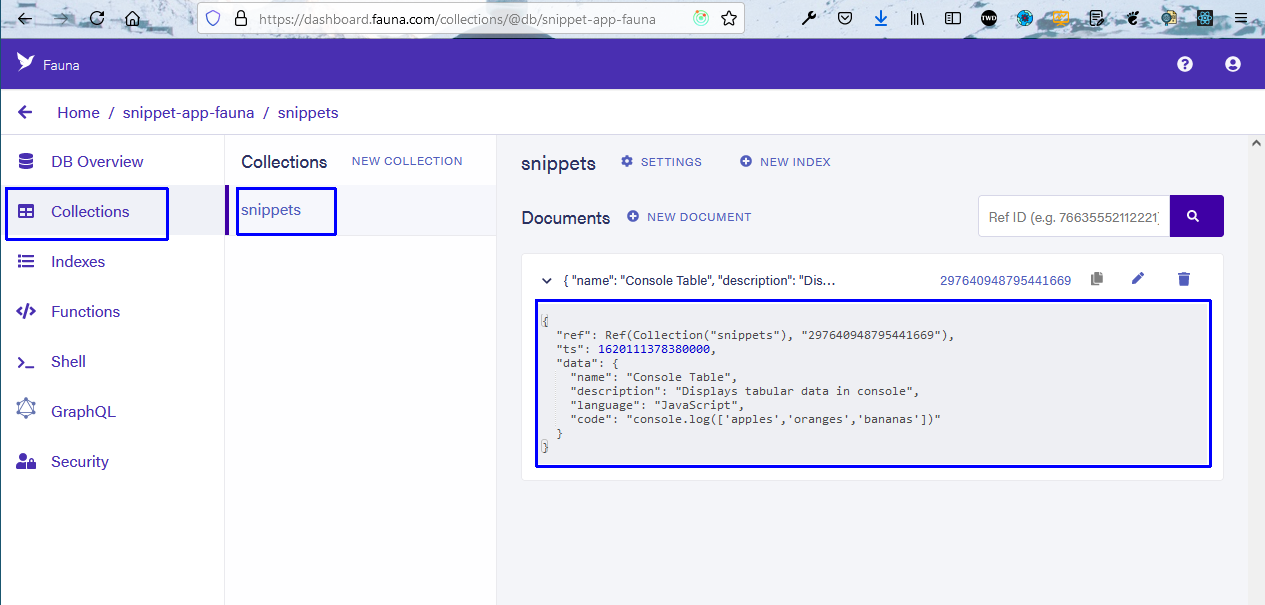 Document
We need to set the API keys next. So, click on the Security tab and then the NEW KEY button.
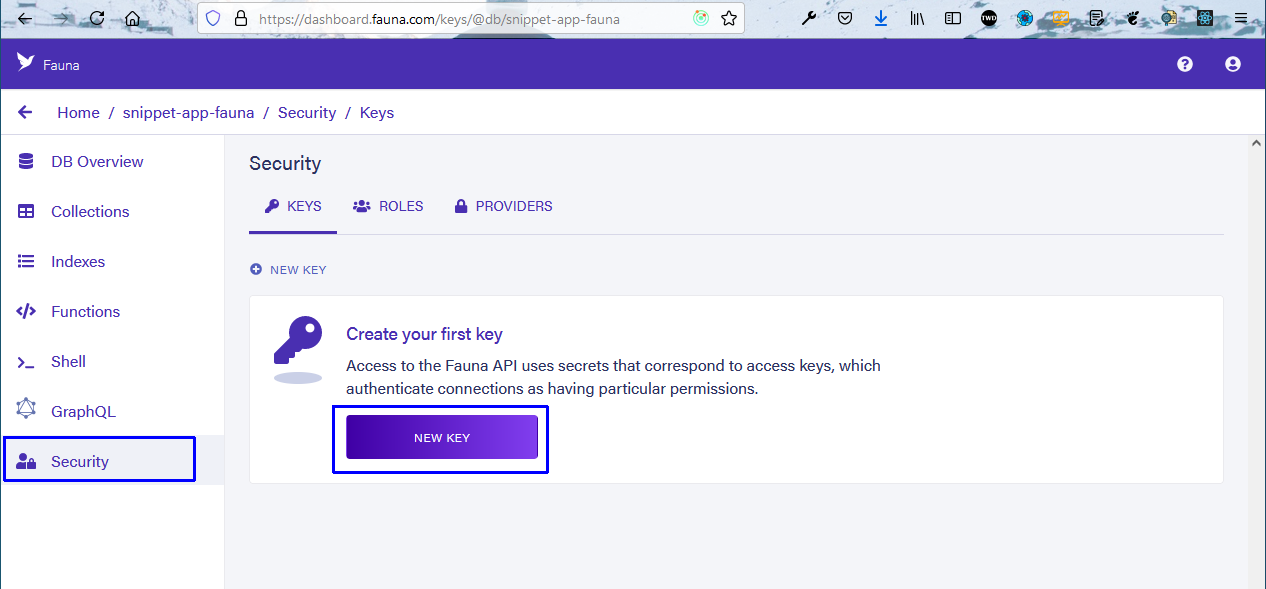 NEW KEY
In the next screen, from the Role dropdown, click on Server and then give the name snippet_app_key. And then click on the SAVE button.
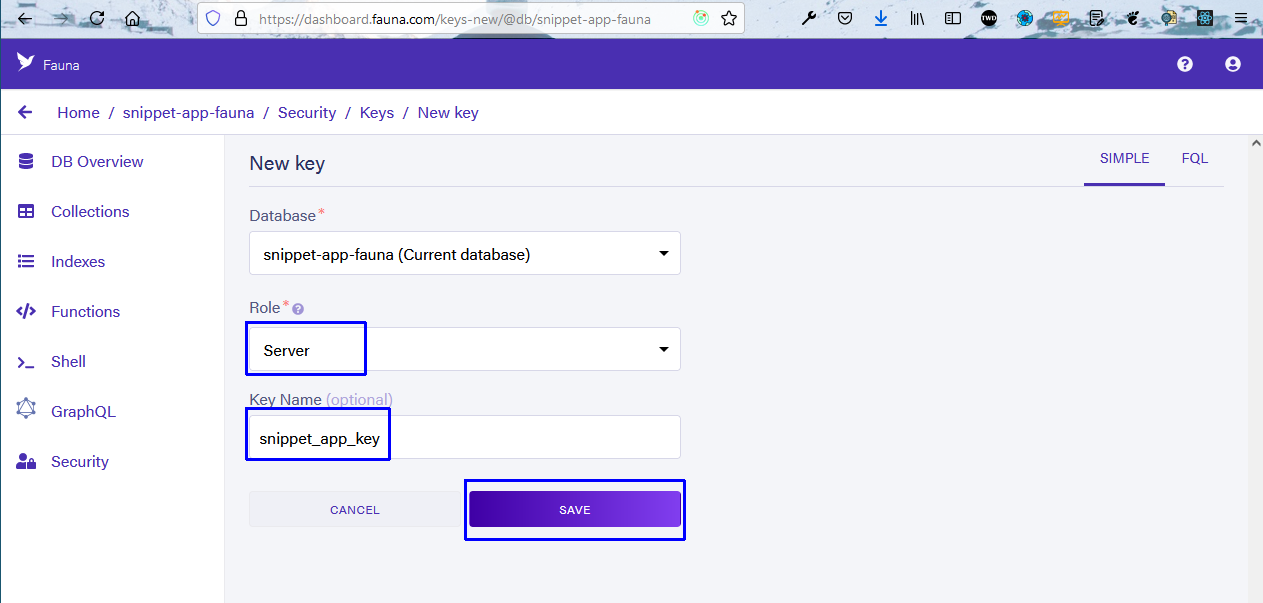 snippet key
The next screen will give our API key which we need to copy, as it won’t be shown again.
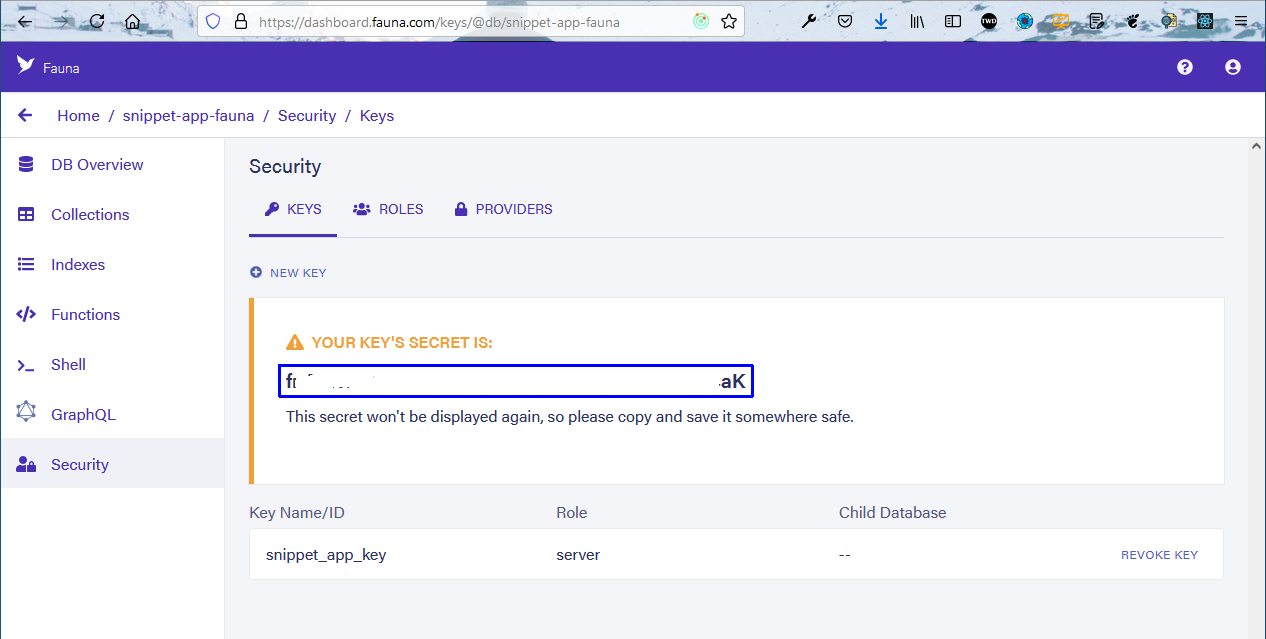 Secret Key
Now, back in our code create a file .env.local in the root directory and add the secret key in a variable FAUNA_SECRET.
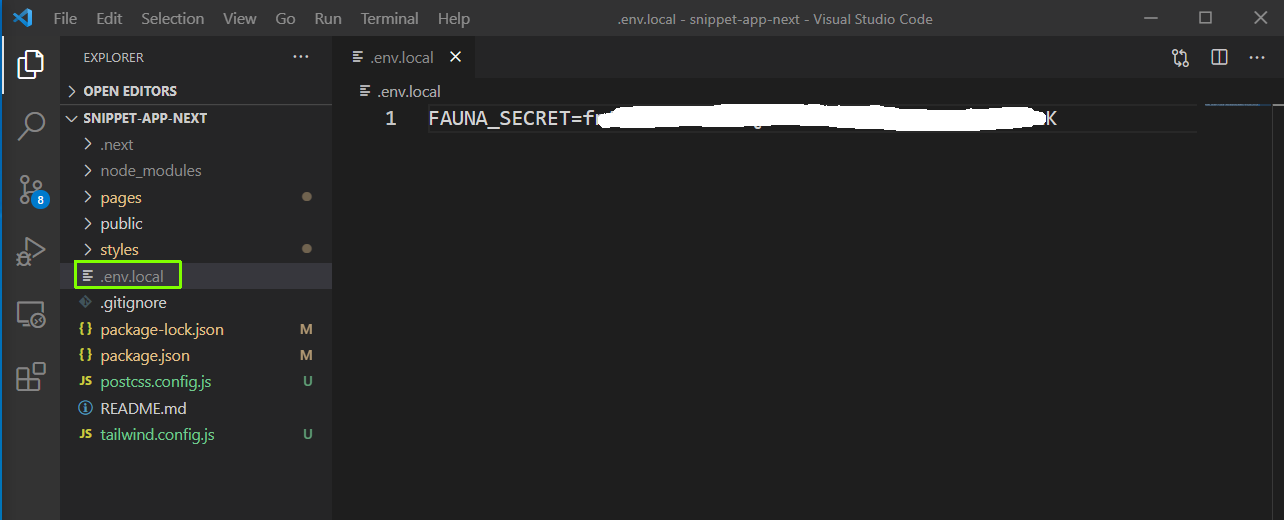 .env.local
Now, before connecting our FaunaDB to the frontend code, we will add the files to show it.
Create a components folder in the root directory and create a file Snippet.js inside it. Put the below content in it.
Here, we are getting the snippet props in which we will show the name, language, and description. We are passing the code to another component Code.
We are also showing an Edit and Delete button.
    import React from 'react';
    import Code from './Code';
    import Link from 'next/link';

    export default function Snippet({ snippet }) {

    const deleteSnippet = async () => {
        };

        return (
            <div className="bg-gray-100 p-4 rounded-md my-2 shadow-lg">
                <div className="flex items-center justify-between mb-2">
                    <h2 className="text-xl text-gray-800 font-bold">
                        {snippet.data.name}
                    </h2>
                    <span className="font-bold text-xs text-red-800 px-2 py-1 rounded-lg ">
                        {snippet.data.language}
                    </span>
                </div>
                <p className="text-gray-900 mb-4">{snippet.data.description}</p>
                <Code code={snippet.data.code} />
                <Link href={`/edit/${snippet.id}`}>
                    <a className="text-gray-800 mr-2">Edit</a>
                </Link>
                <button onClick={deleteSnippet} className="text-gray-800 mr-2">
                    Delete
                </button>
            </div>
        );
    }
Now, create a file Code.js in the same folder and add the below content in it. Here, we will show the code on the click of a button. We also have a copy functionality, which copies the code to the clipboard.
    import React, { useState } from 'react';

    export default function Code({ code }) {
        const [showCode, setShowCode] = useState(false);
        const [copyText, setCopyText] = useState('Copy');
        const copyCode = async () => {
            await navigator.clipboard.writeText(code);
            setCopyText('✅ Copied!');
            setTimeout(() => {
                setCopyText('Copy');
            }, 1000);
        };

        return (
            <div>
                <button
                    className="bg-red-800 text-xs hover:bg-red-900 text-white font-bold py-1 px-2 rounded focus:outline-none focus:shadow-outline mb-2"
                    type="submit"
                    onClick={() => setShowCode(!showCode)}
                >
                    {showCode ? 'Hide the Code' : 'Show the Code 👇'}
                </button>
                {showCode && (
                    <div className="relative">
                        <pre className="text-gray-800 bg-gray-300 rounded-md p-2">
                            {code}
                        </pre>

    <button
                            className="bg-gray-500 text-xs hover:bg-gray-600 text-white font-bold py-1 px-2 rounded focus:outline-none focus:shadow-outline mb-2 absolute top-0 right-0 transform -translate-x-1 translate-y-1"
                            type="submit"
                            onClick={copyCode}
                        >
                            {copyText}
                        </button>
                    </div>
                )}
            </div>
        );
    }
Now, with Next.js, we can use server-side route code also, as we do in Node.js. So, inside the pages-> api folder, create a new file snippets.js and add the below content in it. We will create the API endpoints in it soon.
    import { getSnippets } from '../../utils/Fauna';
    export default async function handler(req, res) {
        if (req.method !== 'GET') {
            return res.status(405);
        }

    try {

        } catch (err) {
            console.error(err);
            res.status(500).json({ msg: 'Something went wrong.' });
        }
    }
Now, it’s time to connect our frontend to FaunaDB. So, create a folder utils in the root directory and a file Fauna.js inside it. Put the below content in it.
Here, we are first doing the required imports and after that, we have a getSnippets function. In the function, we are first iterating through our collection snippets which we have created earlier, and getting everything in the data variable.
We need the id of each snippet to be extracted from ref, so we are mapping through it and changing it. Lastly, we are exporting the getSnippets function.
    const faunadb = require('faunadb');
    const faunaClient = new faunadb.Client({ secret: process.env.FAUNA_SECRET });
    const q = faunadb.query;

    const getSnippets = async () => {
        const { data } = await faunaClient.query(
            q.Map(
                q.Paginate(q.Documents(q.Collection('snippets'))),
                q.Lambda('ref', q.Get(q.Var('ref')))
            )
        );

    const snippets = data.map(snippet => {
            snippet.id = snippet.ref.id;
            delete snippet.ref;
            return snippet;
        });

    return snippets;
    };

    module.exports = {
        getSnippets,
    };
Now, we will update our code in the snippets.js file by calling getSnippets() and returning the snippets array.
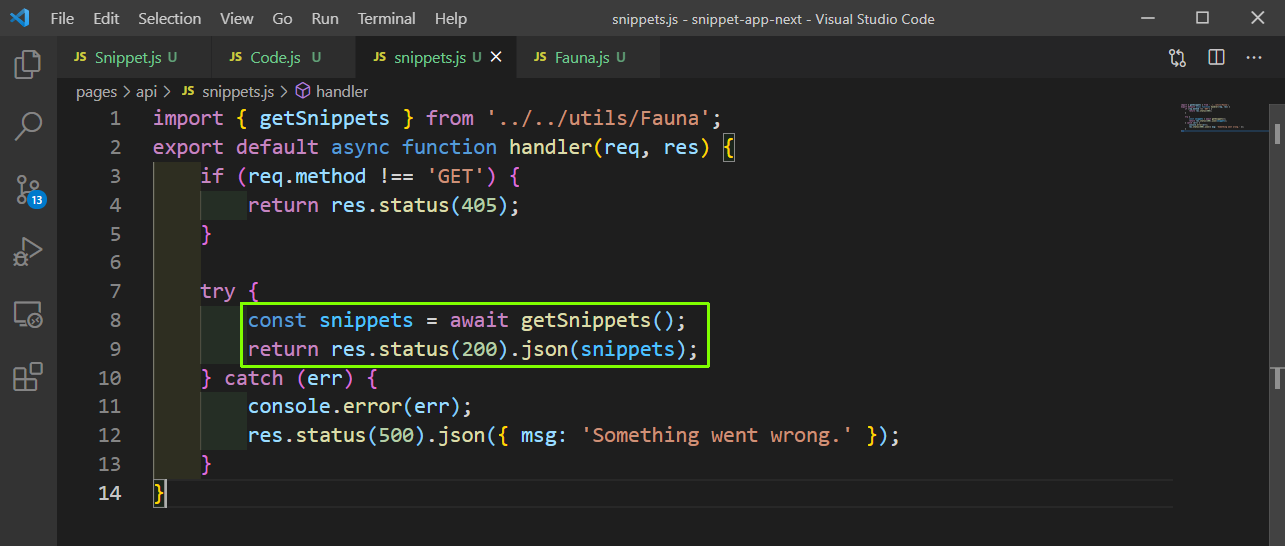 snippets.js
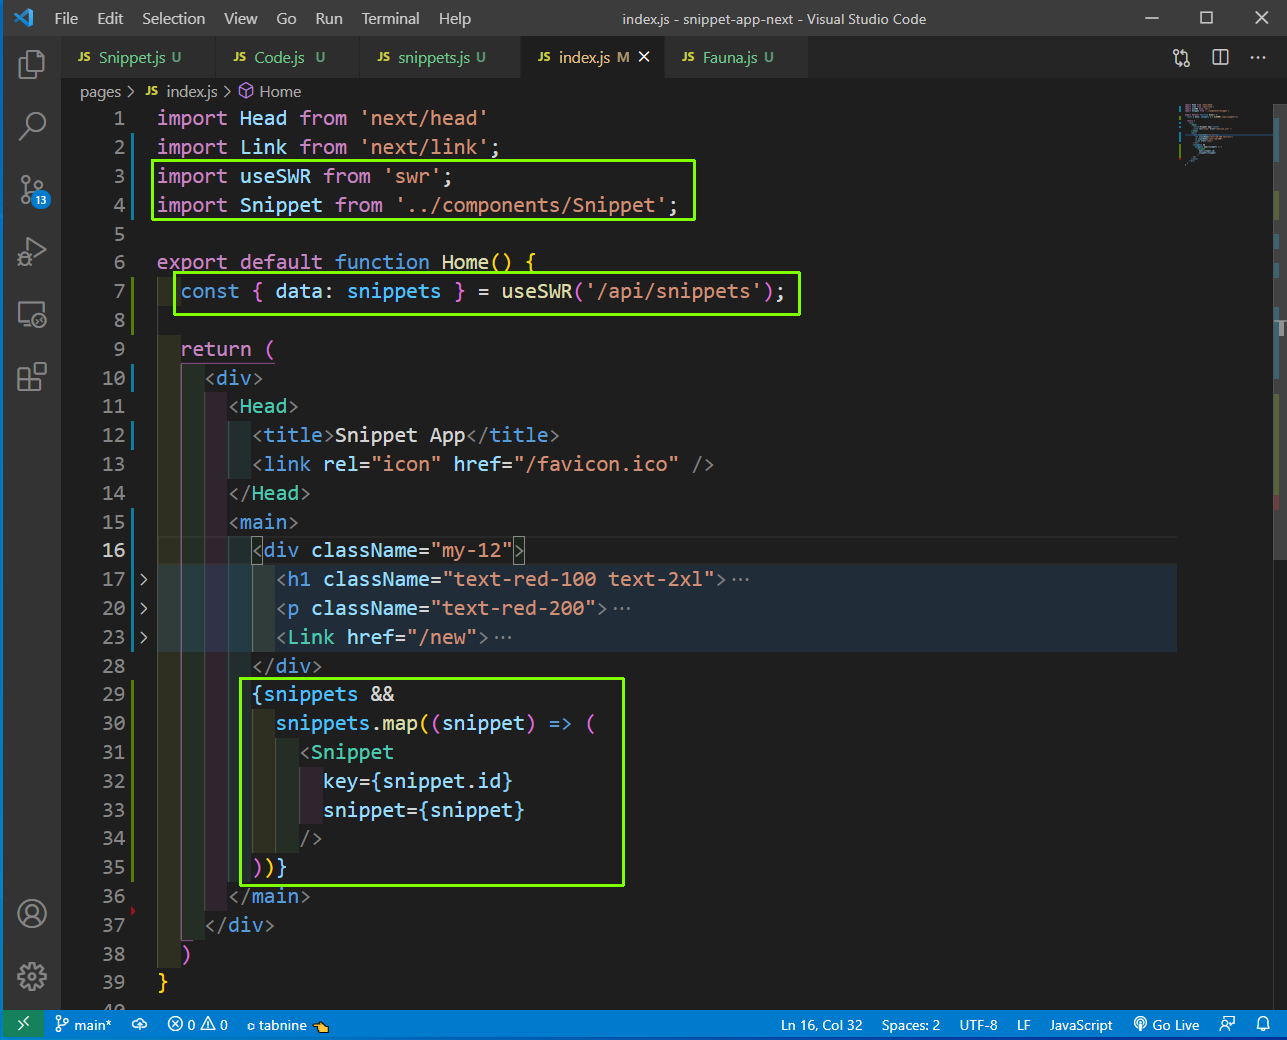
Next, we will update our index.js page to get all the snippets using SWR. Here, we are using the useSWR hook to call the /api/snippets endpoint and get the snippets array. After that, we are mapping through it and passing it to the Snippet component, which we have created earlier.
 index.js
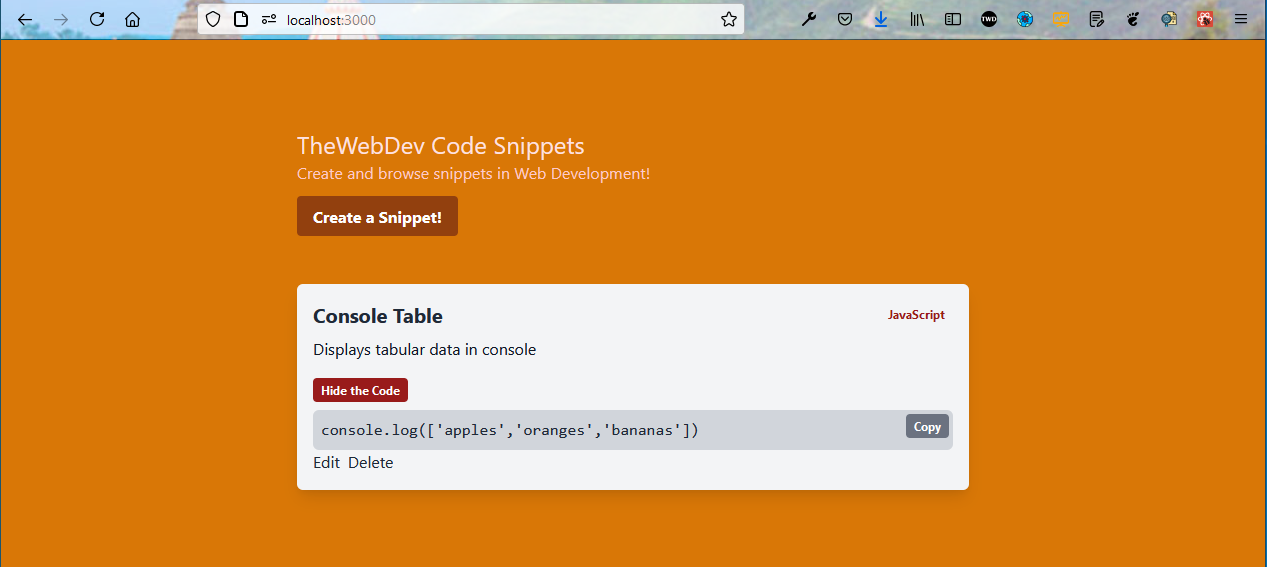
Now, our homepage shows our snippet has been fetched from the FaunaDB database.
 FaunaDB data
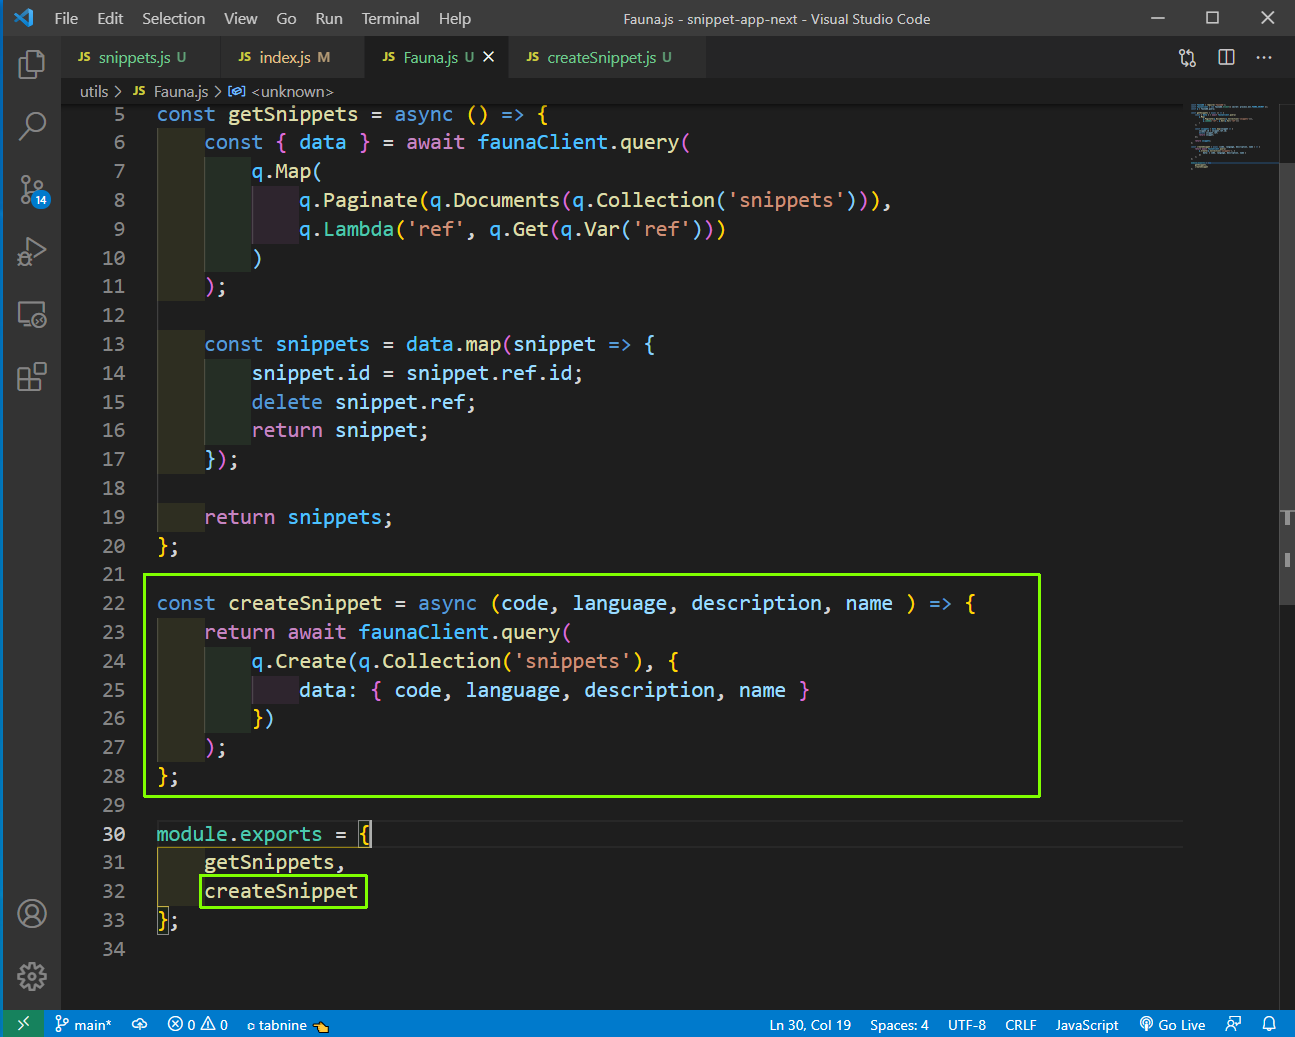
Now, we will add the functionality to create a snippet. We will first create a new function createSnippet inside the Fauna.js file. It will add a new snippet with values code, language, description, name in FaunaDB.
 Fauna.js
Next, create a file createSnippet.js inside the api folder and add the below content in it. It is mostly similar to our snippets.js file, but used to call the createSnippet function.
    import { createSnippet } from '../../utils/Fauna';

    export default async function handler(req, res) {
        const { code, language, description, name } = req.body;
        if (req.method !== 'POST') {
            return res.status(405).json({ msg: 'Method not allowed' });
        }

    try {
            const createdSnippet = await createSnippet(code, language, description, name);
            return res.status(200).json(createdSnippet);
        } catch (err) {
            console.error(err);
            res.status(500).json({ msg: 'Something went wrong.' });
        }
    }
Now, we need to show a form to take input from the user and for this create a new file new.js inside the pages folder. Put the below content in it. It is just calling a component SnippetForm which we will create next.
    import Head from 'next/head';
    import SnippetForm from '../components/SnippetForm';

    export default function Home() {
        return (
            <div>
                <Head>
                    <title>Create Next Snippet</title>
                    <link rel="icon" href="/favicon.ico" />
                </Head>

    <main className="max-w-lg mx-auto">
                    <h1 className="text-red-100 text-2xl mb-4">New Snippet</h1>
                    <SnippetForm />
                </main>
            </div>
        );
    }
Next, create a file SnippetForm.js inside the components folder and put the below content in it. We are using the package react-hook-form in it, which is useful to maintain form state and do validations.
Put the below content in it. Here, we are creating a form with the help of react-hook-form. Notice that we have used register, handleSubmit from react-hook-form.
The register code is used in each field and we need to wrap our function createSnippet with handleSubmit in the form.
Now, in the createSnippet function, we will send a POST request to /api/createSnippet which we created earlier and send the code, language, description, name as the body.
    import React from 'react';
    import { useForm } from 'react-hook-form';
    import { useRouter } from 'next/router';
    import Link from 'next/link';

    export default function SnippetForm() {
        const {register, handleSubmit} = useForm();
        const router = useRouter();

    const createSnippet = async (data) => {
            const { code, language, description, name } = data;
            try {
                await fetch('/api/createSnippet', {
                    method: 'POST',
                    body: JSON.stringify({ code, language, description, name }),
                    headers: { 'Content-Type': 'application/json'}
                })
                router.push('/');
            } catch (err) {
                console.error(err);
            }
        };

    return (
            <form onSubmit={handleSubmit(createSnippet)}>
                <div className="mb-4">
                    <label
                        className="block text-red-100 text-sm font-bold mb-1"
                        htmlFor="name"
                    >
                        Name
                    </label>
                    <input
                        type="text"
                        id="name"
                        name="name"
                        className="w-full border bg-white rounded px-3 py-2 outline-none text-gray-700"
                        {...register('name', { required: true })}
                    />
                </div>
                <div className="mb-4">
                    <label
                        className="block text-red-100 text-sm font-bold mb-1"
                        htmlFor="language"
                    >
                        Language
                    </label>
                    <select
                        id="language"
                        name="language"
                        className="w-full border bg-white rounded px-3 py-2 outline-none text-gray-700"
                        {...register('language', { required: true })}
                    >
                        <option className="py-1">JavaScript</option>
                        <option className="py-1">HTML</option>
                        <option className="py-1">CSS</option>
                    </select>
                </div>
                <div className="mb-4">
                    <label
                        className="block text-red-100 text-sm font-bold mb-1"
                        htmlFor="description"
                    >
                        Description
                    </label>
                    <textarea
                        name="description"
                        id="description"
                        rows="3"
                        className="resize-none w-full px-3 py-2 text-gray-700 border rounded-lg focus:outline-none"
                        placeholder="What does the snippet do?"
                        {...register('description', { required: true })}
                    ></textarea>
                </div>
                <div className="mb-4">
                    <label
                        className="block text-red-100 text-sm font-bold mb-1"
                        htmlFor="code"
                    >
                        Code
                    </label>
                    <textarea
                        name="code"
                        id="code"
                        rows="10"
                        className="resize-none w-full px-3 py-2 text-gray-700 border rounded-lg focus:outline-none"
                        placeholder="ex. console.log('helloworld')"
                        {...register('code', { required: true })}
                    ></textarea>
                </div>
                <button
                    className="bg-red-800 hover:bg-red-900 text-white font-bold py-2 px-4 rounded focus:outline-none focus:shadow-outline mr-2"
                    type="submit"
                >
                    Save
                </button>
                <Link href="/">
                    <a className="mt-3 inline-block bg-red-800 hover:bg-red-900 text-white font-bold py-2 px-4 rounded focus:outline-none focus:shadow-outline mr-2">
                        Cancel
                    </a>
                </Link>
            </form>
        );
    }
Now, from home page when we click on the Create a Snippet button we will be taken to below form, in which we can fill the data.
 Data fill
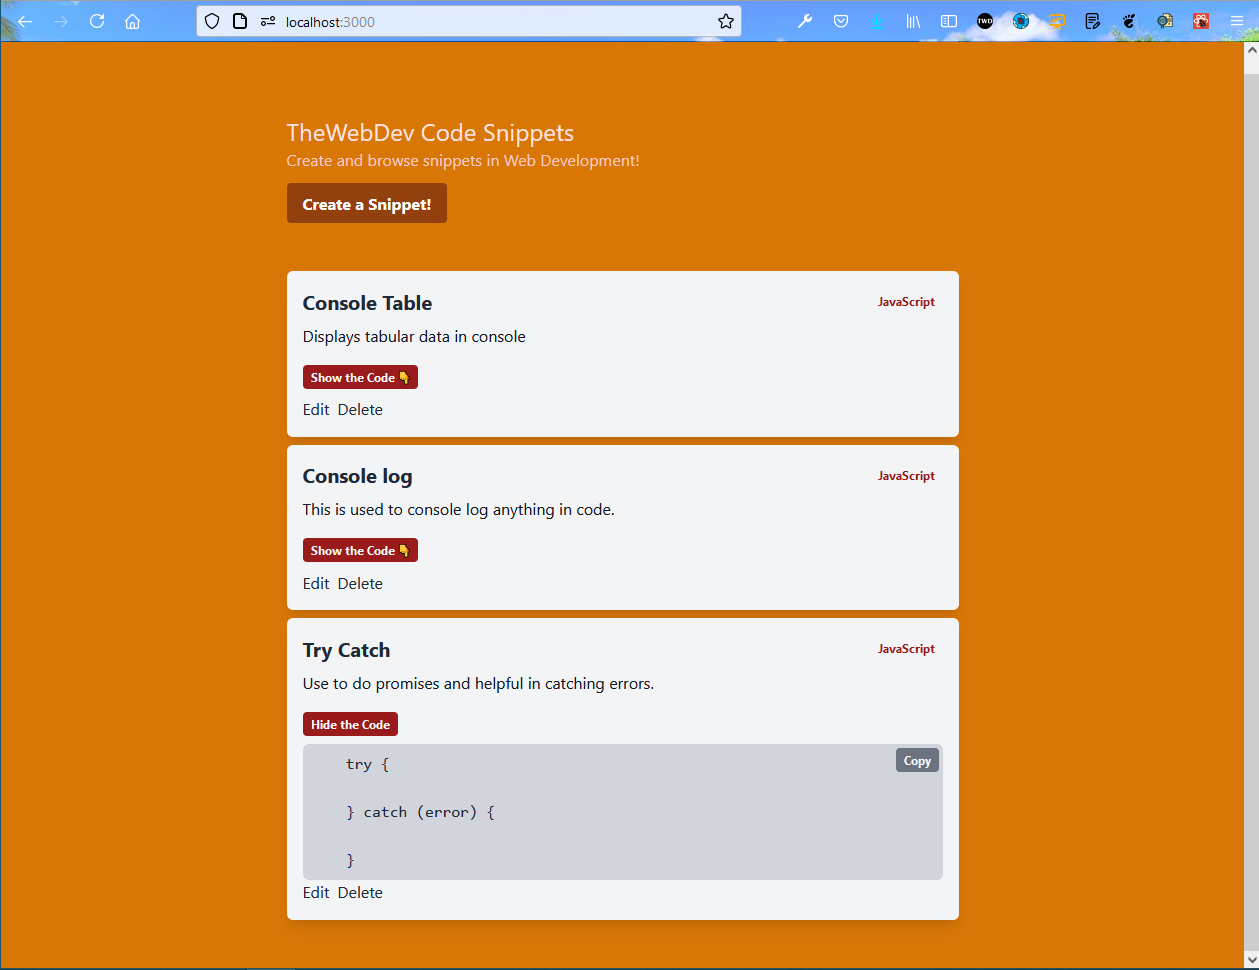
After we click on the Save button, we are taken back to the home page and out snippet been added.
 Snippet added
Now, we will add the Update functionality in our App. So, again go to the Fauna.js file and add two new functions updateSnippet and getSnippetById, which are similar to createSnippet.
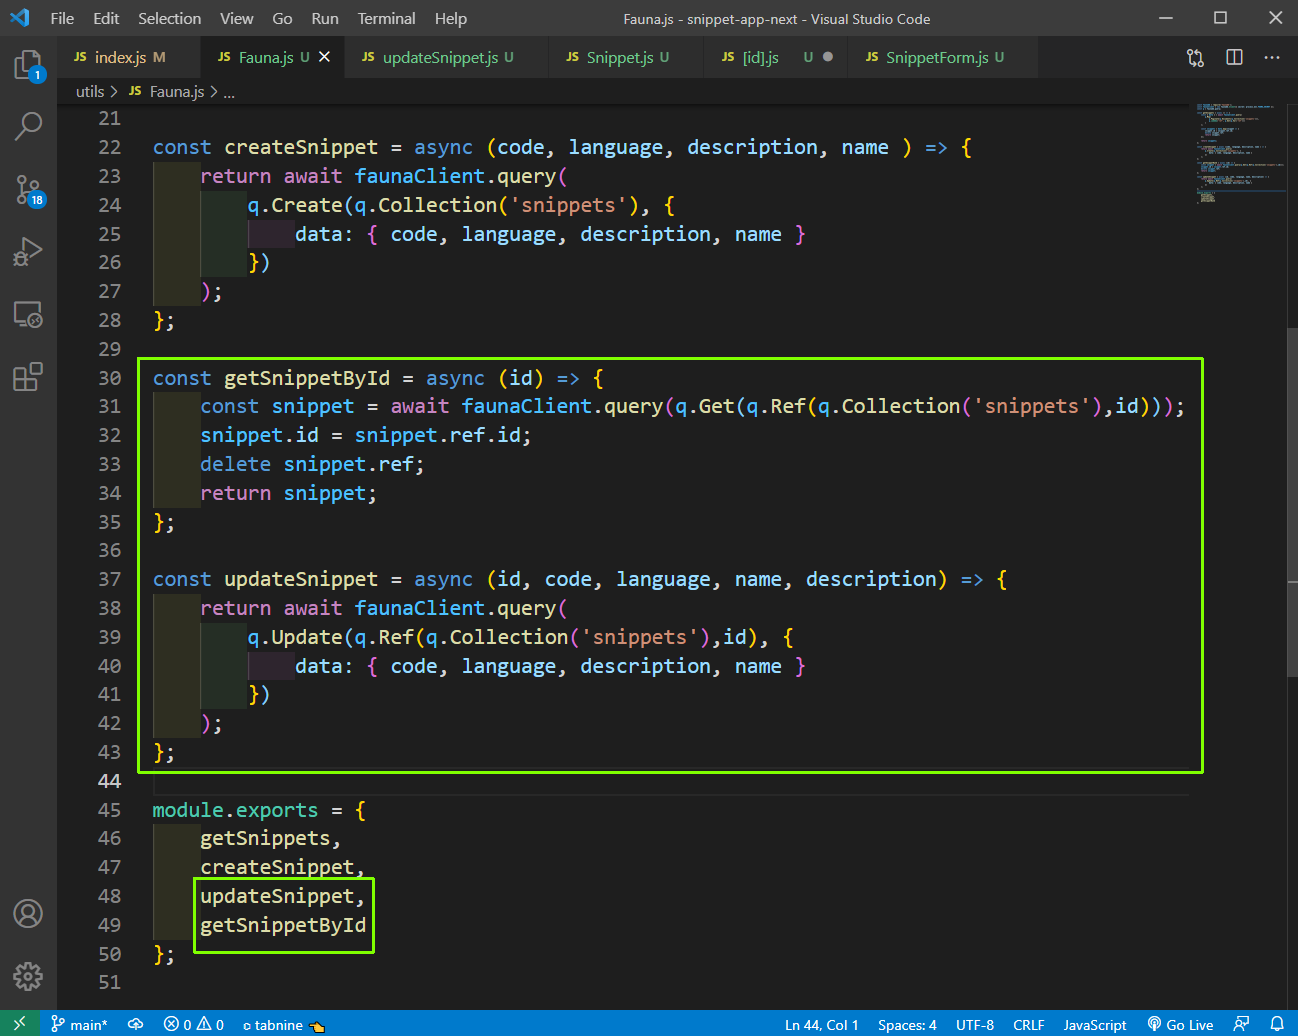
Next, create a file updateSnippet.js inside the api folder and add the below content in it. It is mostly similar to our createSnippet.js file, but used to call updateSnippet function.
    import { updateSnippet } from '../../utils/Fauna';

    export default async function handler(req, res) {
        if (req.method !== 'PUT') {
            return res.status(405).json({ msg: 'Method not allowed' });
        }
        const { id, code, language, description, name } = req.body;

    try {
            const updated = await updateSnippet(id, code, language, description, name);
            return res.status(200).json(updated);
        } catch (err) {
            console.error(err);
            res.status(500).json({ msg: 'Something went wrong.' });
        }
    }
Now, we need to create a dynamic route which will be called when the user clicks on the edit link. So, create a folder edit inside the pages folder and a file [id].js inside it.
Put the below content in it. Here, we are using getSnippetById to get the snippet data and then passing it to the SnippetForm component.
    import Head from 'next/head';
    import { getSnippetById } from '../../utils/Fauna';
    import SnippetForm from '../../components/SnippetForm';

    export default function Home({ snippet }) {
        return (
            <div>
                <Head>
                    <title>Update Next Snippet</title>
                    <link rel="icon" href="/favicon.ico" />
                </Head>

    <main className="max-w-lg mx-auto">
                    <h1 className="text-red-100 text-2xl mb-4">Update Snippet</h1>
                    <SnippetForm snippet={snippet} />
                </main>
            </div>
        );
    }

    export async function getServerSideProps(context) {
        try {
            const id = context.params.id;
            const snippet = await getSnippetById(id);

    return {
                props: { snippet },
            };
        } catch (error) {
            console.error(error);
            context.res.statusCode = 302;
            context.res.setHeader('Location', `/`);
            return { props: {} };
        }
    }
Next, we will add the Edit functionality in our SnippetForm.js file. Here, we are first taking the prop snippet. After that inside the useForm hook, we will take the defaultValues if we get the snippet prop.
In the onSumbit of the form, we are again checking whether snippet prop is there and calling updateSnippet, if it is present. Otherwise, we are calling createSnippet.
The updateSnippet is quite similar to createSnippet, only we are doing a PUT call and passing the id also.
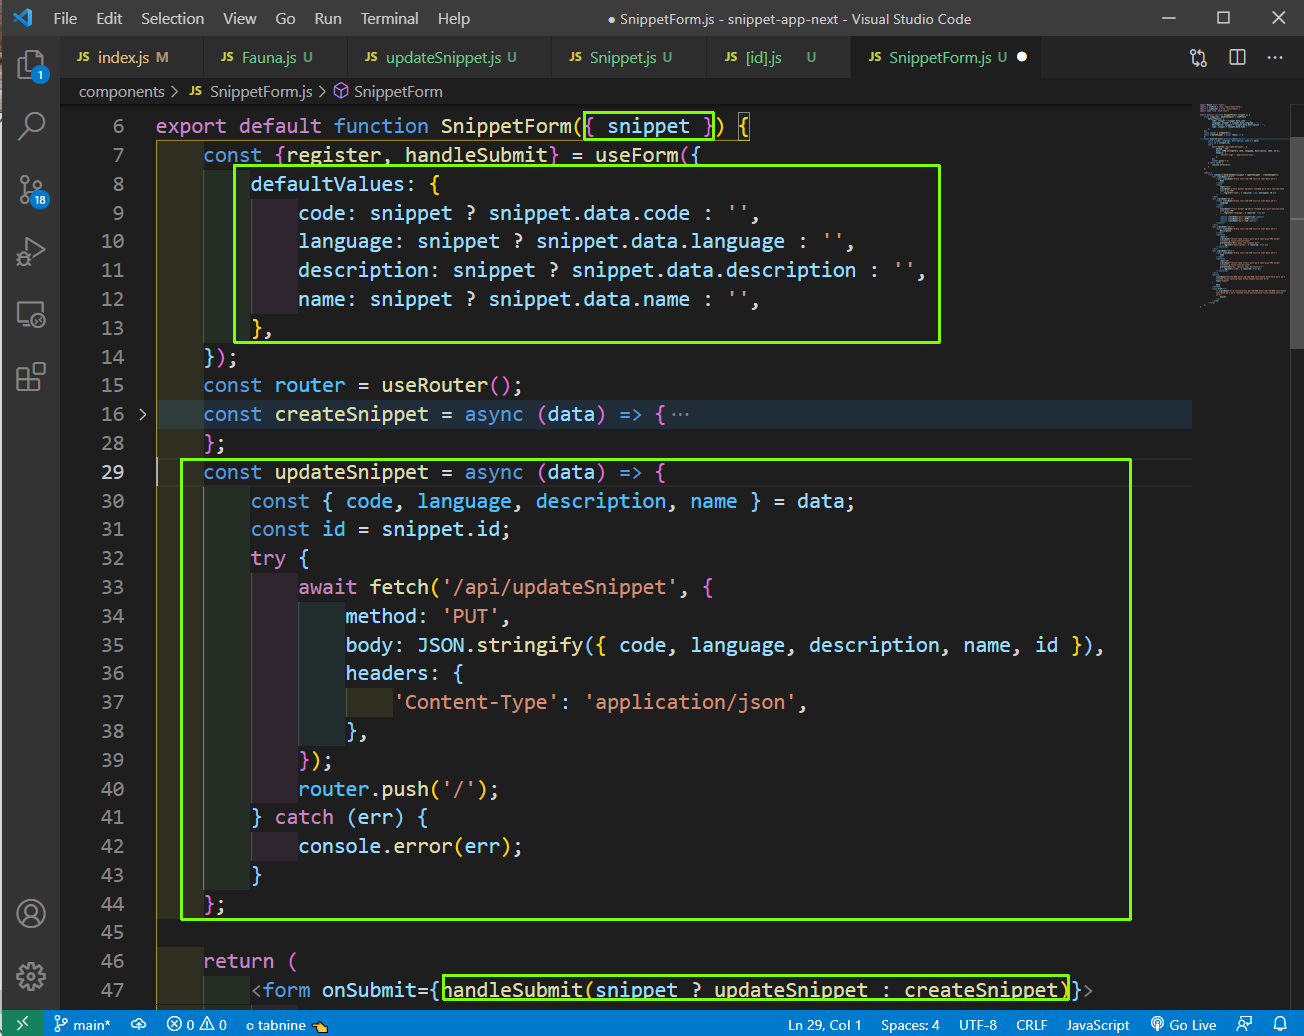 SnippetForm.js
Now, edit something and save in localhost and it will work properly. Now, we will add the logic to Delete something.
So, again go to the Fauna.js file and add a new function deleteSnippet, which is similar to earlier functions.
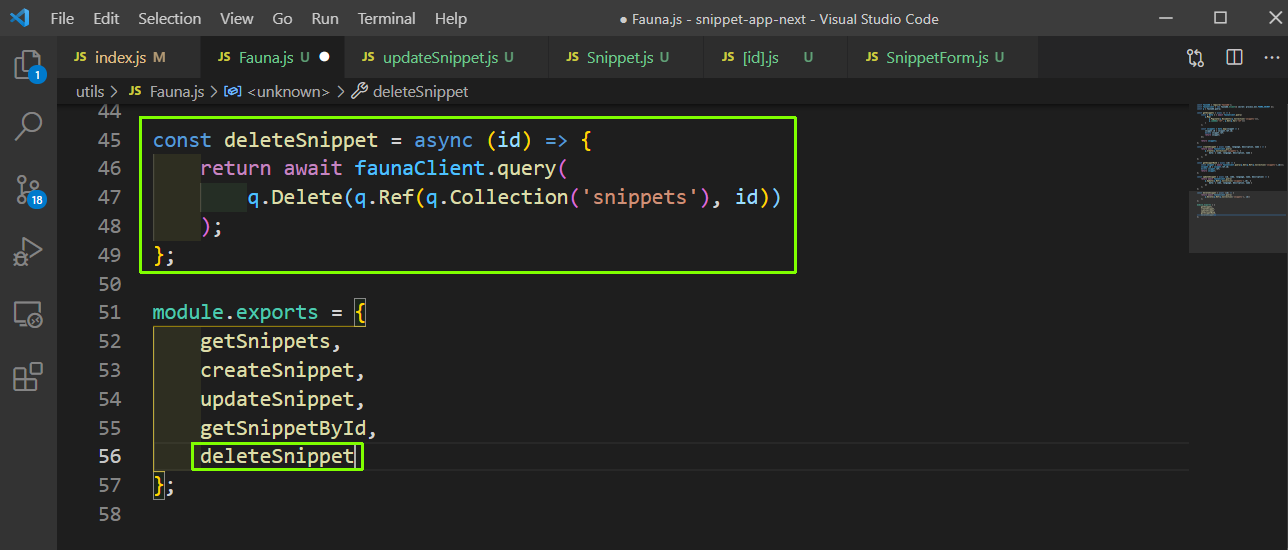 Fauna.js
Next, create a file deleteSnippet.js inside the api folder and add the below content in it. It is mostly similar to our createSnippet.js file, but used to call the deleteSnippet function.
    import { deleteSnippet } from '../../utils/Fauna';

    export default async function handler(req, res) {
        if (req.method !== 'DELETE') {
            return res.status(405).json({ msg: 'Method not allowed' });
        }

    const { id } = req.body;
        try {
            const deleted = await deleteSnippet(id);
            return res.status(200).json(deleted);
        } catch (err) {
            console.error(err);
            res.status(500).json({ msg: 'Something went wrong.' });
        }
    }
Now, in our Snippet.js file, we will add the logic to delete a snippet in the deleteSnippet function. We are also getting a new prop snippetDeleted now.
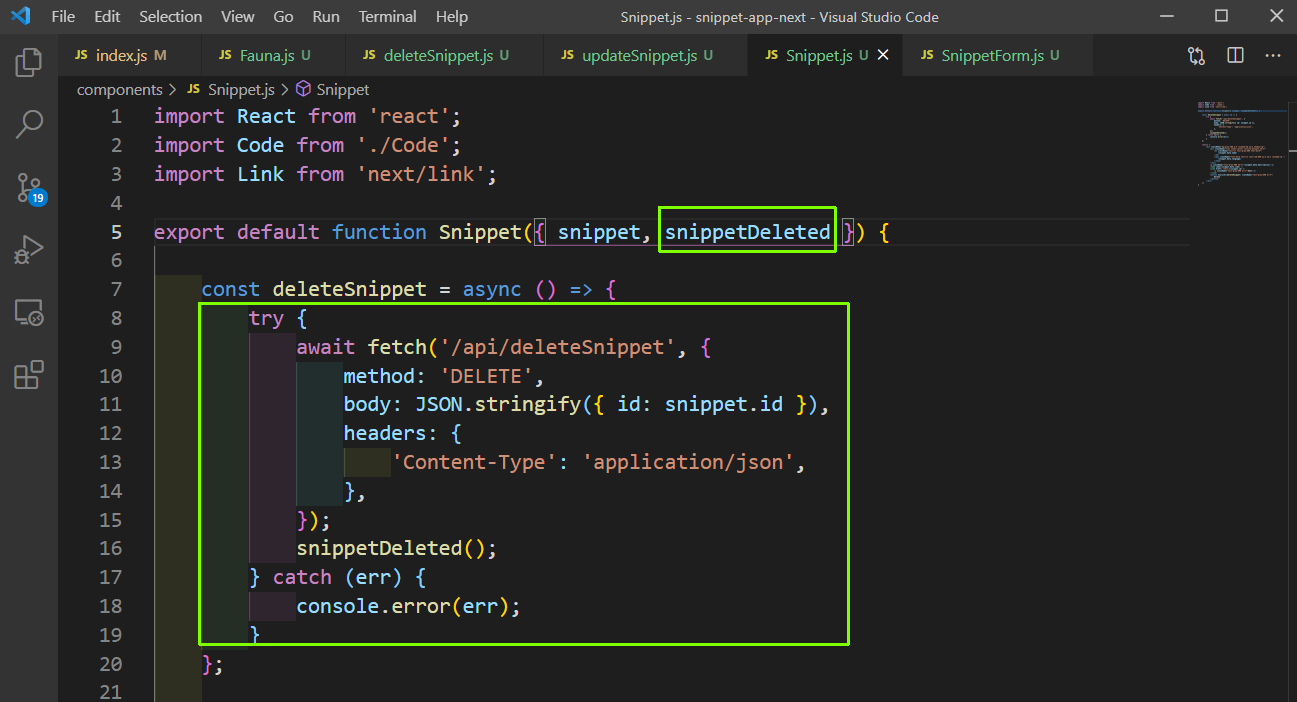 Snippet.js
Now, we will pass the prop snippetDeleted from the index.js file. The prop triggers a mutate which re-fetches the data from the server.
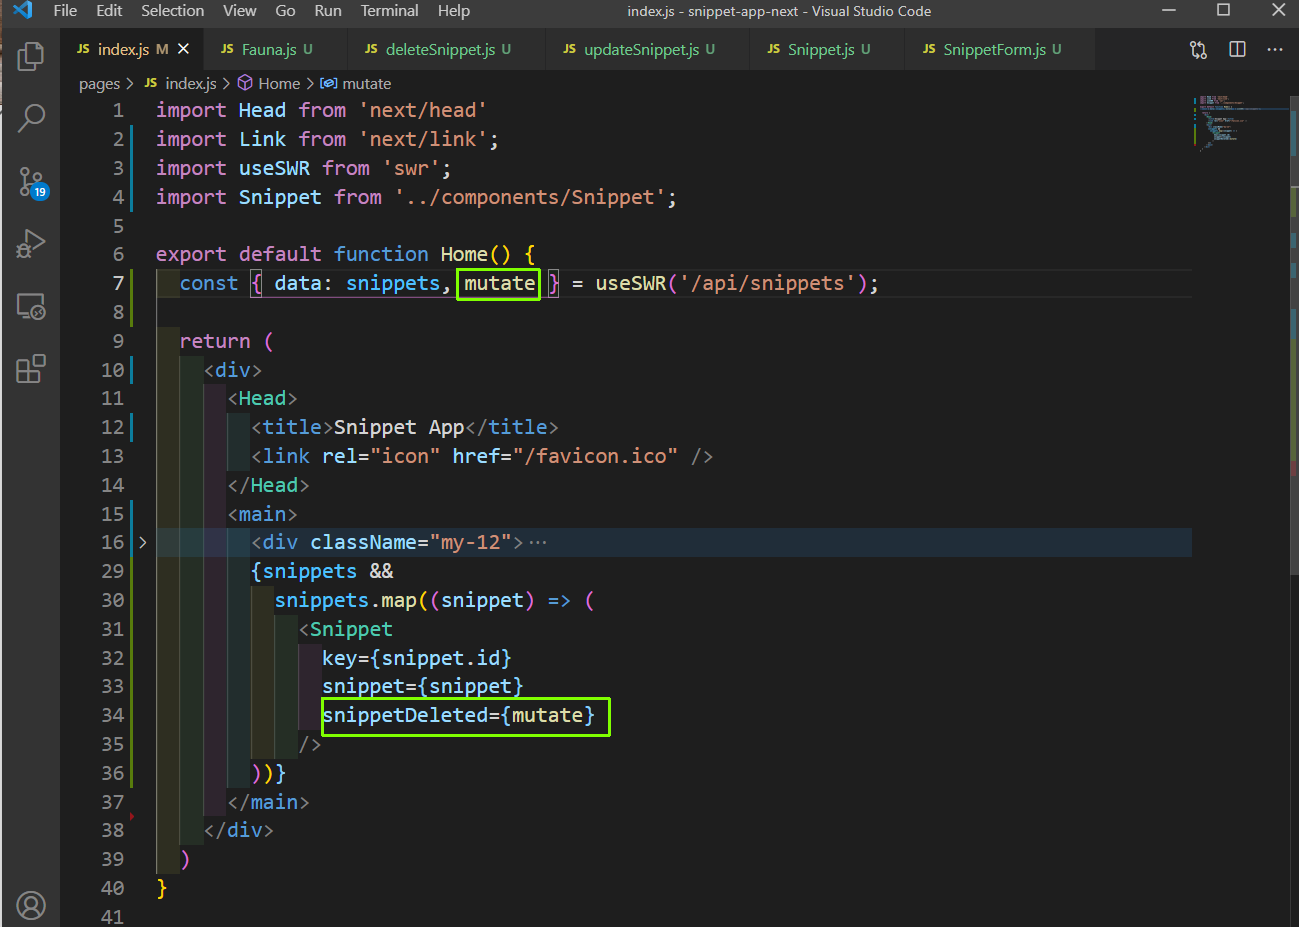 index.js
So, now our delete functionality is also working.
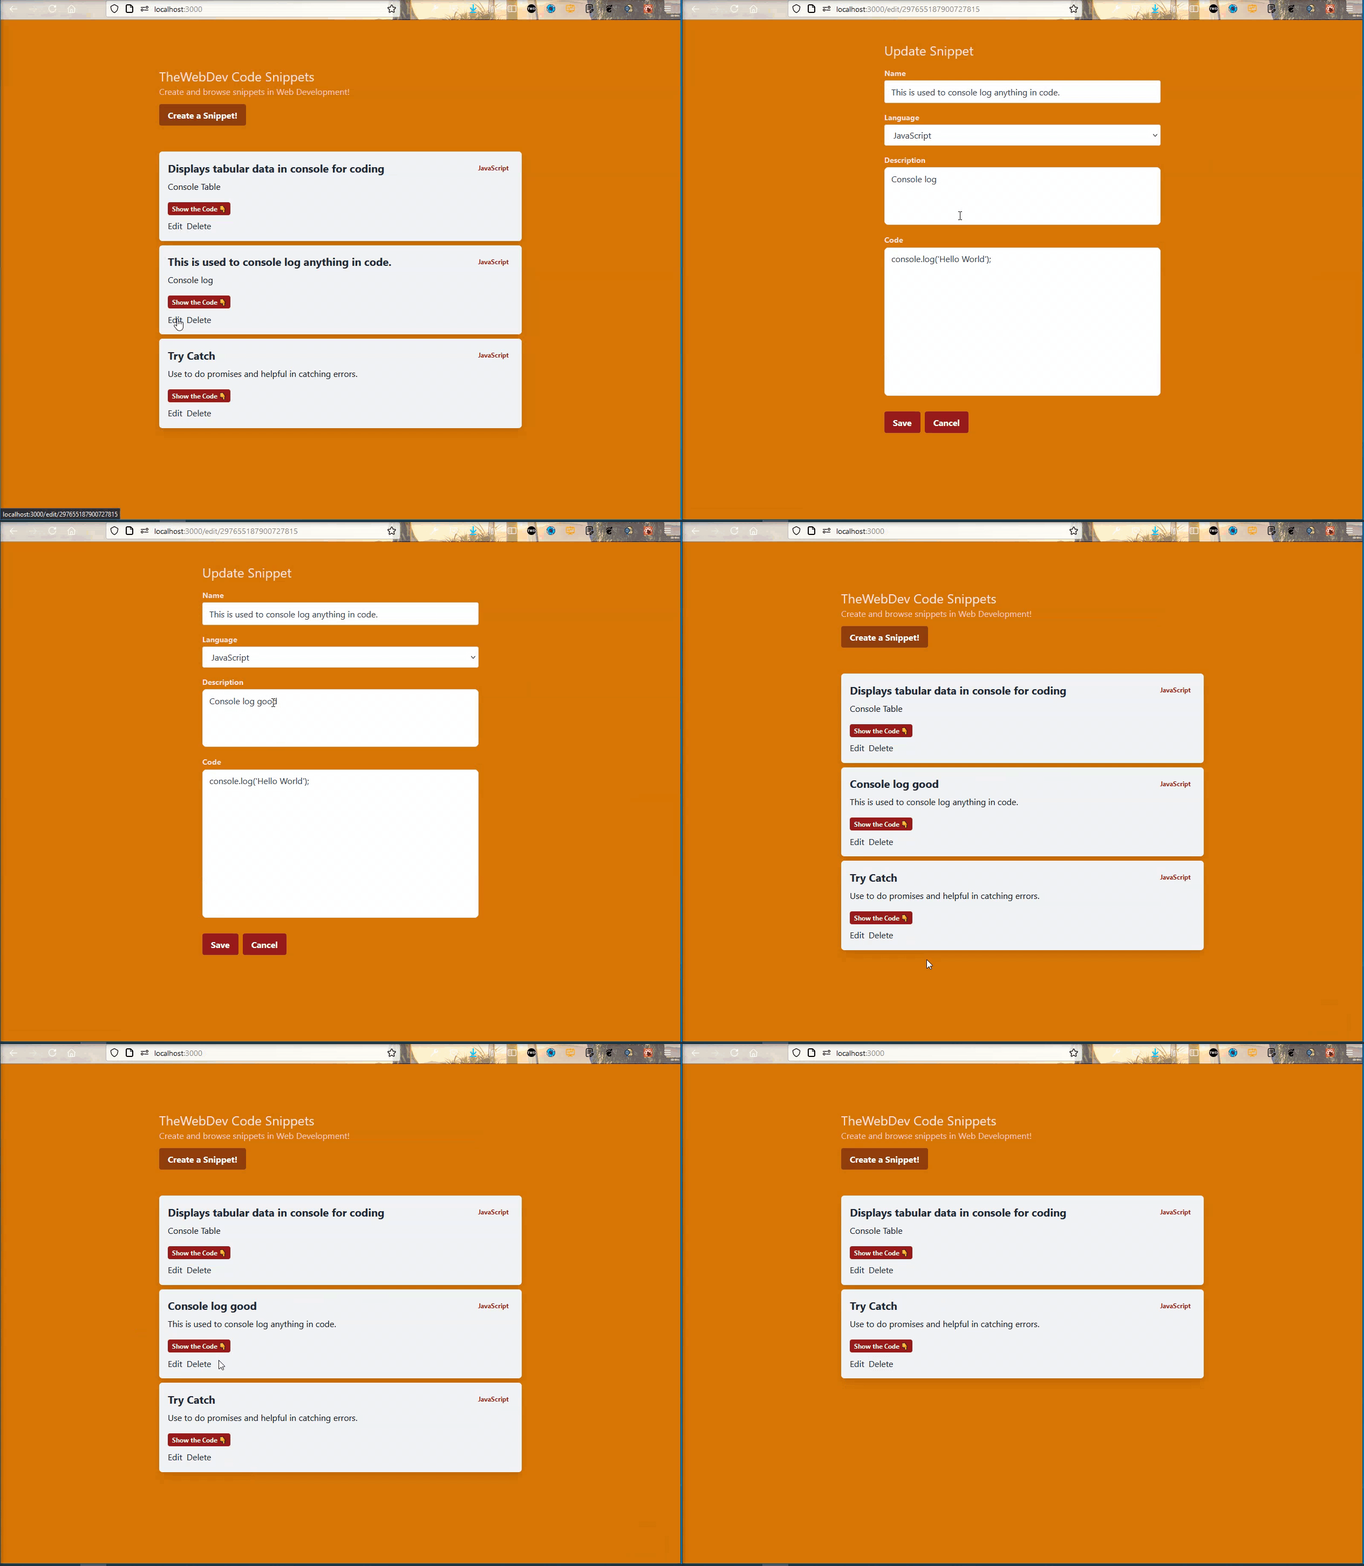 Edit and delete
Now, we will add protected routes and Authentication in our app using Auth0. So, head over to https://auth0.com/ and Sign Up.
Once you log in, hover your mouse over the right menu and then click on the Applications tab and again on Applications.
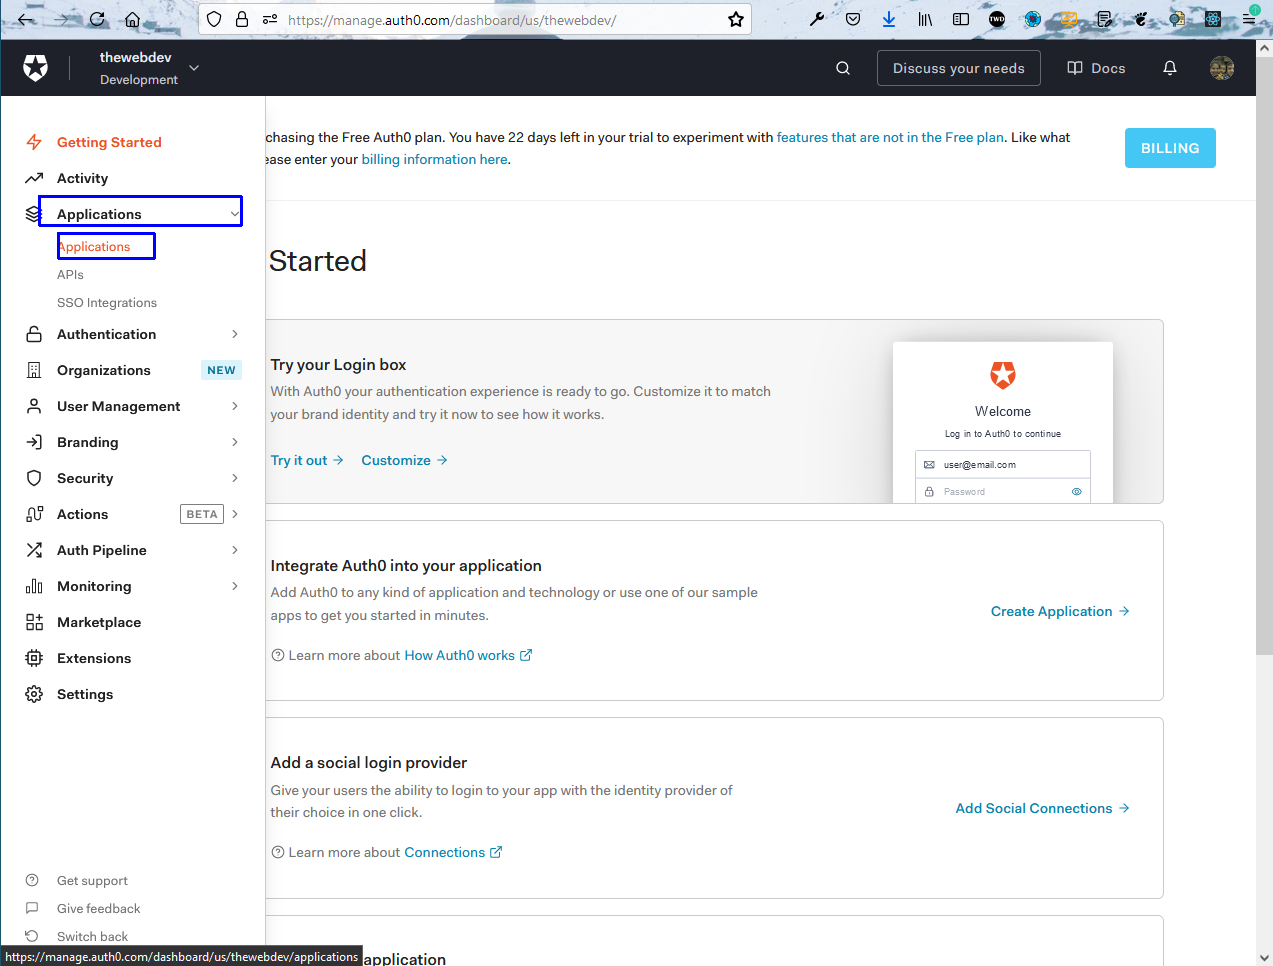 Applications
On the next screen, click on the CREATE APPLICATION button.
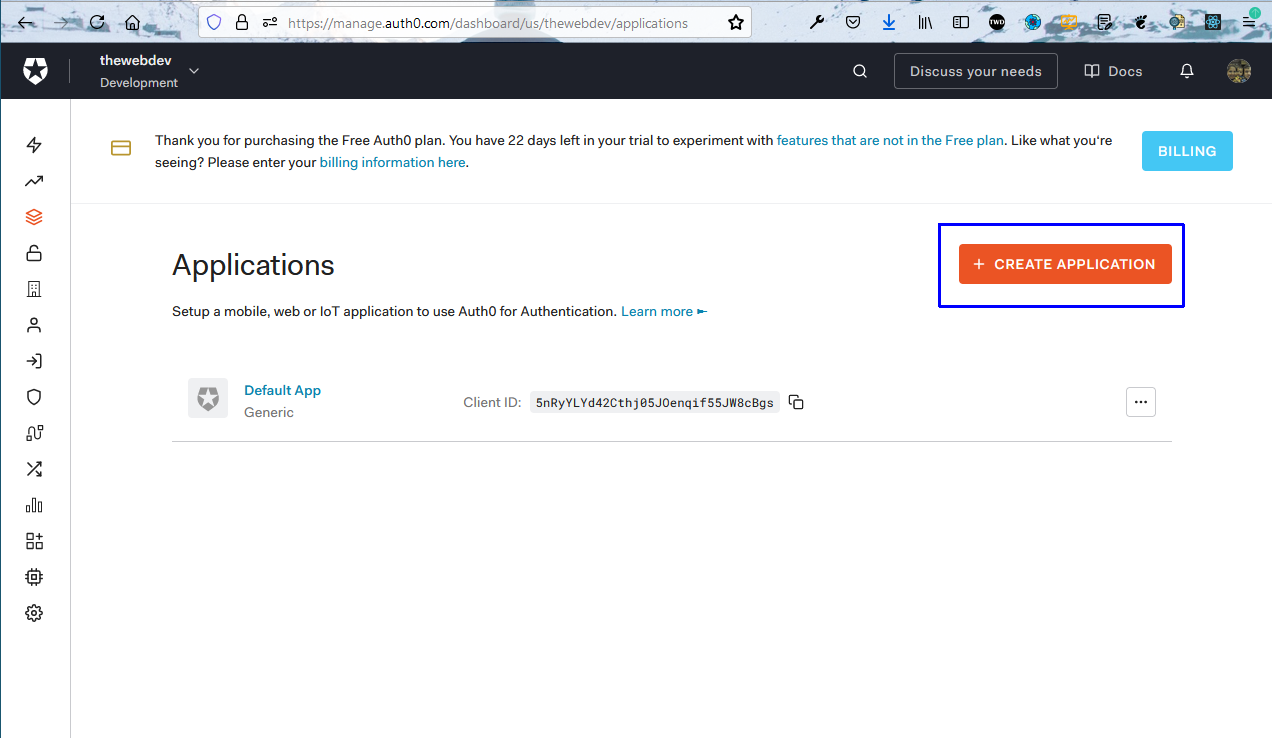 Create Application
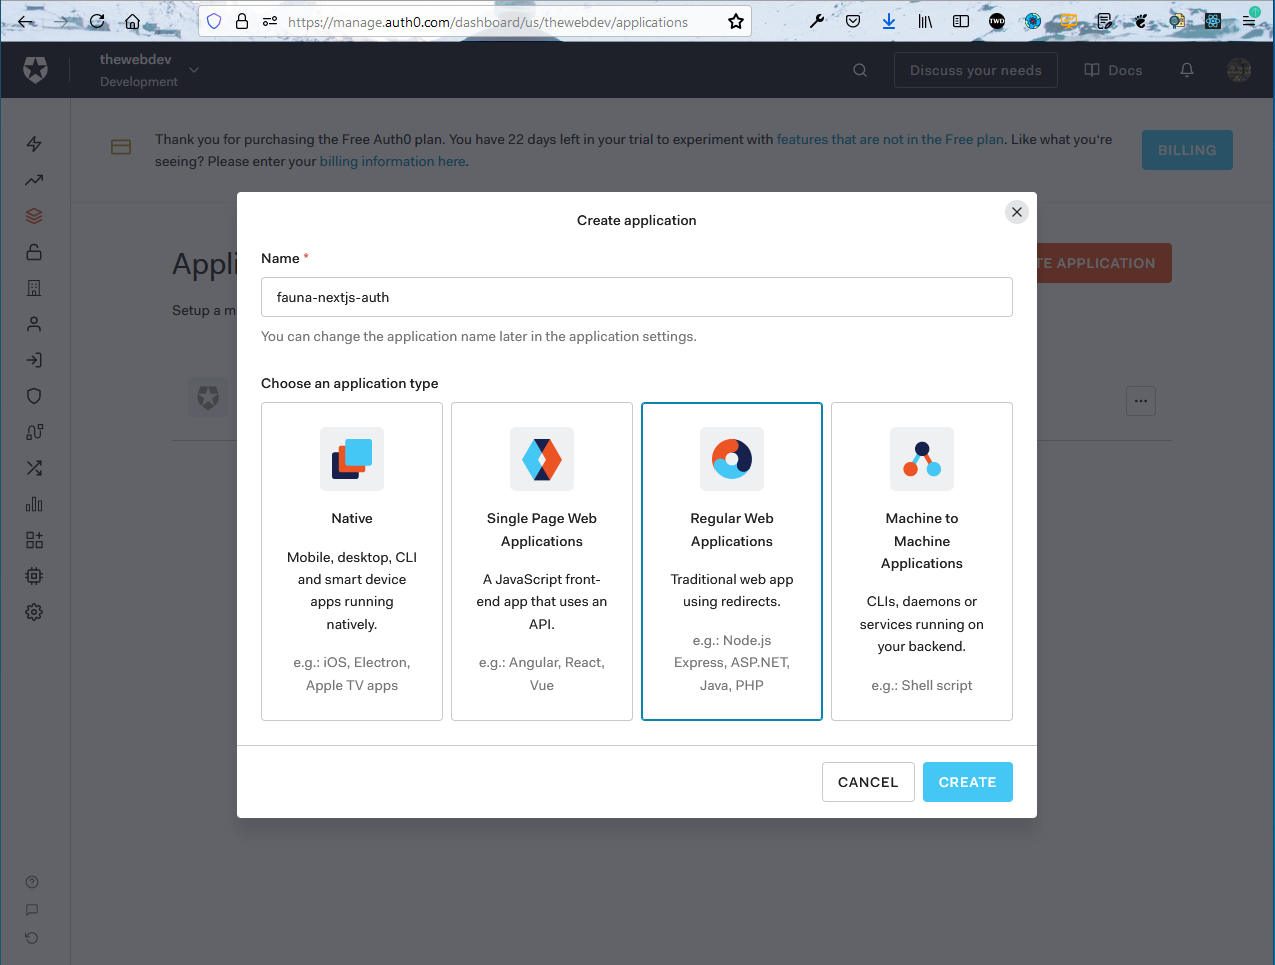
On the next screen, give the app a name like fauna-nextjs-auth and choose Regular Web Applications and click on the CREATE button.
 Create Application
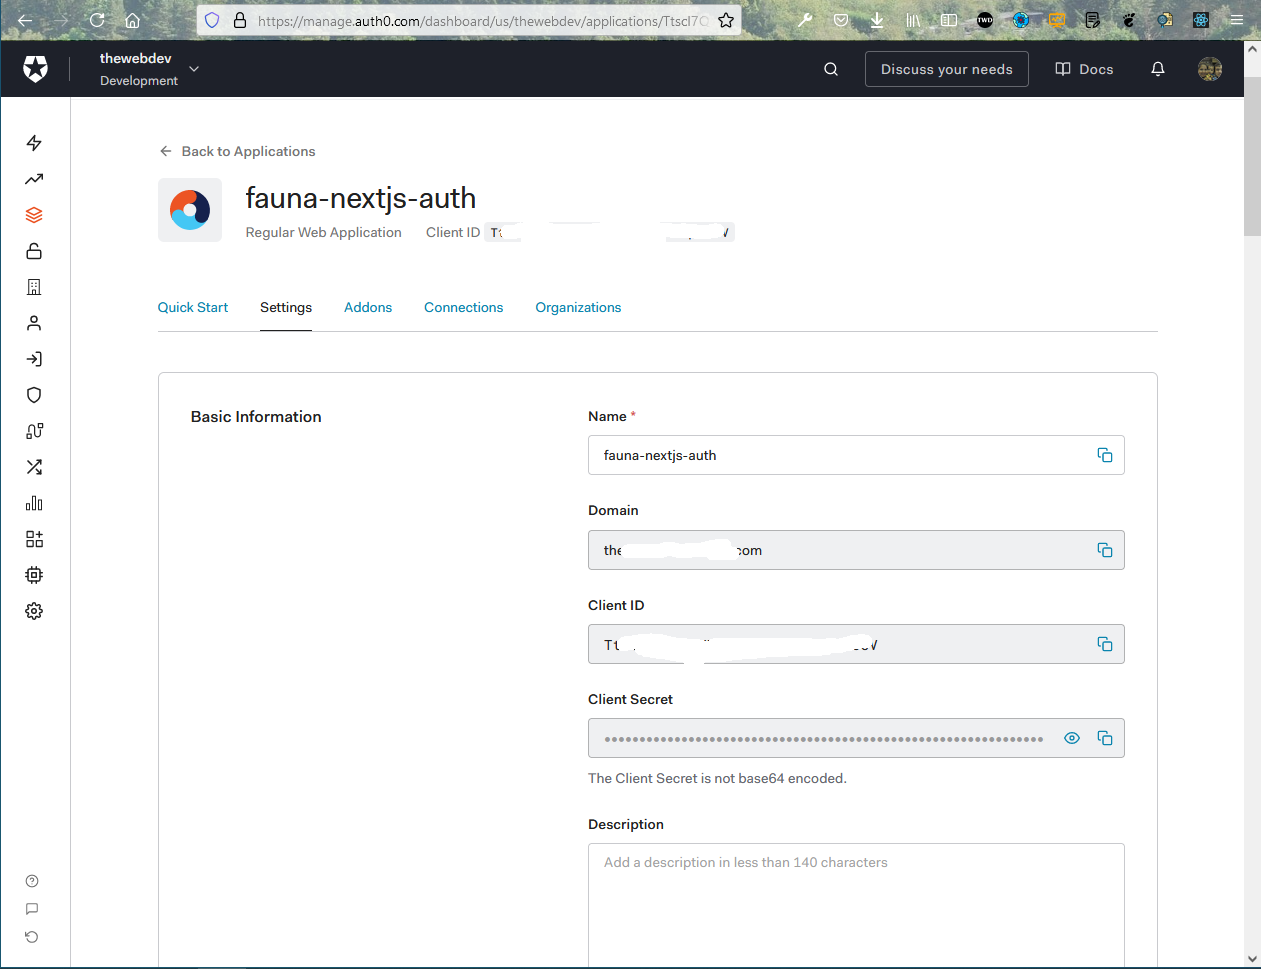
The next screen will be showing us all our secrests, which are required in our app.
 Secrets
We are using the auth0 package for NextJS and the instruction are in this link. So, as per the instructions, copy the secrests in .env.local file. Also, notice that AUTH0_SECRET can be any string.
 .env.local
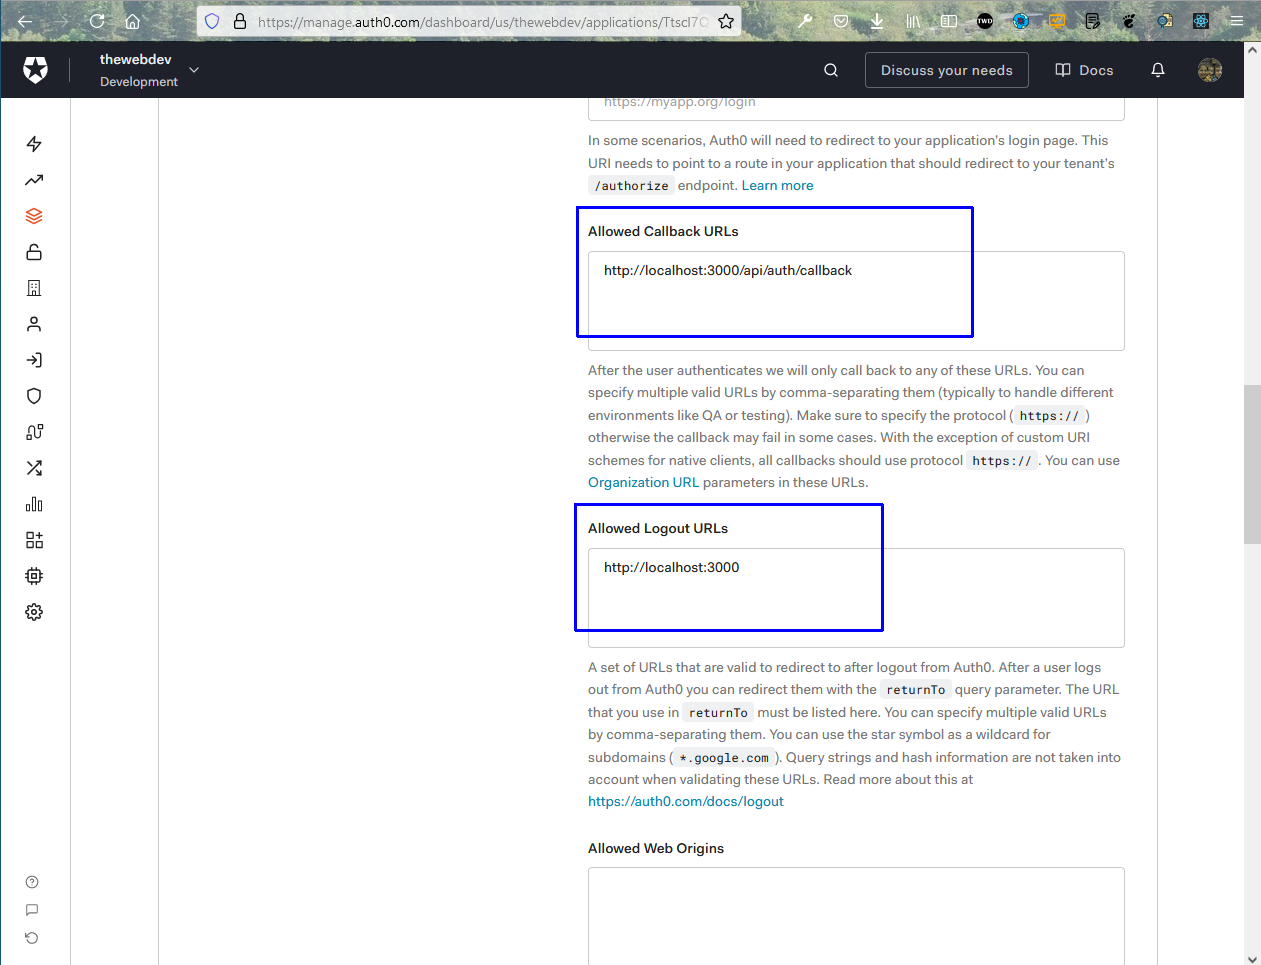
Now, again go back to the Auth0 URL and scroll down a bit and add the Allowed Callback URLs and Allowed Logout URLs.
 Auth0
Auth0
Now, before moving forward, open up your terminal and install the auth0 package for Next.js.
npm install @auth0/nextjs-auth0
Now, create a new folder auth inside api folder and a file […auth0].js inside it. Put the below content in it.
![[…auth0].js](https://res.cloudinary.com/thewebdev/image/upload/v1622634927/React/snippet-next/32_sk4ytf.png) […auth0].js
[…auth0].js
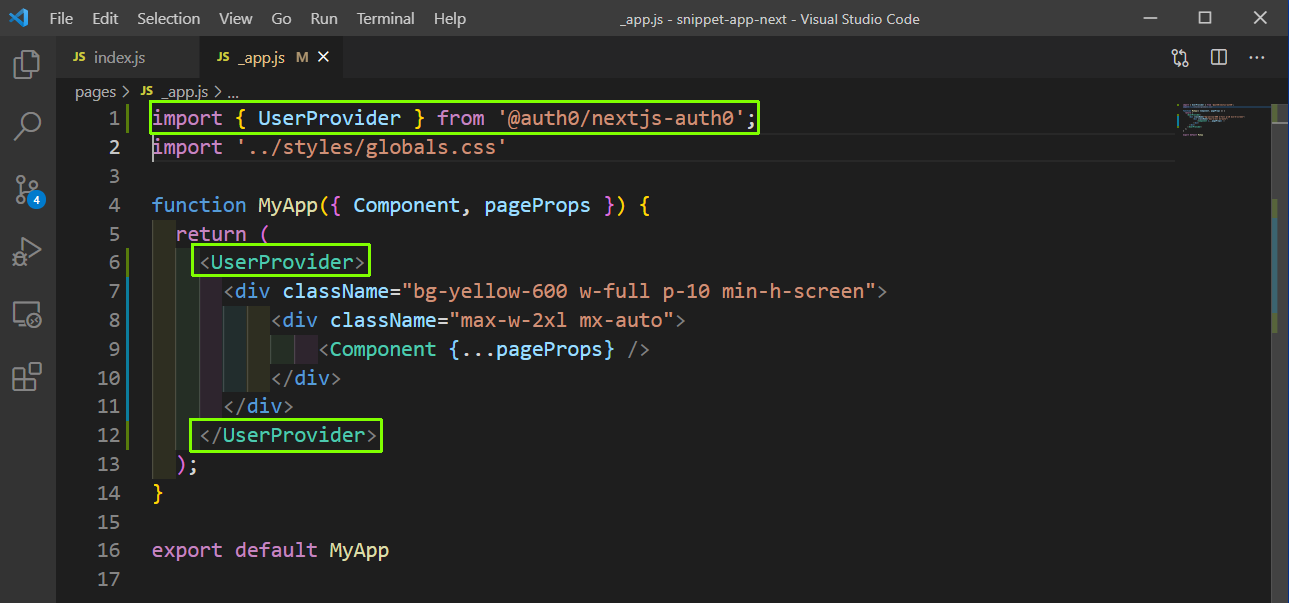
Now, we need to wrap everything in the _app.js file with UserProvider.
 _app.js
We will show the Login link from a Navbar. So, create a file Navbar.js inside the components folder and add the below content in it. Here, we are using the variable user, isLoading from useUser hook from auth0.
Depending on this value, we are showing a Login or a Logout button.
    import Link from 'next/link';
    import { useUser } from '@auth0/nextjs-auth0';

    const Navbar = () => {
        const { user, isLoading } = useUser();

    return (
            <nav>
                <Link href="/">
                    <a className="text-2xl mb-2 block text-center text-red-200 uppercase">
                        TheWebDev Snippets
                    </a>
                </Link>
                <div className="space-x-3 m-x-auto mb-6 flex justify-center">
                    {!isLoading && !user && (
                        <Link href="/api/auth/login">
                            <a className="text-red-100 hover:underline">Login</a>
                        </Link>
                    )}
                    {!isLoading && user && (
                        <>
                        <span className="text-red-100">Hello {user.name}</span>
                        <Link href="/api/auth/logout">
                            <a className="text-red-100 hover:underline">
                                Logout
                                </a>
                        </Link>
                        </>
                    )}
                </div>
            </nav>
        )
    }

    export default Navbar
Now, include this Navbar component in the _app.js file.
 _app.js
Now, in localhost we will see the Login button. On clicking the Login button we will get the below pop-up, which has the option of Continue with Google or login through a Auth0 account.
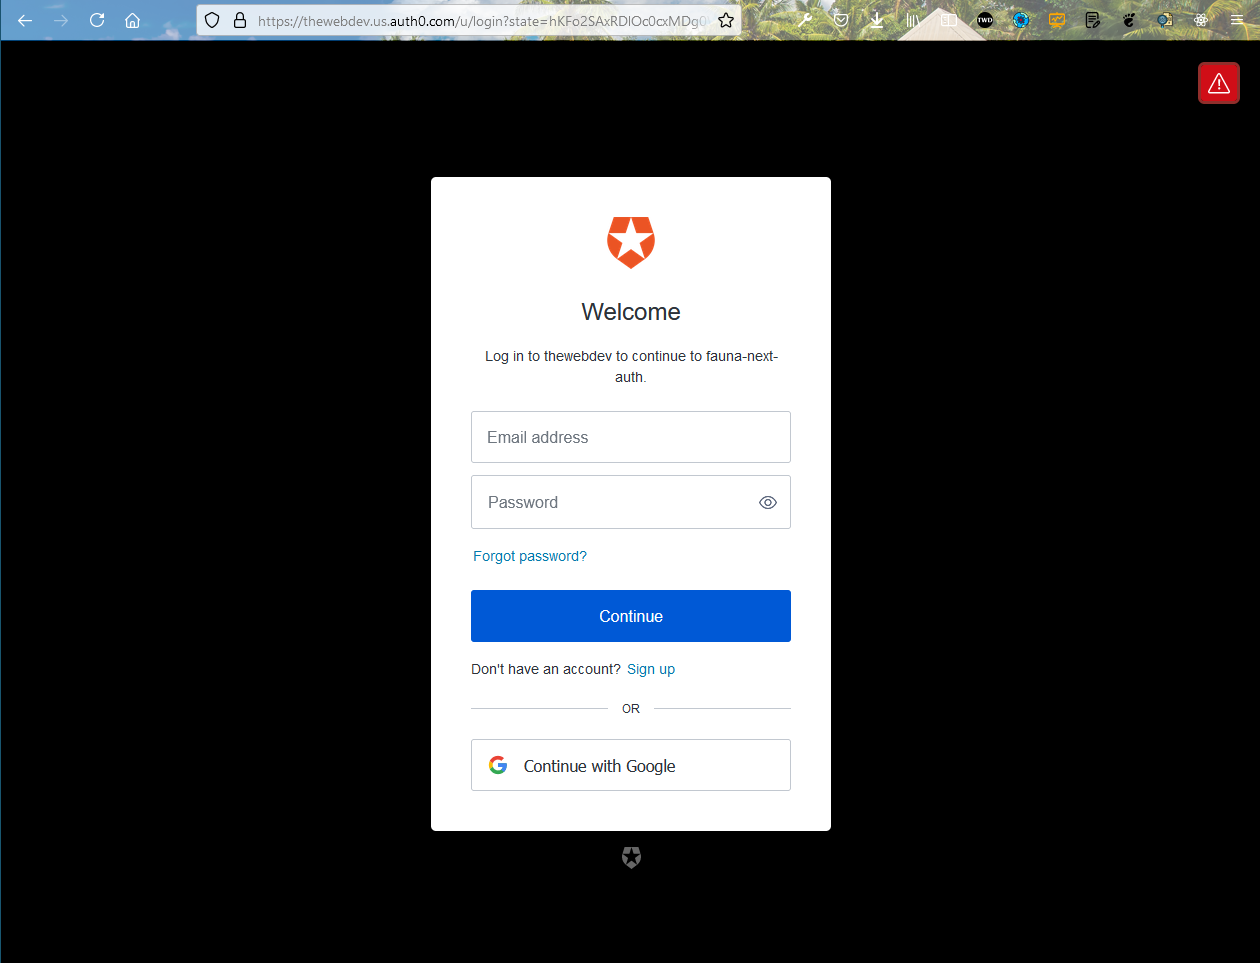 Login
Login
I have logged in with my google account and taken back to the app, where i now, we can see the Logout link along with the Hello username.
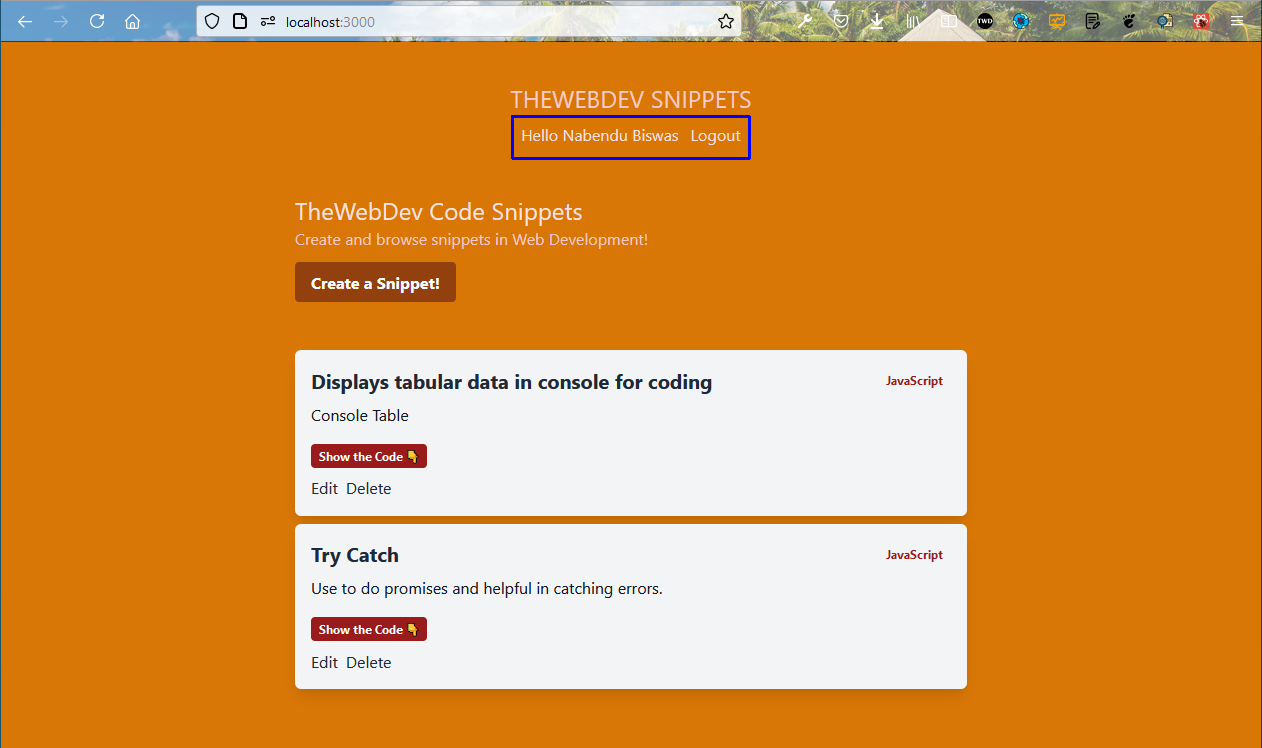 localhost
Now, we only want to show the Create a Snippet! button if the user is logged in. So, for this, in the components folder, create a file Header.js and put the below content in it.
Here, we are again using the useUser hook and will get the user and isLoading from it. Now, if the user is present, we are showing the Create a Snippet! button or else Login to Create Snippets! button.
    import { useUser } from '@auth0/nextjs-auth0';
    import Link from 'next/link';

    const Header = ({ title, subtitle }) => {
        const { user, isLoading } = useUser();

    return (
            <header className="my-12">
                <h1 className="text-red-100 text-2xl">{title}</h1>
                {subtitle && <p className="text-red-100">{subtitle}</p>}

    {!isLoading && user && (
                    <Link href="/new">
                        <a className="mt-3 inline-block bg-red-800 hover:bg-red-900 text-white font-bold py-2 px-4 rounded focus:outline-none focus:shadow-outline">
                            Create a Snippet!
                        </a>
                    </Link>
                )}
                {!isLoading && !user && (
                    <Link href="/api/auth/login">
                        <a className="mt-3 inline-block bg-red-800 hover:bg-red-900 text-white font-bold py-2 px-4 rounded focus:outline-none focus:shadow-outline">
                            Login to Create Snippets!
                        </a>
                    </Link>
                )}
            </header>
        )
    }

    export default Header
Now, in index.js we use the Header component and pass the title and subtitle to it. We have also removed the code for the same from here.
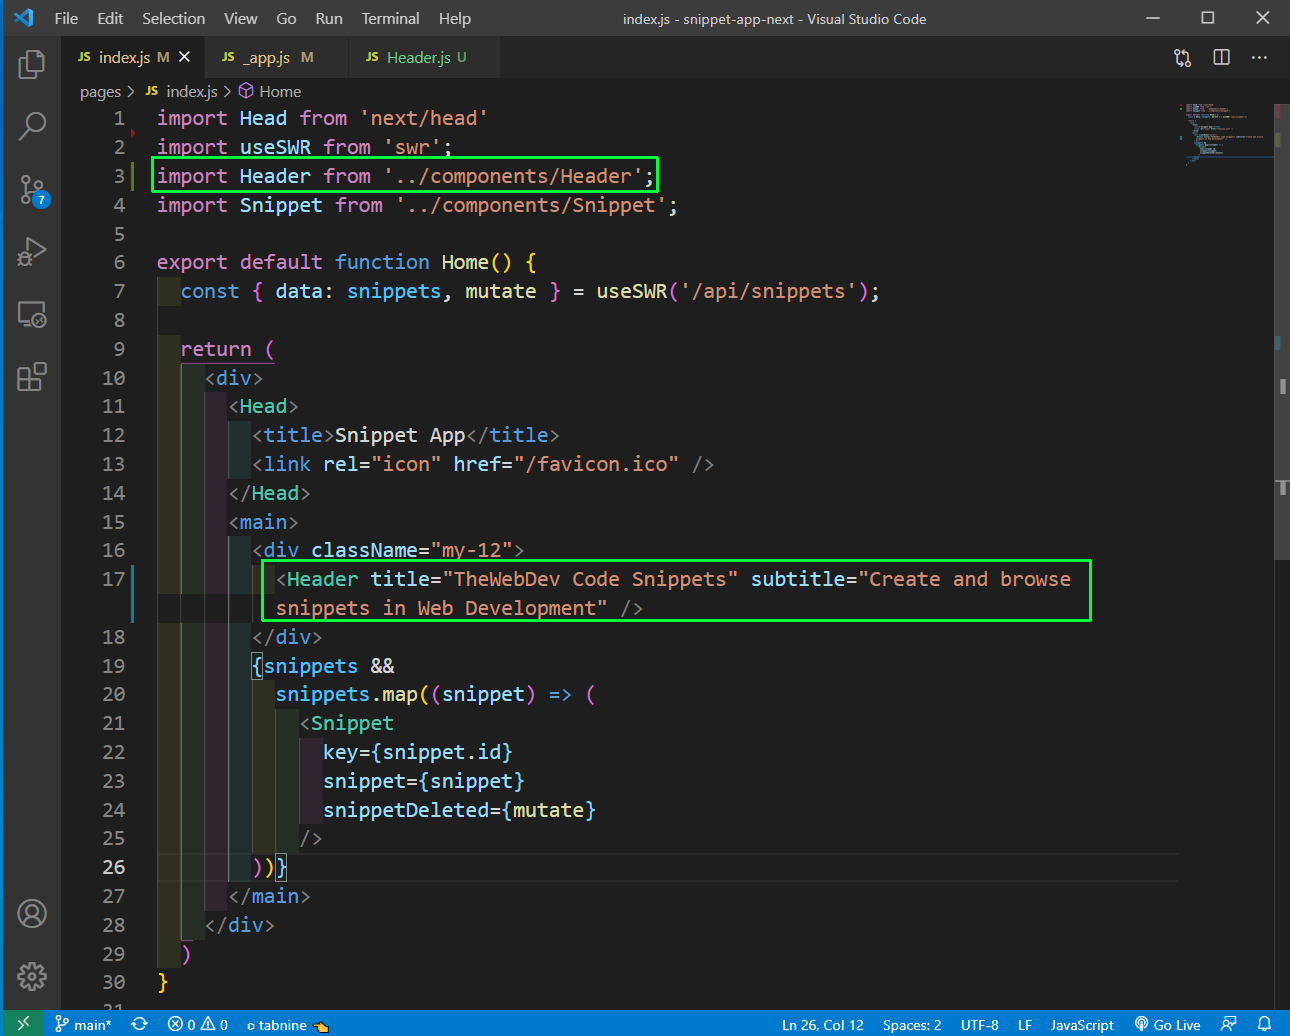 index.js
Now, we have a problem which is that even if we are not logged in, we can go to the route http://localhost:3000/new. So, we need to protect this route.
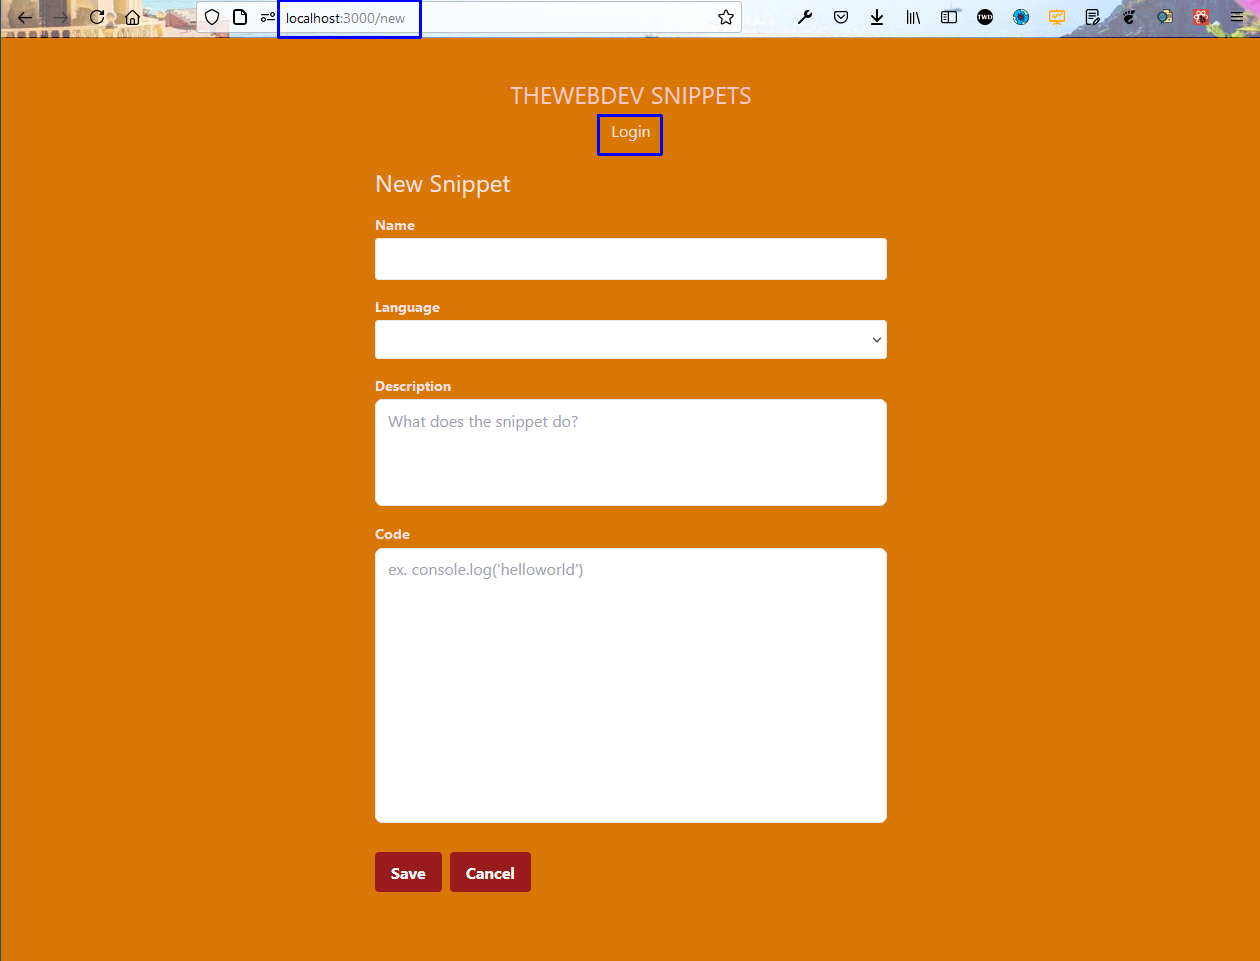 Not logged in
With auth0, we can protect a route very easily by importing withPageAuthRequired and exporting it from the page, which is new.js in our case.
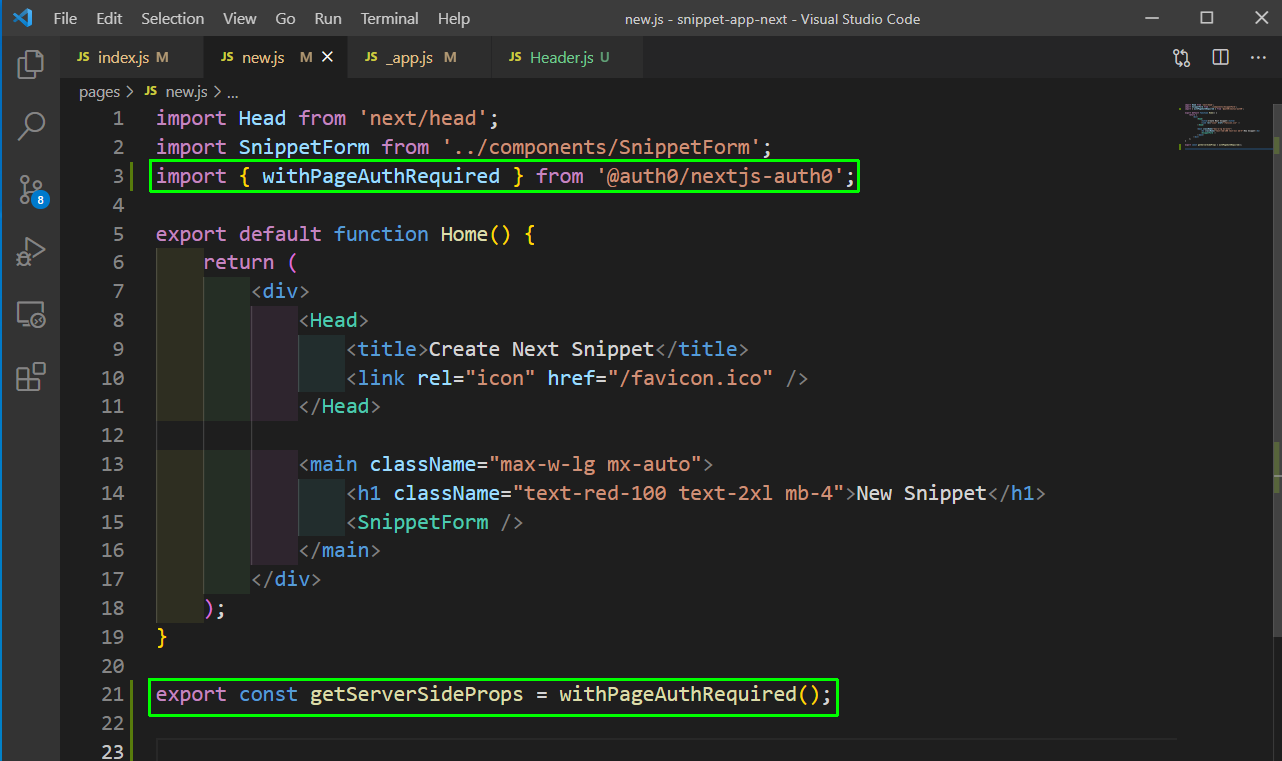 new.js
Now, if you directly try to go to the link http://localhost:3000/new without being logged in, it will redirect you to the login page for auth0.
Next, we will also have a user associated with each snippet. So, we need to update the createSnippet.js file. Here, we are first importing the withApiAuthRequired, getSession from auth0.
Next, wrap the whole function with withApiAuthRequired, since it’s a higher-order function. Next, inside the function, we are getting the userId and passing the same to createdSnippet.
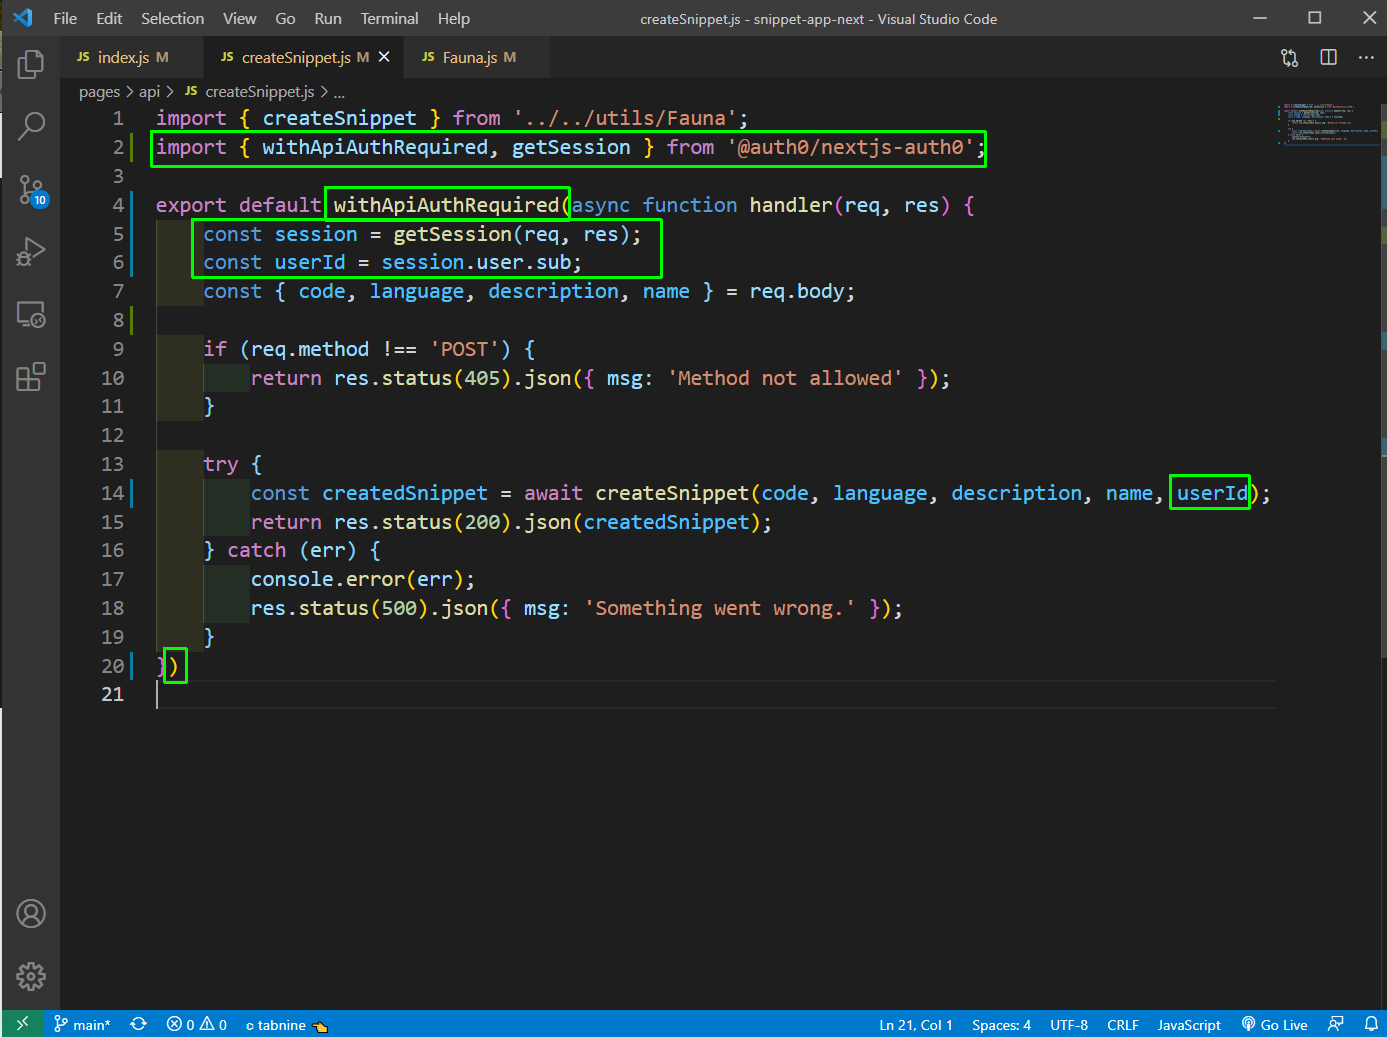 createSnippet.js
Now, in the Fauna.js file, in our createSnippet function we have to include the userId.
 Fauna.js
Next, go back to the FaunaDB dashboard and delete all the documents, as they were created earlier without userId.
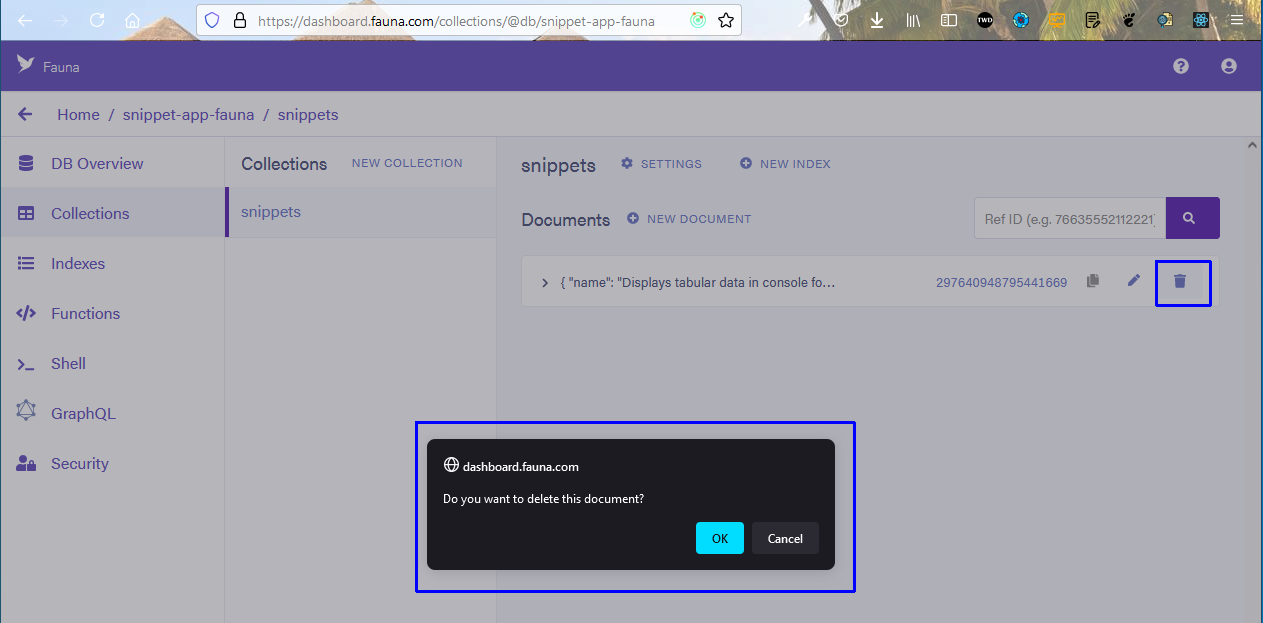 Deleting
Now, I have created a new snippet and in the faunaDB document, it also includes the userId now.
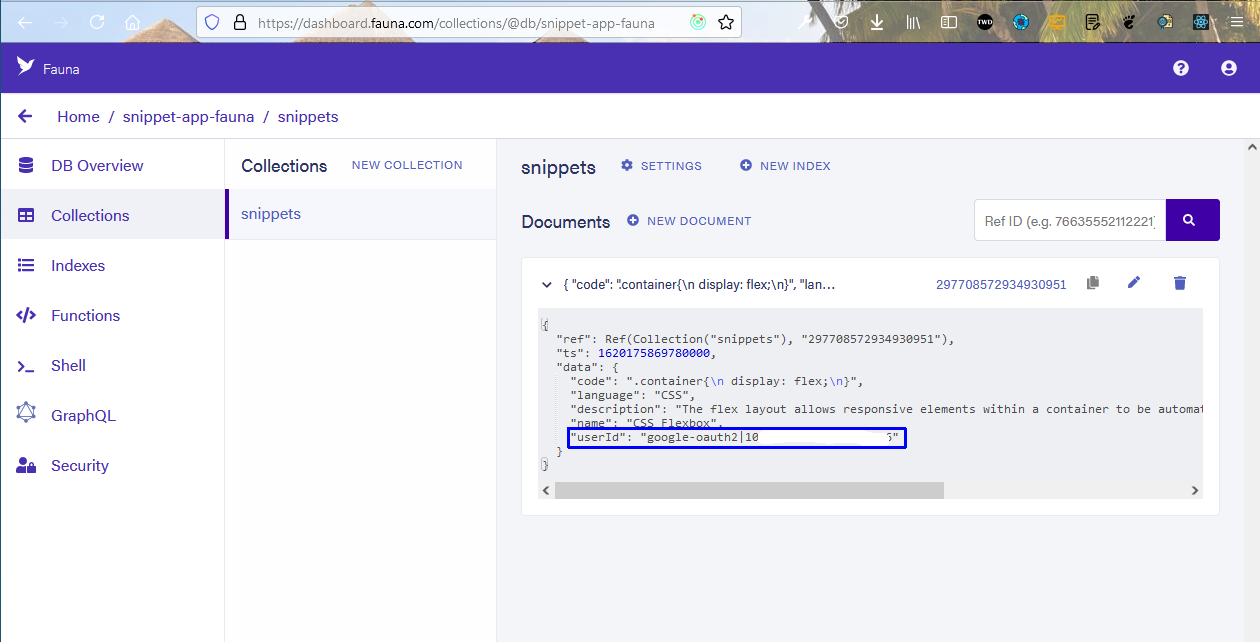 userID
Now, we will do a similar thing for updating a snippet, where only a logged in user can edit a snippet. So, in [id].js file first import withPageAuthRequired and then wrap the getServerSideProps with it.
![[id].js](https://res.cloudinary.com/thewebdev/image/upload/v1622634928/React/snippet-next/44_trvb0h.png) [id].js
[id].js
Now, if you are not logged in and directly go to a route like http://localhost:3000/edit/297708572934930951, you will be re-directed to the auth0 authentication page.
Now, we also need to protect the authentication on the route, or else someone can send a request from Postman and use it.
We also need to make sure that only the user who created the snippet can update it. The same is true for delete also.
In the updateSnippet.js file, we are first importing the withApiAuthRequired, getSession from auth0. We are also importing getSnippetById.
Next, wrap the whole function with withApiAuthRequired, and check if the user is the owner of the snippet. If he is not the owner, we are just returning the record not found message.
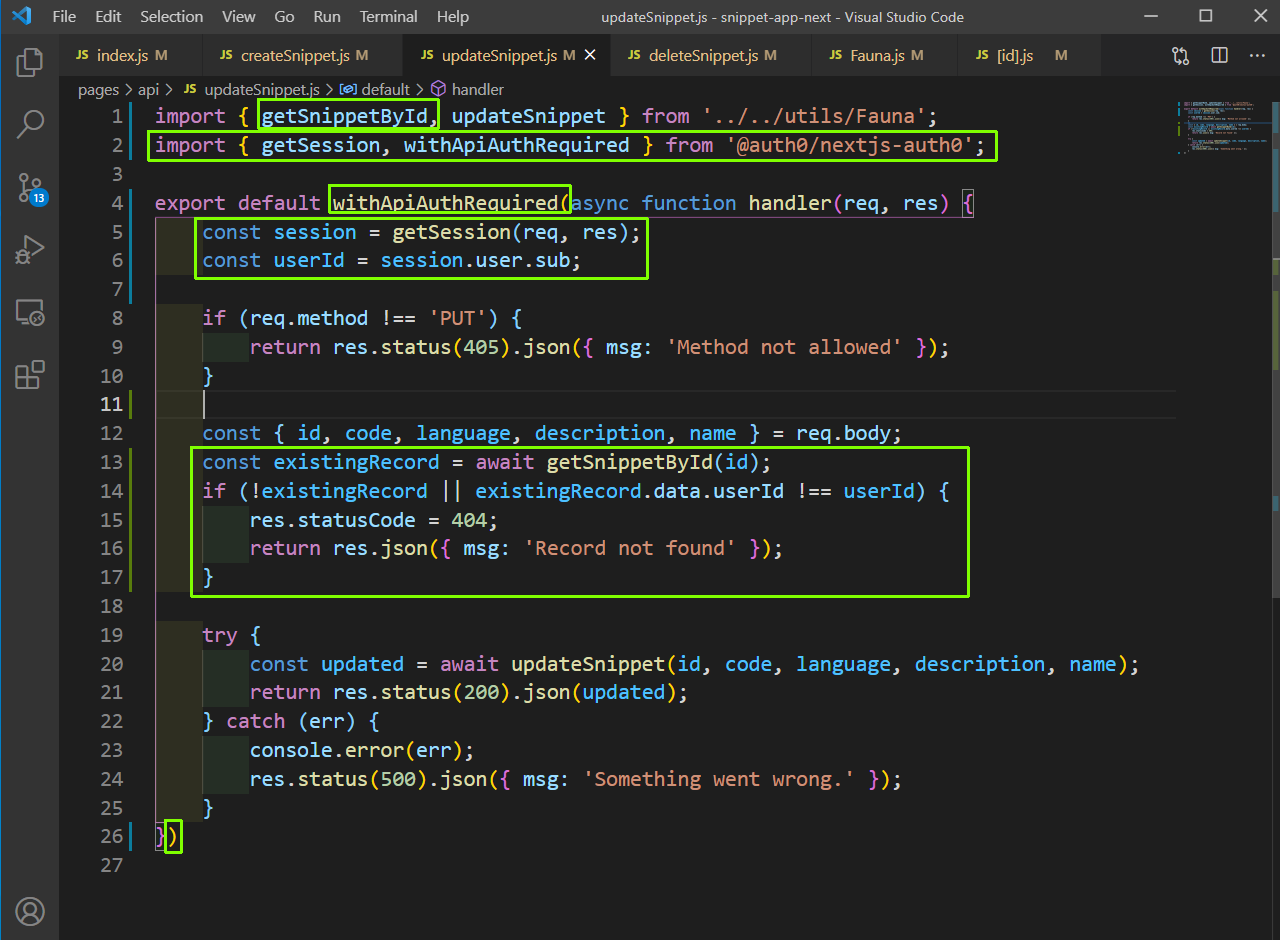 updateSnippet.js
We will add a similar logic in the deleteSnippet.js file.
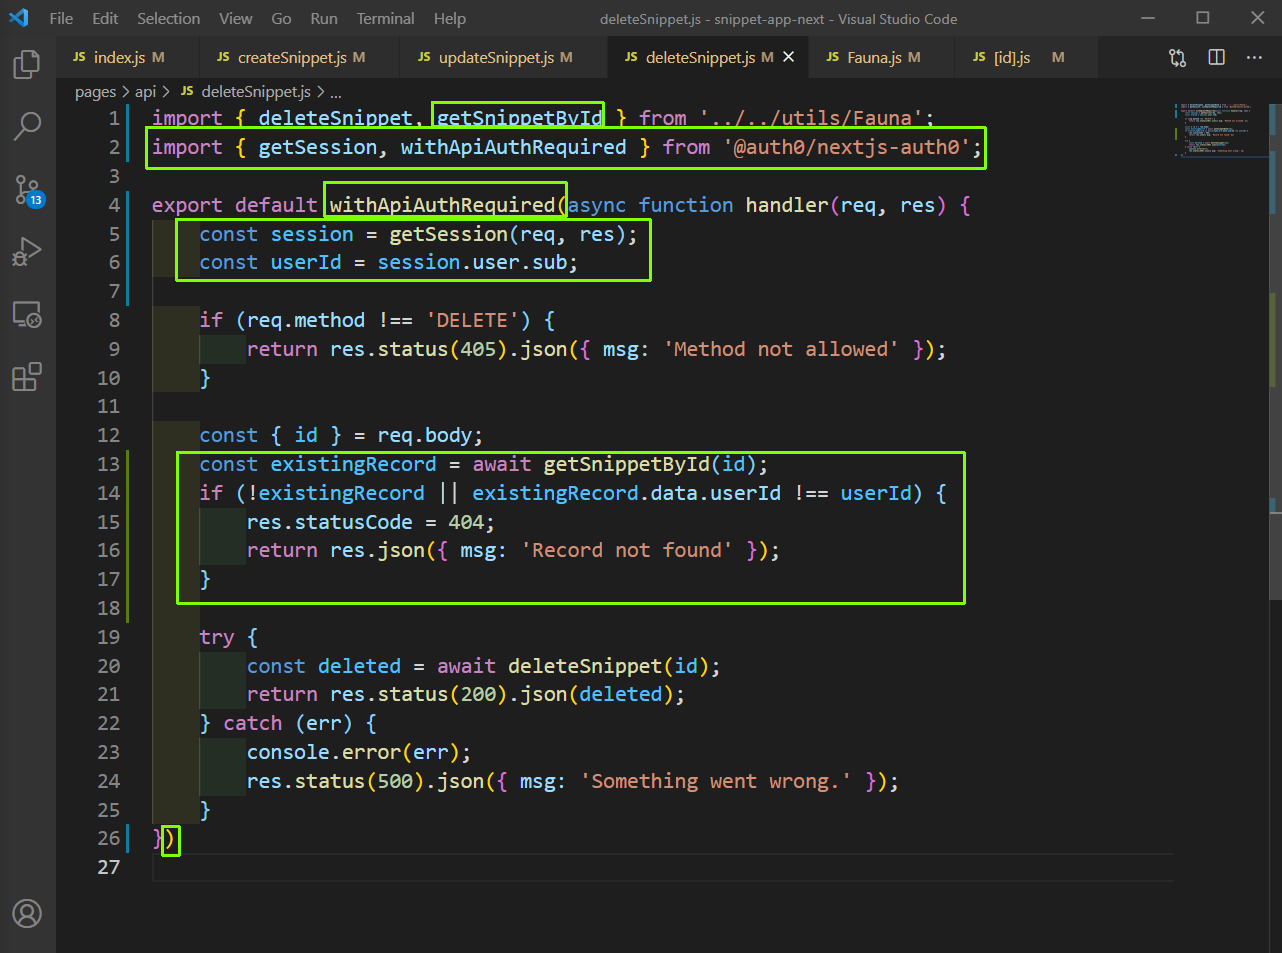 deleteSnippet.js
Now, we are able to edit and delete, when we are logged in. But we want to show the edit and delete button only to the user to whom it belongs.
So, in the Snippet.js file, we will use the user element from useUser hook. We are then checking if the logged in user is the same user as the snippet creation user.
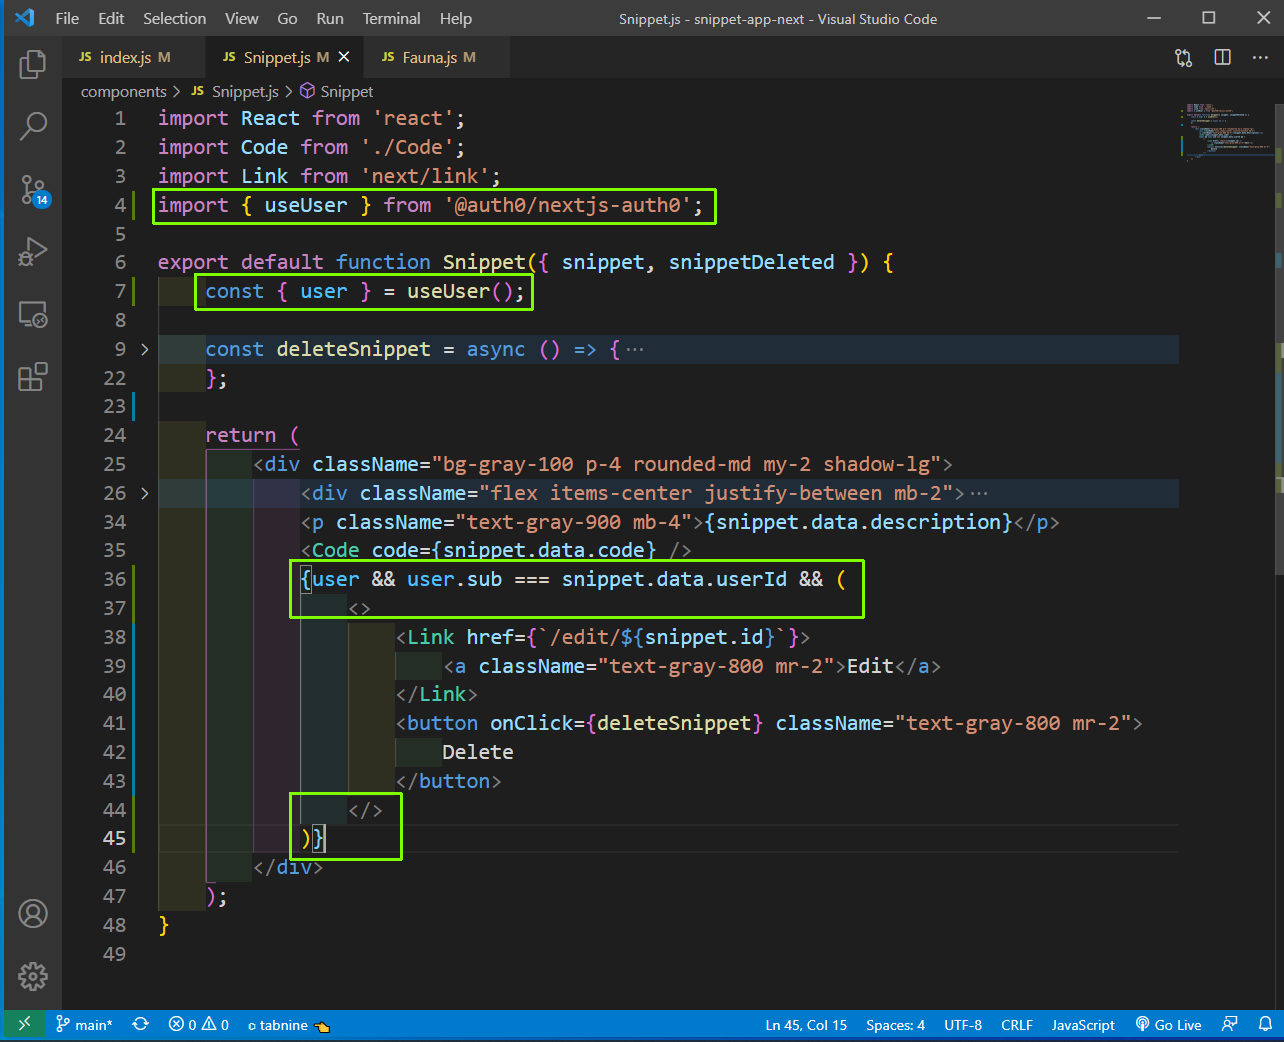 Snippet.js
Now, I logged in with a different Google account and created a snippet and was able to edit and delete that one only, and not the other created by the other user.
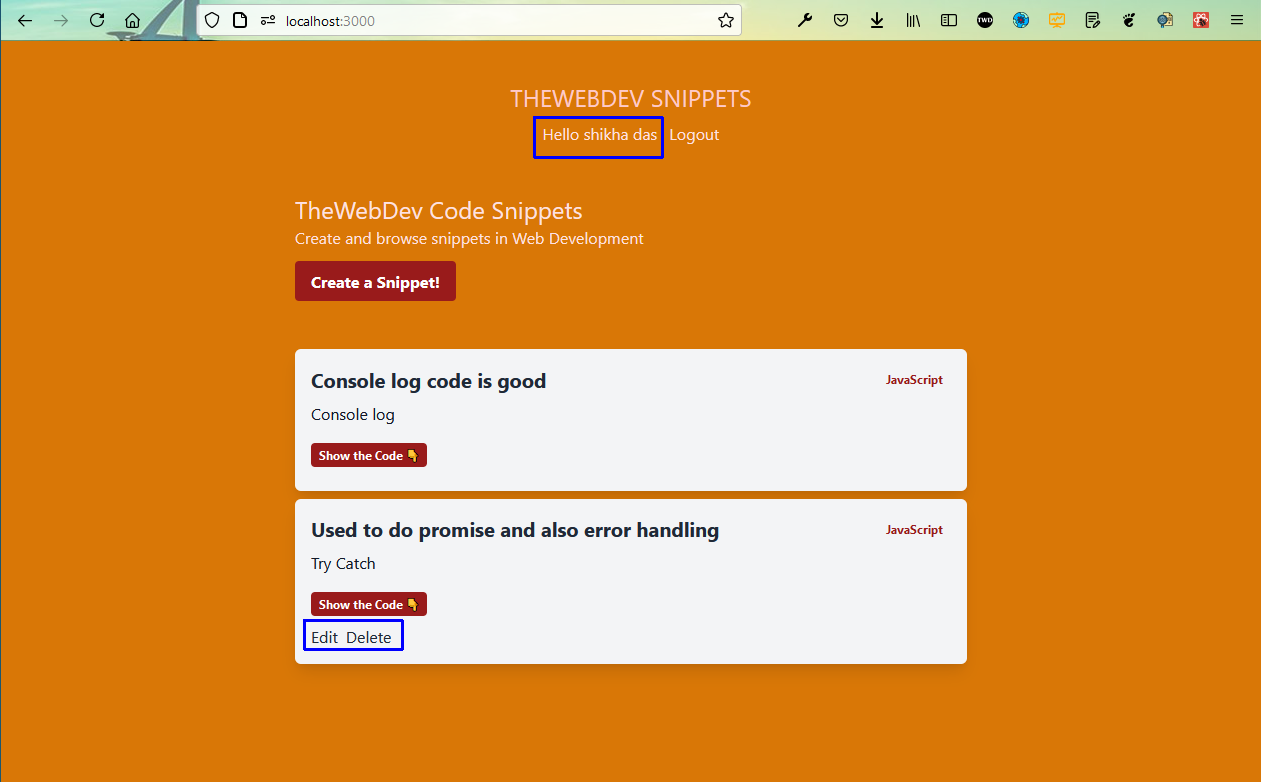 Logged in
This completes our Snippet app. You can find the code for the same here.